E-learning is a learning process using information technology, including the network environment. There are two main objectives. The first objective is to develop distance learning. Statistically, it is known that a significant proportion of students fail to complete the course when studying on their own without a teacher. E-learning techniques try to partially replace the role of the teacher by:
advanced study materials, where the student chooses the level of depth (difficulty) of the discussed topic and where the explanation is supplemented by multimedia - pictures, recordings, video recordings,
test applications, where the student can test how well he/she understands the material and can apply it,
communication applications that put the self-student in contact with classmates and the tutor (discussion forum, real-time discussion on a computer network),
administrative tools that help the teacher to effectively assess students, generate statistics on which the course can be further improved, etc.
Well-designed, didactically sound, fully e-learning courses can make higher education accessible to people who cannot attend full-time classes. In the IS AMBIS environment, both free and commercial e-learning courses can be designed for the general public.
In IS AMBIS, it is possible to create an e-learning course within full-time or combined studies (in a given course and a specific semester), but it is also possible to create an e-learning course without any relation to the study, semester or course (similar to a MOOC or Massive Open Online Course). Such a course (independent of semester and course) can be made available by its author/teacher to any person (even to a person without the učo).
A course intended for the public can be made available free of charge to interested students
.
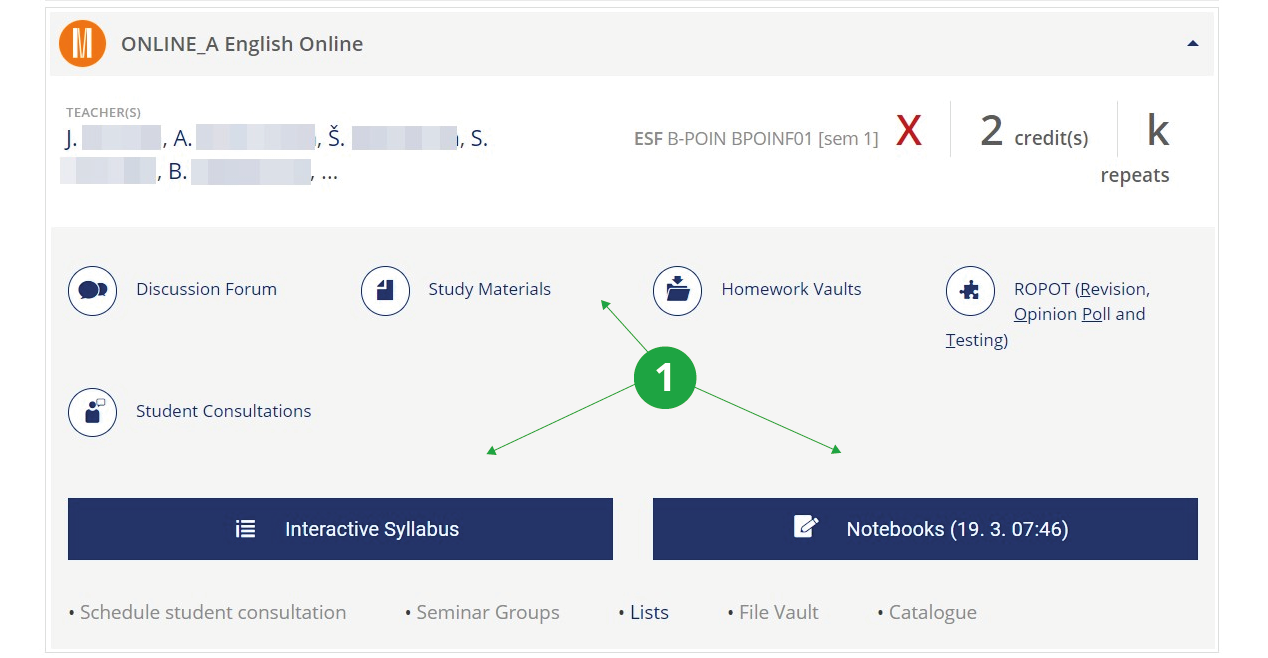
A person without the učo can create an account in the IS AMBIS (thus obtaining the učo) and can enrol in published e-learning courses. The author creates the e-learning course content using the tools in the IS AMBIS, specifically the Teacher's Notebook.
He/She can use all e-learning applications such as Study Materials, ROPOTs, Interactive Syllabus, Homework Vault, etc.
If you are interested in creating such a course, please contact the ambisisfimunicz.
Tools for creating e-learning course content are available to teachers in the Teacher's Notebook.
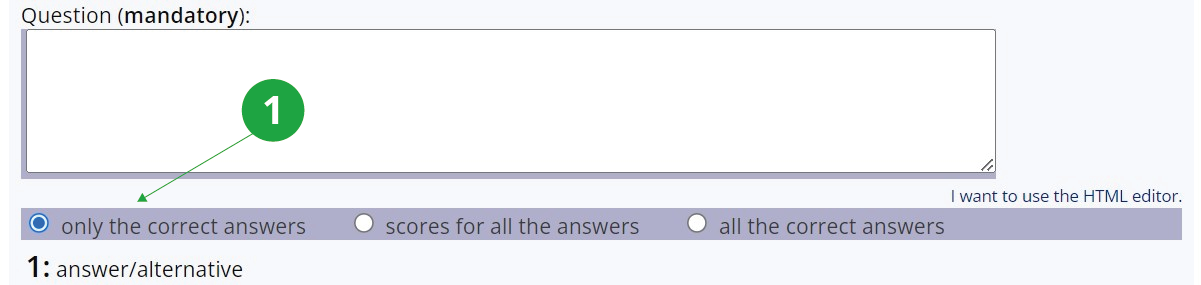
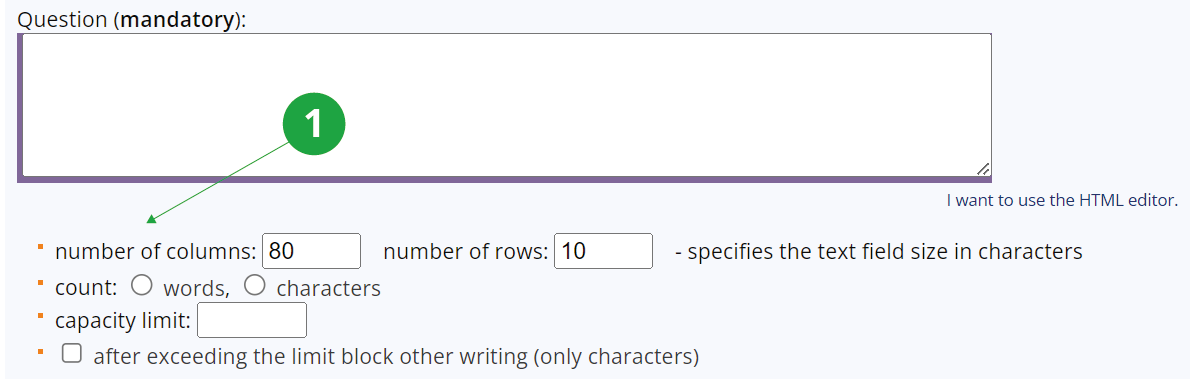
Study materials
The Information system Teacher [course selection] (Study materials) Work with study materials Learning materials
The Information system Help E-learning Posting study materials on the Information system
They allow you to post different types of materials. The student can clearly see the new materials, the teacher can see the readership statistics. Groups of materials can be uploaded and downloaded to the home computer in bulk (ZIP). Existing materials displayed on the regular web can be transferred to the application. IS AMBIS automatically converts the materials into a text version to make them searchable.
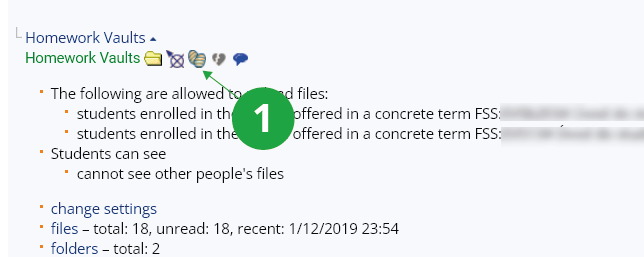
Homework Vaults
The Information system Teacher [course selection] Homework Vaults
The Information system Help Teacher Homework Vaults
The student uploads the homework into the homework vault, the system allows to correct the homework or to award points for it in the Notebook.
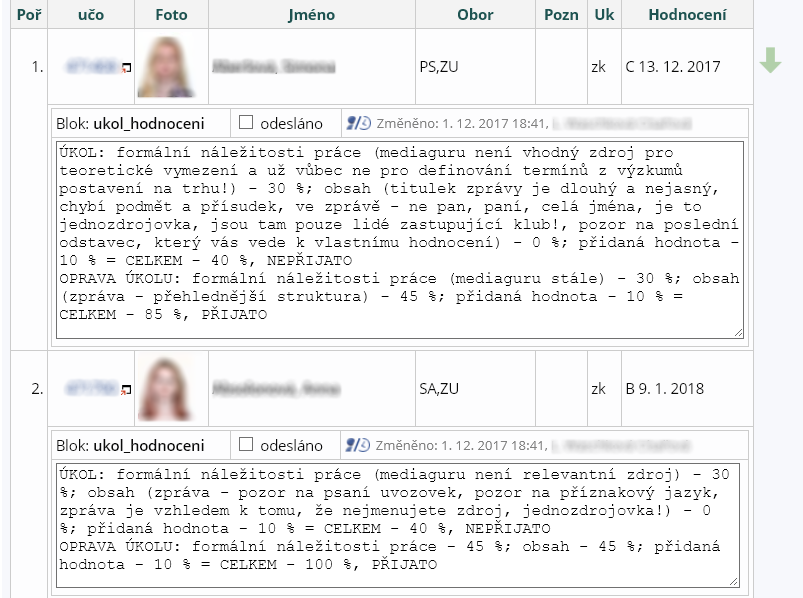
1 Example of notebook
It can be set up so that the student has access to classmates' assignments (e.g., papers).
ROPOTs
Electronic tests containing assignments/questions to which students respond (test questions with one or more correct answers, tick-box selections, text entry, etc.). They can be used for practice, computer-based live testing or scanning tests. They incorporate security features to prevent, for example, unwanted leakage of assignments or to prevent copying. The ROPOTs can be used to prepare exercises on the text to be read, work on the text, drill information to be memorised, tests to verify knowledge, etc.
Read the introduction to the application:
The Information system Help E-learning ROPOT
Interactive syllabus
E-learning content and course activities can be organized by the teacher in the syllabus for students. General information about the course, its organisation and teaching can be concentrated here. The syllabus can be used as a signpost to topics, teaching units (weeks, modules, etc.) or it can be made into a comprehensive teaching material with the character of an electronic interactive teaching website by inserting text comments.
The Information system Teacher [course selection] Interactive syllabi
The Information system Help E-learning Interactive syllabi
Course discussion forums
The teacher participates in the course discussion according to his/her interest, the activity is not compulsory. See the Help for more details. .
Topic lists
The Topic lists application simplifies the assignment and organization of seminar papers and projects in the classroom. It allows the teacher to define topics for seminar papers, reports, projects and to provide students with the possibility and conditions for independent reservation of topics. It provides the teacher with tools for bulk work with the topics and the registered students. The application can also be used if the teacher needs to divide the students of the seminar into groups and organize, for example, work teams.
The Information system Teacher [course selection] Topic lists
The usual course preparation process involves the following steps:
Make it clear for whom you want to create the course (for students in the course, for the public, paid, free), what activities you want to run in the course and what materials you want to prepare. Basic options are:
static teaching materials (html, word, pdf, ...),
collecting the short assignments – e.g. to issue an assignment to which the student has to respond with a paragraph of text entered directly into IS AMBIS,
collecting the files – essays, homework assignments, worked out exercises, which the student uploads to the IS AMBIS as a file,
free discussion, encouraging students to interact,
discussions according to certain rules – e.g. open a topic, have students comment on it by a certain deadline and comment on each other's comments, awarding points for comments provided,
practice – ungraded tests, usually having a large number of examples,
surveys – polls, questionnaires,
test yourself – questions for students to check their level of knowledge,
tests – actual secure testing for grades,
enlivened texts – enriching the static teaching with exercises, questions, puzzles,
links to internet resources, e.g. tests and exercises on other servers.
In the Study Materials agenda (Learning Materials folder) you can create folders for individual types of published materials, e.g.:
interpretation of grammar,
reading,
recordings to listen to,
dictionaries,
overview of exercises from the Internet.
The breakdown is arbitrary, you can even have multiple levels so that the materials are clearly structured. Place the static materials you want to publish in the folders. Either paste them as files or type them in with an editor (text or HTML editor). You can also insert a link to a web resource (e.g. a dictionary).
If you want to collect homework (files), we recommend using Homework Vaults folder and to create subfolders for each assignment. Use "Open folder as a Homework Vault" to make them available to students.
See the Study Materials Help section for more information.
.
The testbank folder is special – you can use it to protect your ROPOTs and test questions. See the Help section on managing ROPOTs.
You can use the Discussion Forum agenda to discuss with students. If you want to use the discussion for more complex didactic purposes, describe the discussion rules in the first post of the thread or in the discussion forum header, for example. You can also moderate the thread (delete posts).
In their interface, students can see an overview of posted materials (and the number of new unread ones), an overview of homework vaults, available ROPOTs and the number of new posts in the discussion forum.
A preferred format has not yet been determined. If you have a good experience with one, please recommend it to the faculty support or the IS AMBIS developers.
Yes, the posted materials can be transferred without any problems. If you wish to upload large sets of text questions currently in a different format, please consult with ambisisfimunicz.
Below is a description of a set of tools you can use for posting study materials
on the Information System and setting their access rights. You may not be
able to access all of the features mentioned below since some of these
are only available to a limited number of users (students, teachers, etc.).
The reference Work with study materials allows:
teachers to post various types of study
materials on the Information System for these to be used by
students of their courses, other IS users as well as users from
outside the System
teachers to open Homework Vaults - folders into which
students can upload their assignments; teachers can easily
retrieve these later on.
Archive of Theses/Dissertations allows:
students to post their Bachelor's theses, Master's
theses, or dissertations (doctoral theses) on IS
the IS user to browse and read the posted theses
Document Server allows IS users:
to post various regulations and minutes of meetings
and make these accessible to the University community
to make certain materials accessible to a limited
number of users (e.g. Dean's Council, Senate, etc.)
File Depository can be used for:
depositing a file in the System and retrieving it later
on
the posting and temporal storage of files for other
IS users (and/or those outside the Information System) to
download
retrieving the files which, if attached to an e-mail
message, are rejected by the IS mailbox due to their large
size
To read through the instructions on how to use the File
Depository, please use the following path:
Personal Administration DEPOSITORY
Instructions on how ...
Study materials (files, Internet addresses of
sites hosting some related information, etc.) can be stored in
folders, which can also contain sub-folders (containing other
files). Clicking on the name of a file, folder or reference
expands it and displays its contents and further information related to
it. The objects not hitherto read are highlighted (different background
color).
When you do not intend to read an object and, at the same time, you do
not want it to be displayed as the one not hitherto read, you can mark it
as read. The information pertaining to how many times an object
has been read and how many times it has been marked as read (rejected)
can be found in the access statistics section.
The System generates plain text versions of the uploaded materials
automatically so that these can be searched easily. The contents of these
newly generated files, however, might not completely correspond to their
originals since images, tables and some formulae cannot be converted into
plain text.
The plain text version is usually shorter than the original and may help
the user decide whether he/she will or will not download the
unabbreviated original.
When uploading the files of the formats that are not common, you should
check the result of their subsequent conversion (it usually takes the
newly generated files a few minutes to appear in the folder).
Apart from the plain text versions, the System also generates the
.pdf ones (it usually takes the newly generated files a few minutes to
appear in the folder). Therefore, after you upload a file containing some
text (e.g. a .doc or .rtf one), the System always displays three
different icons next to its name that you can use for opening the
individual automatically generated versions. Clicking on the name of
file opens the original.
The Document Server consists of multiple noticeboards on which authorized
users can post texts for other users to read. These may be, for instance,
regulations, instructions, minutes of meetings, etc.
Types of noticeboards/groups
The Document Server thematic groups can be used in the following
situations:
A group of users need to share some official documents such as
official proposals, minutes of meetings which are not public, etc.
They want these documents to be accessible only to a limited number
(a certain group) of users within the Information System that has
been delimited with the aid of Personnel Groups application.
Here are examples of groups (noticeboards) that can be created:
Doctoral Board
Scientific Board
Academic Senate
Dean's Council
...
A certain department want to inform the general public of some
new regulations, provide them with some news, etc. The department
want the groups (noticeboards) to be accessible to every Internet
user regardless of whether he/she is inside or outside the
Information System. Here are examples of groups (noticeboards) that
can be created:
The study materials posted on IS can be found at the address of
https://is.ambis.cz/el/ or that of https://is.ambis.cz/auth/el/ (the latter
applies to the materials inaccessible from outside the System). The exact
address of folder can be found in the folder-related information section.
Here is an example of an internal WWW reference:
The address contains "/el/" meaning e-learning,
information identifying the faculty, term, and course. Addresses in this
format can be used anywhere on the Internet (e.g. on your Web site) as
well. In such a case, the reference to the study materials of the PB151
course would have the following form: https://is.ambis.cz/el/1433/podzim2003/PB151/Sub-folder Addresses
Every newly created folder is given an automatically generated
identification number, which is unique. As a result, the address of a
file stored in a sub-folder has, for instance, this format:
..../podzim2003/PB151/354/12987/slides01.pdf
However, the folder identification number can be replaced with an
abbreviation entered at the creation of the folder or when its
properties are modified. The abbreviations are used to facilitate
navigation inside folders. Here is a version of the aforementioned
address containing an abbreviation instead of the number:
..../podzim2003/PB151/grammar/slides/slides.pdf
Every file stored on the System is checked for viruses within
several minutes of being uploaded or generated. The file remains marked
with the bug icon
until the virus
check is complete. Provided the antivirus application detects a virus in
the file, it deletes its contents and inserts into it the message
'Virus found, file removed.'.
NB: The presence of
means the file
has not been checked for viruses yet, not that it is infected. The
contents of the infected files are removed immediately after a virus has
been detected.
In some situations, users might want the uploaded materials to be
automatically removed from the System after some time. The expiration
date, which you can specify using
, is used for this purpose. The files (or folders) in which
this option has been activated are automatically removed once they
expire. In some sections, the expiration date is imposed on files (or
folders) without any action on the part of the user. The expiration date,
if specified, can be found next to the name of file (or folder).
The information about the objects that have been removed is stored in the
file titled expired (placed in the Folder Management
folder). The expired file expires a year after it was last written
into.
If a folder containing a file (or folder) which has not expired yet
expires, it is not removed.
No expiration date can be specified for the sections of Study
Materials and Theses/Dissertations. On the other hand, the
Depository section requires that the users specify the date(s).
Ne, použijte libovolný vám sympatický editor nebo nástroj. Důležité je,
aby vytvořený soubor měl co nejobvyklejší formát (HTML, pdf, MS Office, ...)
tak, aby s ním studenti mohli bez problémů pracovat. Není vhodné vytvářet
soubory vyžadující pro čtení zvláštní software – studenti nejsou schopni
si jej obstarat, nainstalovat atd.
Jednotná univerzitní pravidla týkající se formy
učebního materiálu stanovena nejsou.
Tyto materiály je žádoucí vložit do Studijních materiálů IS AMBIS.
K materiálům v IS AMBIS mají studenti nejsnazší přístup, mohou sledovat
nové materiály, aktualizace, prohledávat
je, pracovat s nimi jednotným způsobem. Ušetříte adminstrativu sobě (nebudou
je po vás opakovaně vyžadovat nebo se dotazovat na jejich umístění) i jim.
K materiálům můžete nastavit práva a variabilně omezit přístup – např.
pouze na studenty vašeho kurzu.
Pokud jste autorem těchto materiálů, jsou vaše práva chráněna autorským zákonem
a dalšími právními předpisy.
Pokud by někdo protiprávním způsobem používal váš materiál, může
být trestně stíhán.
Chcete-li veřejnosti dát k dispozici rozsáhlejší učební materiál, je to vítané.
Lze však publikovat i díla menšího rozsahu. Kritériem je informační hodnota
a zpracování díla v určité kvalitě taková, aby čtenář a zájemce o obor z prostředí
mimo univerzitu získal smysluplný zdroj informací, aniž by měl k dispozici
váš prezenční výklad. Je-li dokument sám o sobě použitelný jako výukový
materiál, je vhodné jej publikovat.
Je vítáno, pokud se statické materiály rozhodnete rozšířit
o interaktivní rozměr při provozu konkrétního kurzu.
IS AMBIS v tomto směru nabízí celou řadu e-learningových aktivit.
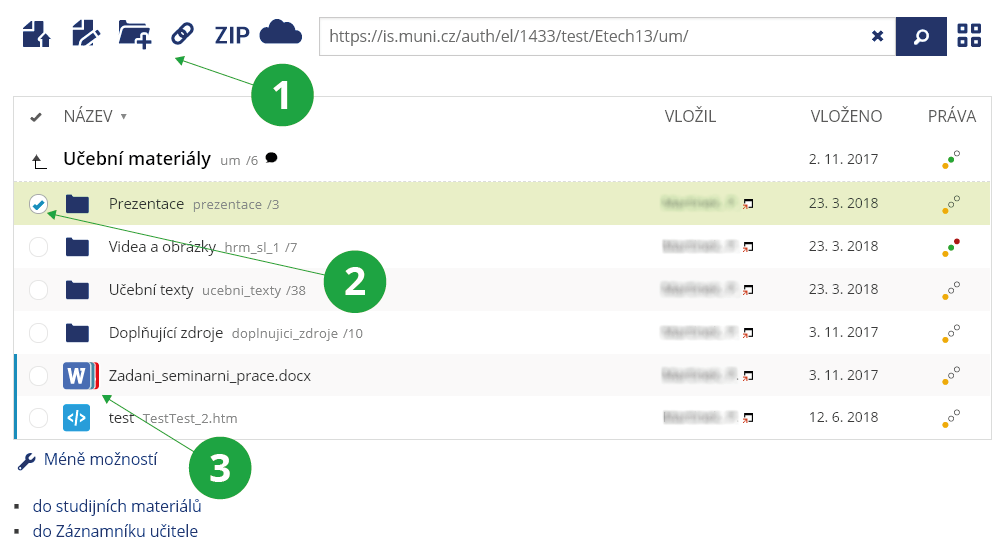
Kliknutím na název vstoupíte do složky nebo otevřete soubor.
Po označení zvoleného souboru/složky se napravo od obsahu složky zobrazí panel nástrojů pro práci se souborem/složkou.
Soubory je možné označit zatržením checkboxu vlevo před typy dostupných souborů.
Více za sebou seřazených ikon vlevo od názvu znamená, že soubor je dostupný ve více formátech. Po najetím kurzorem myši na tuto ikonu se zobrazí všechny dostupné formáty souboru (po kliknutí na příslušnou ikonu dojde ke stažení daného souboru).
Jak nahrát soubor z PC do IS?
Pomocí Správce souborů – Přidat → Soubor nahrát (v případě, že máte nastaveno zobrazení Méně možností), nebo Soubor – nahrát (v případě nastavení Více možností).
1 Klikněte na ikonu, pokud chcete vložit soubor, nebo vybírejte z menu „+ Přidat“.
2 Označte složky/soubor (nebo více souborů/složek) zatržením checkboxu nebo kliknutím do volného prostoru příslušného řádku.
3 Dostupné formáty příslušného souboru.
Pomocí funkce Drag&Drop – další možností jak nahrát soubor do ISu z počítače je pomocí funkce Drag&Drop. Tato funkce umožňuje „přetažení” souboru z počítače přímo do grafického prostředí ISu zobrazeného v internetovém prohlížeči. Tuto funkci lze použít tak, že “uchopíte” pomocí myši soubor (či složku) na svém počítači a poté jej přesunete přetažením do právě otevřené složky v ISu. Po tomto kroku se otevře okno, které zobrazí vkládané soubory a umožní jejich případnou změnu Názvu, Jména souboru nebo přidání požadovaného popisu souboru. Pomocí funkce Drag&Drop lze navíc přidávat více souborů pomocí jednoho přetažení.
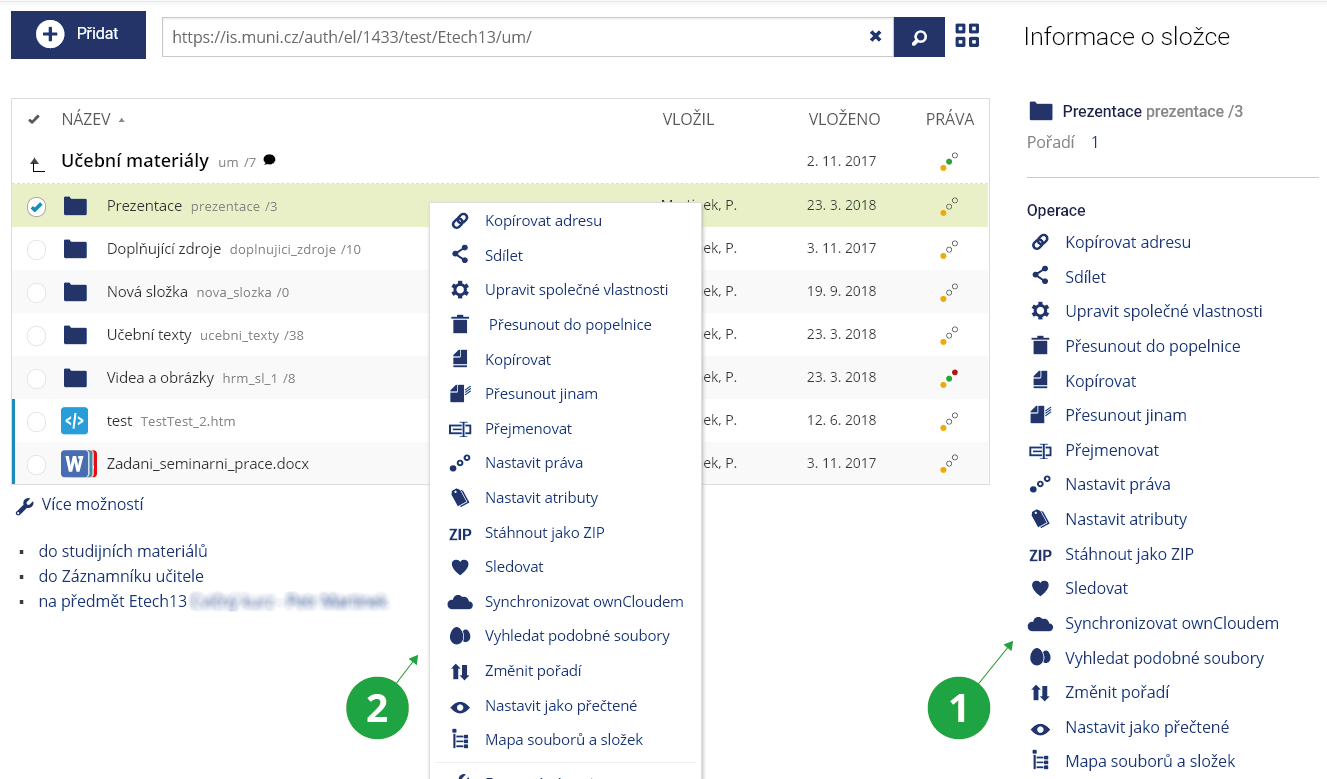
Operace jsou dostupné buď ze svislé nabídky panelu nástrojů (napravo od obsahu složky), nebo po kliku pravým tlačítkem myši na příslušný soubor/složku, kdy se zobrazí totožné menu.
Jak pracovat s více řádky najednou, např. jich více odstranit? Zaškrtněte řádky zaškrtávátkem v levém sloupci a v menu Operace .. Zaškrtnuté vyberte úkon, který s nimi chcete provést.
1 Panel nástrojů po označení vybraného souboru/složky, případně více souborů a složek.
2 Zobrazené menu nástrojů, které se zobrazí po kliknutí pravým tlačítkem myši na příslušný soubor/složku.
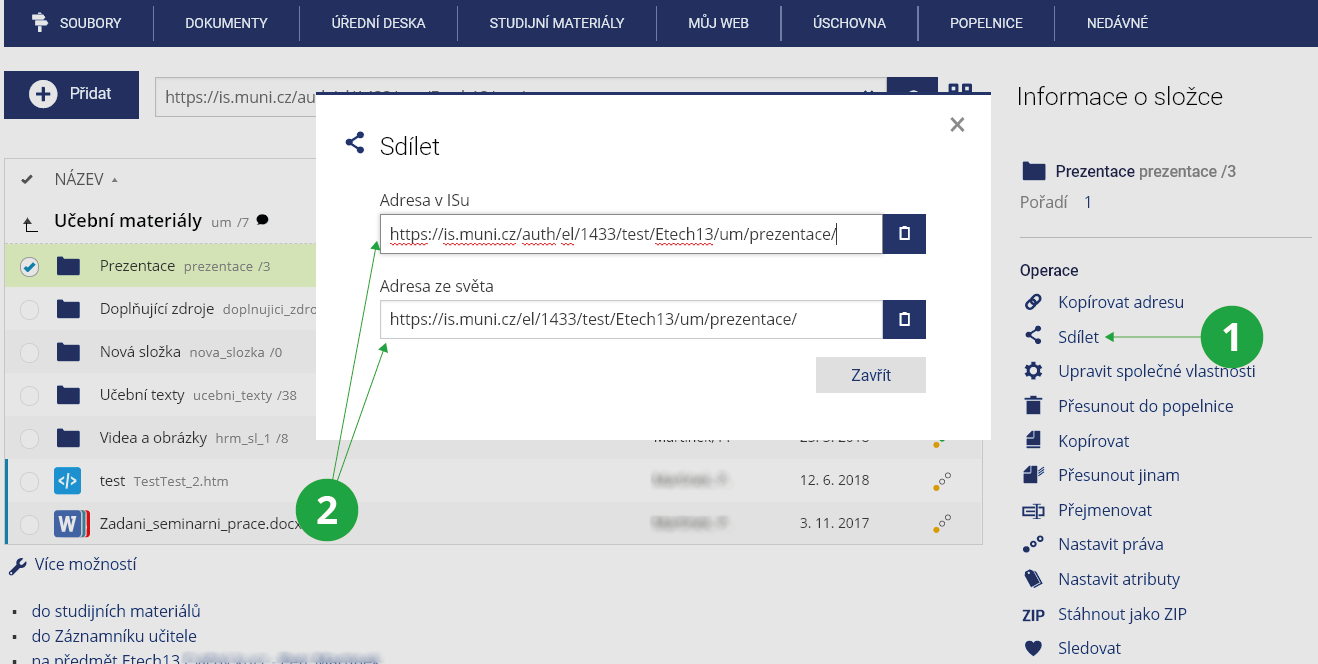
Pro získání Adresy souboru v ISu, pod kterou je objekt dostupný, nejprve soubor označte a poté klikněte na odkaz Sdílet vpravo. Zobrazí se dva odkazy Adresa v ISu a Adresa ze světa. Ty můžete zkopírovat a uložit nebo odeslat příjemci. Odkaz na složku, ve které se právě nacházíte, navíc vidíte i v poli nad obsahem právě otevřené složky.
1 Odkaz pro sdílení souboru.
2 Adresa v ISu slouží pro přihlášené osoby v ISu. Adresa ze světa je pak dostupná všem, kteří budou mít tento odkaz.
Další možností, jak lze sdílet adresu na vybraný soubor, je pomocí funkce Kopírovat adresu. Tu je možné opět použít dvěma způsoby. První možností je označit zvolený soubor a poté v pravém panelu nástrojů kliknout na Kopírovat adresu. Druhým způsobem je kliknutí pravým tlačítkem myši na příslušný soubor, a zde na Kopírovat adresu. Tato funkce automaticky zkopíruje adresu na příslušný soubor do paměti počítače a poté ji můžete vložit, kam potřebujete, a to buď kliknutím pravým tlačítkem myši a poté vložením nebo pomocí klávesové zkratky Ctrl+v. Tato adresa je Adresou v ISu, tedy bude přístupná pouze autentizovaným uživatelům, kteří mají na práci se souborem příslušná práva.
Nastavení přístupových práv u specifického souboru/složky je viditelné v obsahu složky, ve sloupci práva. Nastavení práv je graficky znázorněno třemi vzestupnými body různých barev. Tmavě žlutý bod znamená, že soubor je přístupný pouze pro čtení. Zelený znamená zpřístupnění pro vkládání a červený bod posléze označuje právo na správu daného souboru/složky.
K nastavení práv je možné se dostat dvěma způsoby. Buď označíte příslušný soubor (či více souborů) a kliknete na odkaz Nastavit práva v panelu nástroj. Nebo kliknete na ikonu zobrazující nastavení práv ve sloupci Práva. Poté se otevře nové okno s možnostmi nastavení přístupových práv. Zde můžete přidávat a odebírat jednotlivé skupiny, nebo jednotlivce, u kterých chcete nastavit přístupová práva. U jednotlivých definovaných skupin můžete dále nastavit pomocí checkboxů tři základní atributy – číst, vkládat a spravovat. Pod ikonou hodin se pak skrývá možnost nastavení od kdy do kdy může příslušná definovaná skupina s daným souborem/složkou pracovat (typicky nastavení horní časové hranice pro odevzdání domácích úkolů od studentů apod.).
1 Hromadné nastavení přístupových práv.
2 Skupiny osob, pro která jsou práva nastavena. Kliknutím na křížek, před názvem skupiny osob danou skupinu odeberete. Opět ji můžete přidat kliknutím na Přidat další právo.
3 Nastavení jednotlivých atributů u dané skupiny osob (číst, vkládat, spravovat a nastavení doby práce se souborem).
Navigační lišta umožňuje prostřednictvím svých ikon tyto akce:
setřídit dle daného sloupce (Název, Vložil, Vloženo),
zkontrolovat přístupová práva.
Pod béžovou lištou je aktuálně otevřená složka, nad ní jsou nadřazené složky. Vodící lišty složek/souborů jsou šedé. Nad názvem stromové struktury, ve které se právě nacházíte (typicky předmětu), se nachází struktura nadřazených složek. Pro přechod mezi nimi na ně lze jednoduše kliknout. Modrý pruh na začátku řádku s příslušným souborem značí, že se jedná o nepřečtené složky/soubory.
1 Možnosti seřazení souborů ve složce podle Názvu, jméno, kdo soubor Vložil, a data, kdy byl soubor Vložen. Seřazení vždy nejprve seřadí složky a poté až jednotlivé soubory.
2 Stromová struktura, která ukazuje, na jaké pozici se ve struktuře nadřazených složek.
3 Modrý pruh označující, že daný soubor dosud vámi nebyl přečten/otevřen.
Změnu automatického řazení souborů můžete docílit dvěma základními cestami. V první řadě můžete pro seřazení využít označení příslušných sloupců v panelu Navigační lišty (Název, Vložil, Vloženo). V první řadě se vždy seřadí složky a poté až soubory.
V případě, že není takovéto automatické řazení dostatečné, je možné využít i možnost vlastního nastavení řazení jednotlivých souborů a složek. Toho můžete docílit pomocí aplikace Změnit pořadí (opět v pravím panelu nástrojů, nebo po kliknutím pravým tlačítkem myši na příslušný soubor). Po kliknutí na Změnit pořadí se zobrazí nabídka, která vyžaduje zadání čísla pořadí daného souboru/složky. Po zadání pořadí klikněte na tlačítko Uložit, což povede k požadovanému zařazení daného souboru/složky. Pomocí aplikace Změnit pořadí se dokážete vyhnout i automatickému řazení, kdy jsou v první řadě seřazeny složky a poté až soubory. Pomocí této aplikace tak můžete docílit jakékoliv požadované struktury souborů a složek v daném adresáři.
Je k dispozici operace Přesunout do popelnice. Ta nezruší soubory
úplně, ale přesune je do složky Popelnice ve vaší Úschovně. Tam budou
zrušeny (vyexpirují) v běžném termínu expirace Úschovny, tj. za 30
dní. Pokud nechcete, aby byly přesunuty do složky Popelnice, můžete
zatrhnout možnost „odstranit místo přesouvání do popelnice“.
The content of files in the IS AMBIS data repository, for which a plain text version is available, is continuously machine-analyzed. Each document (final work, seminar work, essay, presentation, ...) that the user finds in the system can be compared and displayed with resources that have a similar text:
click on the line with the file (right-click will bring up the details panel on the right, left-click will bring up the context menu),
use the "Find similar documents" operation (two eggs icon),
use the displayed similarities (or adjust the settings and have the similarities recalculated) to assess whether it may be plagiarism or not.
1 "Find similar documents" operation.
For similar documents found, IS AMBIS will list the degree of similarity in percent. There is also an overall calculated similarity of the document with others:
1 Percentage of overall similarity to documents in the database and sources from the Internet.
2 List of source documents with which the document is similar. The similarity percentage is displayed for each.
3 For each source document, there is a menu below the three dot icon where you can find out more information about the document.
4 With the help of the cross, a source document that is not relevant for the comparison of similarities can be removed from the calculation (for example, the student should have drawn from it and has it properly cited).
5 After clicking on the selected highlighted similar passage, documents with which the text is similar will be displayed.
6 The number in the oval indicates the number of documents with which the following passage is similar.
7 After clicking, the number of displayed, skipped and discarded documents, including explanations, is clearly displayed.
8 Ovals with numbers keep track of source documents. Skipped documents can be viewed, discarded documents can be restored.
The similarity percentage is only an indication, the document or part of it may be plagiarism, even if the percentage is significantly low. Counting similar documents is fast, checking for similarities is possible immediately after creating a text version of the file.
People who have led or opposed the final work now or in the past are allowed to print the report in PDF format by expanding the "Modify search or select another document" menu, where they will find the "PDF output" option. Click this option and click the View button to open the log.
The system searches for similarities across the shared database of compared documents, which includes, in addition to the IS AMBIS document server, final theses of participating schools in the
Theses.cz system, seminar and other theses in the
Odevzdej.cz, system, scientific publications in the
Repozitar.cz system and other documents in information systems operated by MU.
Because a significant amount of work and documents are not public, searching the common database is an effective tool for finding possible plagiarism. A student cannot just submit a seminar paper to a friend from another school, because there is a high probability that he is already in the system and there would be similarities. The assignment of seminar and final thesis topics is often repeated, and it is therefore likely that the system will already know about the source documents from which this topic is usually drawn.
The search for similarities also includes an algorithm that analyzes the document being compared and examines it from sources on the Internet. This procedure has various technical limitations and is computationally and time consuming. Therefore, it is preferably used for archives of final theses. Due to the speed of processing, seminar papers in submission offices and long answers in ROPOTs are primarily compared against a shared database of all source documents. This includes, among other things, resources from the Internet, which have been traced in the past for the purpose of checking some of the millions of final theses being compared.
However, there is a difference between finding similarities to seminar papers (for which the shared resource database is used) and final papers (for which the shared resource database is enriched with newly downloaded resources from the Internet). But there is no need to worry, the database is really large, so in most cases the system "knows" enough resources that students usually draw from, as well as enough resources that students usually describe.
Tip: Files in File Depository and My Web won't be displayed to others
Files in File Depository and My Web will be included in the
similarity searches only if they are in the user's File Depository or user's My
Web. Other users will not see similarities found in these repositories.
The supervisor, who usually wants to check the quality of the work when writing the report, proceeds with the help of
The Information system Supervisor (chosen student) Archive of Theses/Dissertations
and select "Find similar documents". They will see the total percentage of similarities and marked similarities, which they can use to scroll through the arrows and assess whether the sections are properly cited.
1 Before confirming that a job review has been performed, the supervisor should use the "Find similar documents" function and assess any compliance.
Note
It is up to the reader to assess the significance of the similarities found, ie whether the student, for example, quotes correctly. The originality of the final thesis is best assessed by the supervisor (he is most familiar with publications in the field).
If you have a document in the form from which a text version can be created (it is not a picture, for example), insert it anywhere in the IS AMBIS (eg in the Provider, in the Study Materials of the subject or in My website) and IS AMBIS
in the similarity search mechanism includes.
By default, documents from the same depositor are not compared. It is therefore necessary to click on the option "Modify search or select another document", select the option "include documents of the same uploader" and display:
1 Click here to view the settings of other search parameters.
2 To compare even between your own documents, check the "include documents of the same uploader" option.
This is a comparison of documents with each other:
A text searchable version is generated for each document in the database. In this text version, the algorithm focuses on similar or paraphrased sections of text and evaluates the degree of agreement across the entire shared document database, including Internet resources.
Texts in Czech, English and Slovak are compared, the condition is that they have at least a few sentences or paragraphs (in very small files there is not enough text for their analysis and finding similarities).
Before the result is presented to the user, those documents that overlap only in passages that are the same as for previously found sources are omitted. Practically, for example, it is a citation of a certain law in another hundred final theses and documents on the Internet. If there are less than 10 similar sources, they will all be displayed without omission.
The user is shown the most relevant documents that have a significant similarity to the document being searched, and the percentage of that similarity.
If students copy from each other, the system evaluates their answers as similar and displays the percentage of similarity. You can find more on this topic in the question How works compare similarities?
Tip: It doesn't pay to copy
As a warning mechanism for students, it is important that the submitted works are archived in the IS AMBIS and can be examined repeatedly. For example, at any time later with another improved version of the algorithm. Remember that copying time can sometimes mean a lot of extra work to repair your reputation. The developers of IS AMBIS are gradually improving the algorithm and the database of searched documents is constantly being expanded by other sources. What systems don't reveal today doesn't mean they won't reveal tomorrow.
Authors can verify that their text has not been used in another author's work.
Important warning!
The similarity that the system found between your work and the work(s) in the database does not necessarily mean that one of the jobs is plagiarism. Each work (similarity) must be assessed by an expert on the topic. There is no % value from which work can be considered plagiarism.
What the similarity search interface shows and how to use it:
1 Percentage of overall similarity to documents in the database and sources from the Internet.
2 List of source documents with which the document is similar. The similarity percentage is displayed for each.
3 For each source document, there is a menu below the three dot icon where you can find out more information about the document.
4 With the help of the cross, a source document that is not relevant for the comparison of similarities can be removed from the calculation (for example, the student should have drawn from it and has it properly cited).
5 After clicking on the selected highlighted similar passage, documents with which the text is similar will be displayed.
6 The number in the oval indicates the number of documents with which the following passage is similar.
7 After clicking, the number of displayed, skipped and discarded documents, including explanations, is clearly displayed.
8 Ovals with numbers keep track of source documents. Skipped documents can be viewed, discarded documents can be restored.
Tip: Files in File Depository and My Web won't be displayed to others
Files in File Depository and My Web will be included in the
similarity searches only if they are in the user's File Depository or user's My
Web. Other users will not see similarities found in these repositories.
Some similar documents do not provide information about the new match, only recurring similar passages of the displayed source documents. The system skips these documents. In practice, for example, these are more extensive citations of a certain law in another hundred final theses and documents on the Internet. Therefore, users will now not see all documents in which copyright law paragraphs are quoted, but will see only one of them. The one that has the most other similarities with the selected document.
1 The gray oval shows the number of skipped documents, clicking on it will display a list of these documents.
First of all, you need to see if you just see another document that contains the similarity. For example, whether the system did not mark an equal collection of laws with the text of the law, and not a newspaper article commenting on the same article.
Tip
Documents are skipped only if there are more than 10 documents found. Until then, all documents are shown for clarity.
Note
Due to the speed of processing, seminar papers in submission offices and long answers in ROPOTs are compared primarily only against the shared database of all source documents. Thus, there is a difference compared to the search for similarities in final theses, where the system submits each final thesis to a direct examination of similarities to the Internet.
But there is no need to worry, the database is really large. In most cases, therefore, the system already "knows" enough resources from which students usually draw, as well as enough resources from which students usually describe.
Tip
If the teacher submits a seminar paper on a very current and new topic or a very marginal issue, it may happen that no one has yet reflected it in the final theses. Then the shared database of all source documents may not yet cover this topic. In these cases, it can be recommended that teachers upload students interesting, relevant and valuable resources for their inspiration or study in the study materials in the IS AMBIS. At the same time, they will be sure that they will not copy from them.
The system also checks longer texts entered as answers to ROPOTs. Answers to questions of the type "Enter text" (: a) are checked if more than 50 characters were entered. The system automatically inserts these answers into the
Study Materials of the subject if the ROPOT is in the study materials. If the ROPOT is not in the study materials, then it is stored under the ROPOT description file. These files are not available to students by default.
The following can be used to check the answers in the ROPOTs:
The Information System Teacher (chosen course) Work with ROPOT (chosen ROPOT) Responses Check for plagiarism of longer texts
1 Here it is possible to check the answers in the whole ROPOT at once.
The individual files, student names and similarity percentage are displayed. You can click on the similarities for each file (ie the individual long answers in the ROPOT) for a more detailed examination.
Note
Are you interested in what texts are found in the ROPOTs? You can find more on this topic in the question What work compares similarities?How works compare similarities?
Tip
If the teachers do not want the students to copy from their presentations and teaching texts during the test, it is possible for the students to upload these files to the study materials in the IS AMBIS. They will thus get into the shared database of compared documents and the long answers in the ROPOT will be compared against them.
The similarity search tool can help prevent copying or resubmission of senior classmates' essays. If students copy from each other, the system evaluates their answers as similar and displays the percentage of similarity. To check the work in the delivery room, use:
The Information System Teacher (chosen course) Homework Vaults (chosen homework vault) eggs icon
1 Here it is possible to check the answers in the whole Homework Vault at once.
The individual files, student names and similarity percentage are displayed.
Note
Are you interested in what texts the similarities are searched for in Homework Vaults? You can find more on this topic in the question How works compare similarities?
Tip
If the teacher does not want the students to copy from his presentations and teaching texts during the test, it is good for the students to upload these files to the study materials in the IS AMBIS They will thus get into the shared database of compared documents and the long answers in the ROPOT will be compared against them.
Plagiarism (copying, imitations) is an unethical activity and fraud that has no place in college. Acceptance of the text of another author without a visible indication of the copied text with the exact citation of the source constitutes an unauthorized infringement of copyright in violation of copyright law. There is a risk of sanctions for the offense, even after graduation.
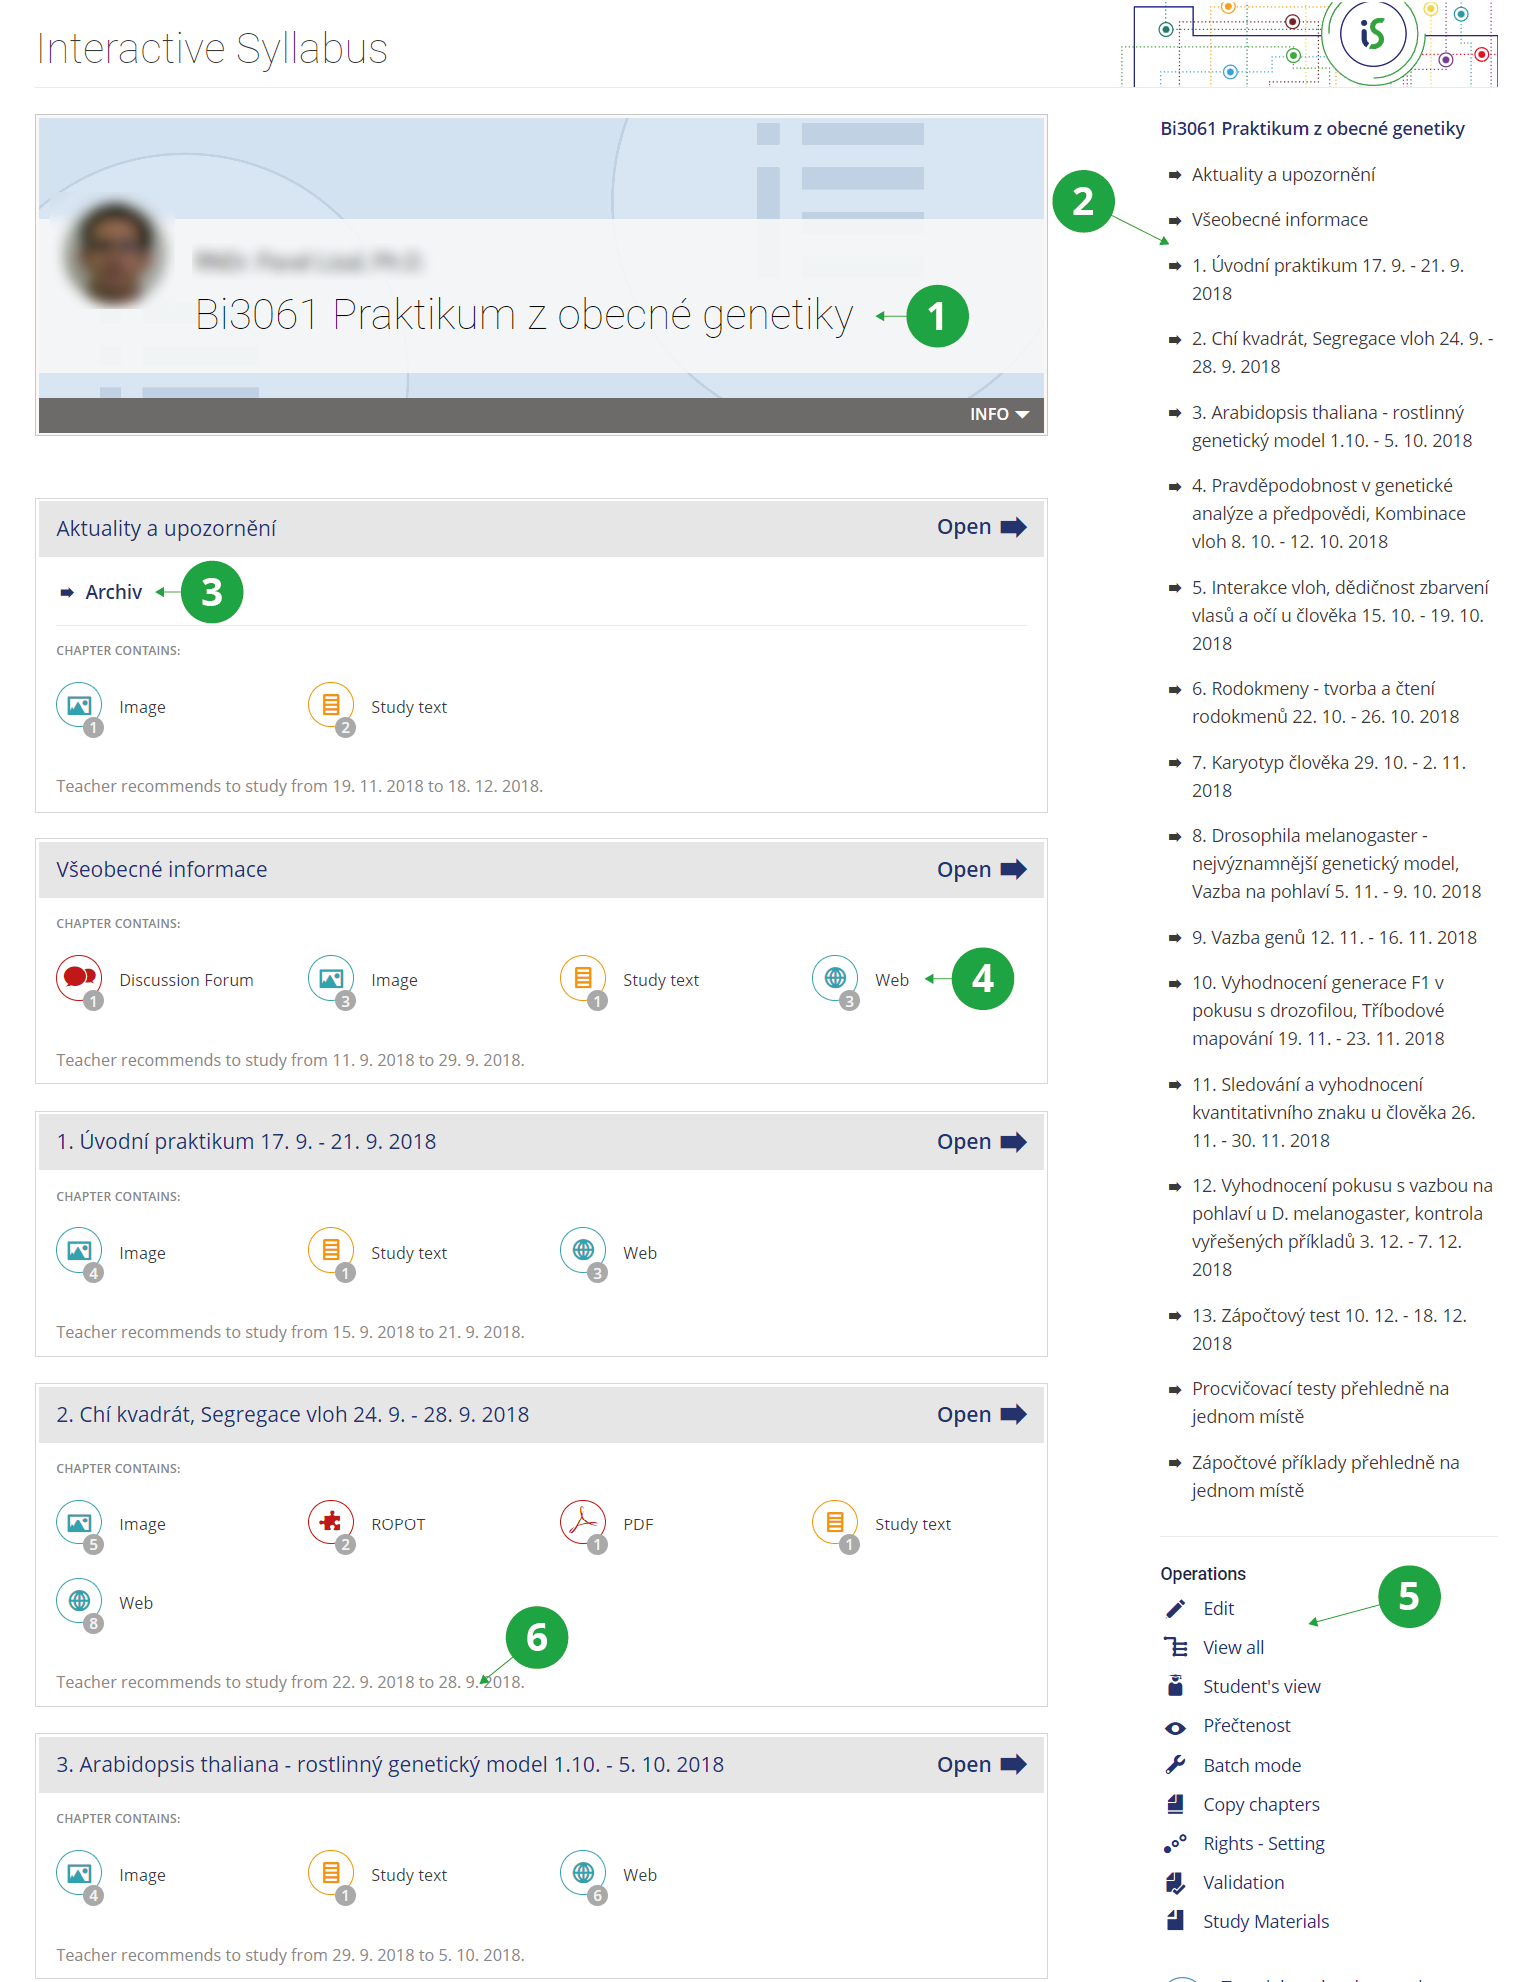
It is a course scenario – a signpost from which students enter the individual e-learning activities. The syllabus is usually structured by time or topic. The teacher prepares the activities one by one and then publishes them to the students in a coherent form.
Homepage of the interactive syllabus in normal view:
1 Name of the interactive syllabus.
2 Navigating the syllabus.
3 Further breakdown of the chapter.
4 List of activities within the chapter.
5 Editing and other operations with the syllabus.
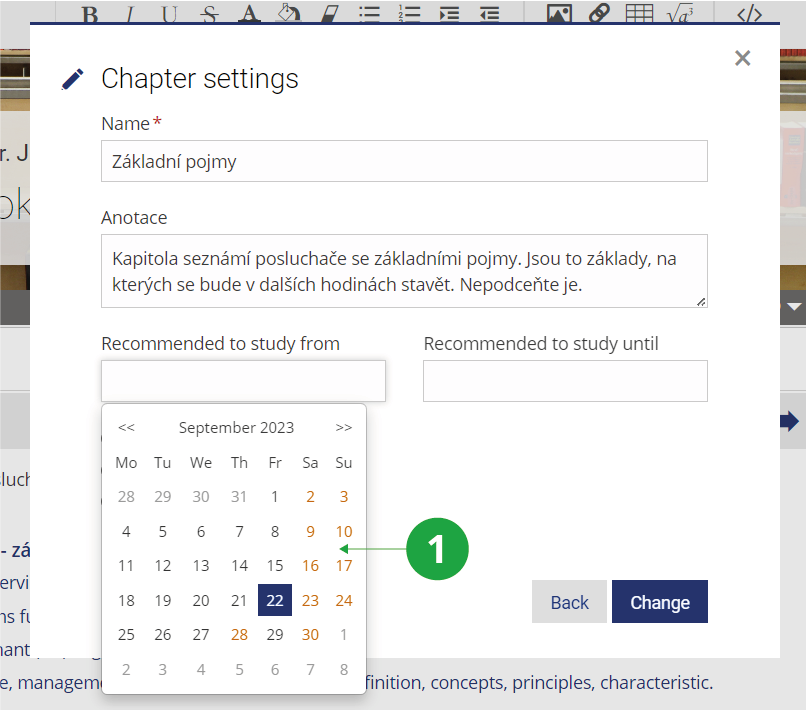
6 When the teacher recommends studying.
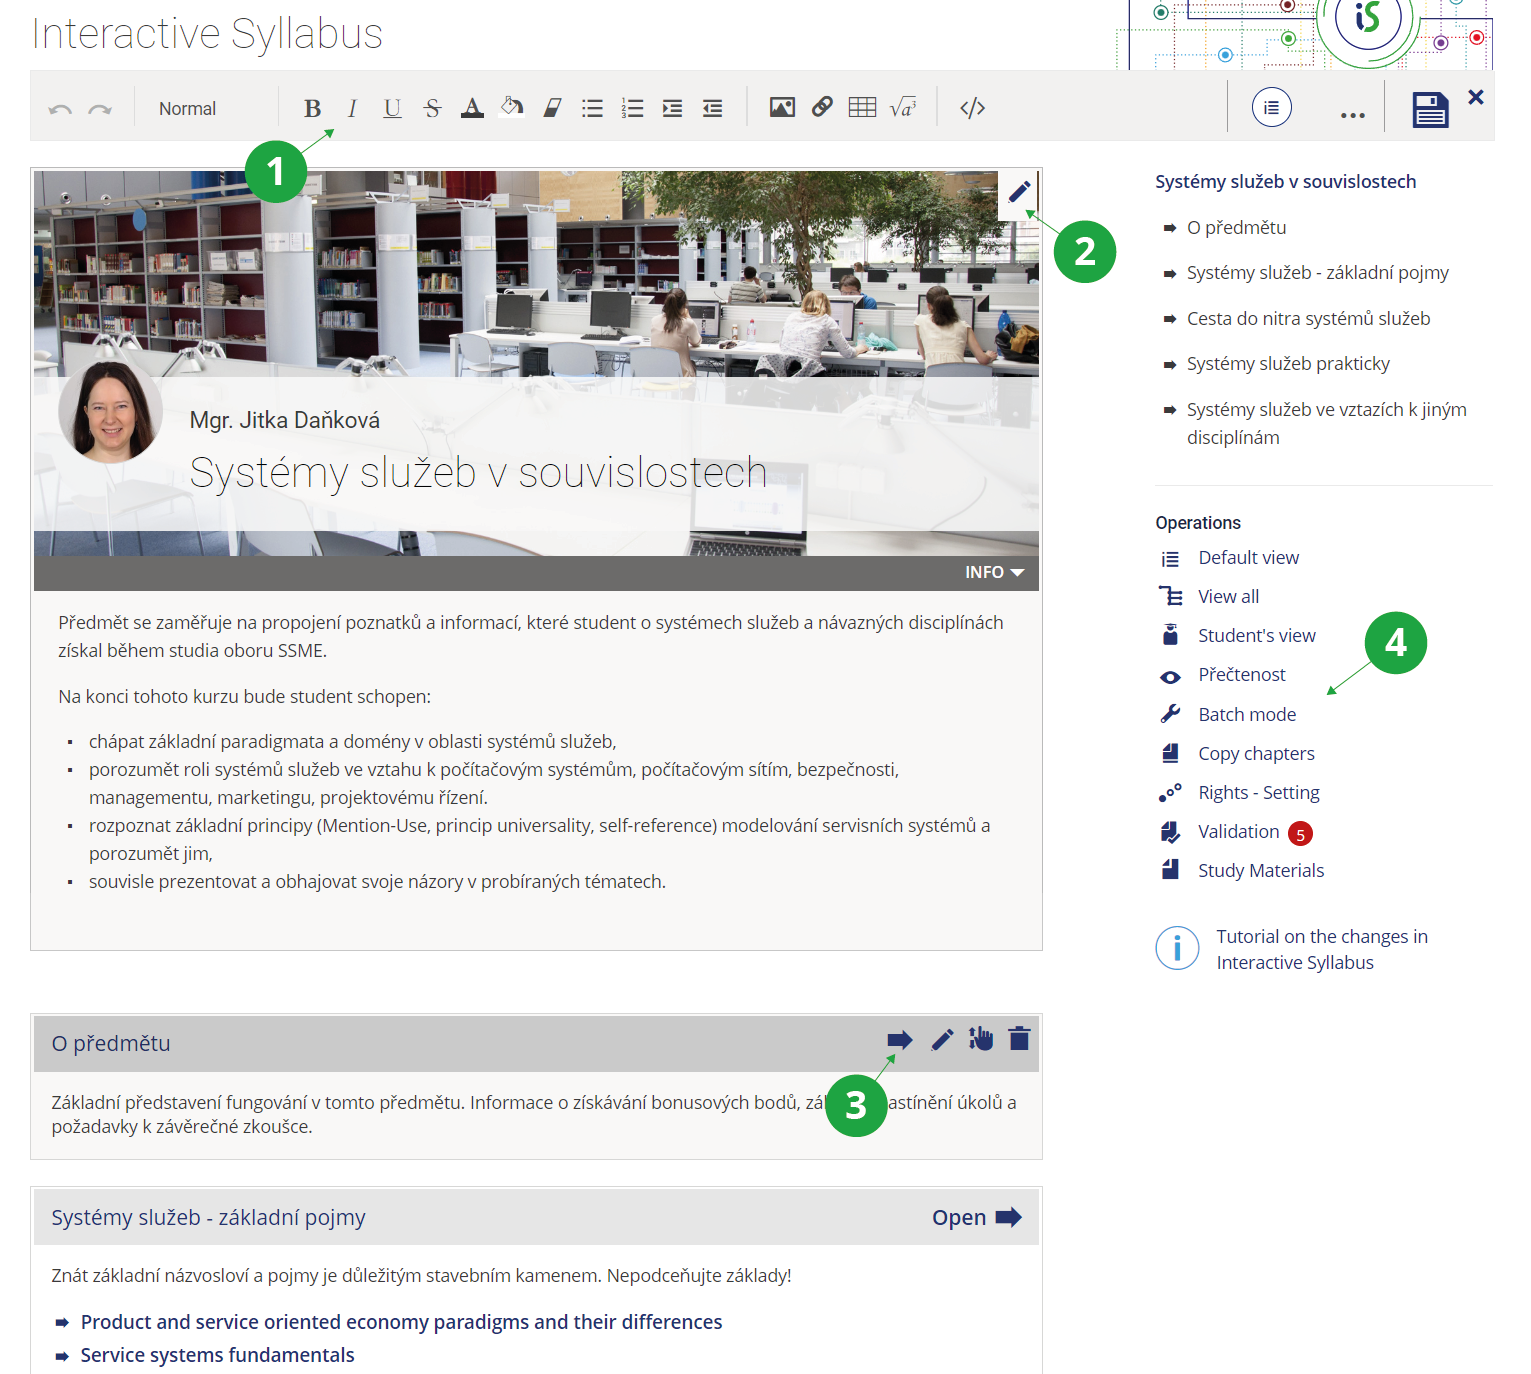
The teacher can fill and edit the syllabus in the editing mode (option "Edit" in the menu of operations for the selected syllabus). Viewing the syllabus in editing mode:
1 When editing mode is turned on, the edit bar appears.
2 Modification of the title of the syllabus, introductory picture and introductory text.
It's not. It is possible to use only part of the e-learning (e.g. practice using ROPOTs, homework vault, discussion forum). It is not necessary to create a syllabus for the small number of activities during the semester. But once students have many learning materials and more learning activities, structuring a course using an interactive syllabus becomes more straightforward for them.
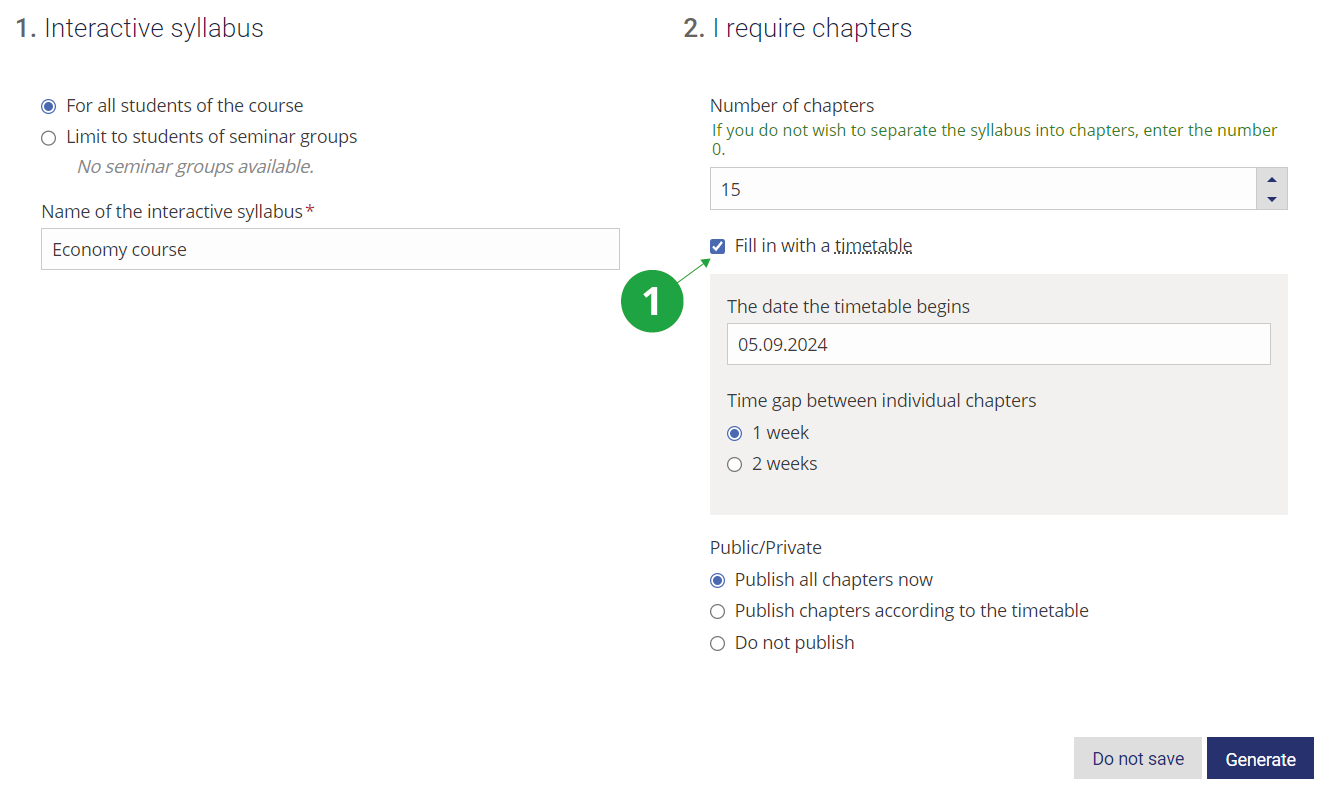
The Information system Teacher [course] Interactive syllabi Create a new interactive syllabus
You can then set who the syllabus is intended for, its title and how many main chapters you wish to divide the syllabus into. It is also possible to set a bulk timetable for unpacking individual chapters and publishing them by clicking on "Fill in with a timetable". Once the syllabus has been created, you can start adding content and editing parts of it.
1 Selecting "Fill in with a timetable" when setting up the curriculum.
For copying the interactive syllabus, as well as other materials in the course, there is an application for copying study materials:
The Information system Teacher [course] Sharing and copying study materials Copy Study Materials
in the ROPOTs and interactive syllabi for the target semester. If the syllabus still needs to be modified (dates, chapter titles), this can be done in the "Batch mode" application. This allows you to bulk move dates in chapters, set locking/publishing and change chapter titles.
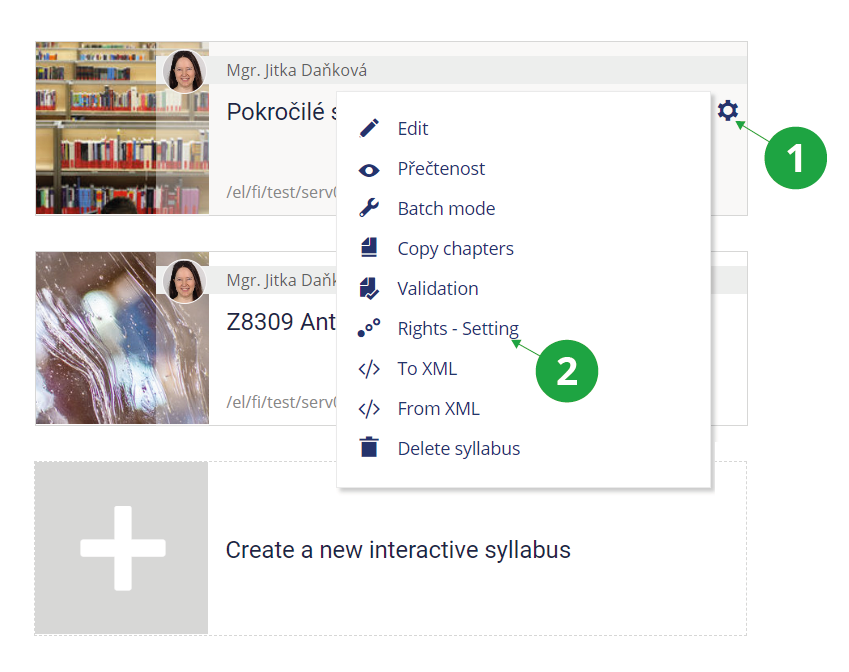
If you need to copy the content of one interactive syllabus to another, you can use the "Copy chapters" tool. The tool can be accessed by following the path:
The Information System Teacher [selected course] Interactive syllabi cogwheel on interactive syllabus Copy chapters
The Information system Teacher [course] Interactive syllabi [interactive syllabus] edit
To insert elements into a chapter, you need to first open the chapter (by clicking on the title or the entire chapter title bar, or the "Open" arrow).
1 When you hover over a chapter, the option icons appear: open the chapter, edit chapter settings, move the chapter, or delete the chapter.
New elements can be inserted by clicking on the corresponding icon in the edit bar. They are inserted at the place where the cursor is currently in the text:
1 Editing bar with elements that can be inserted into the syllabus chapter.
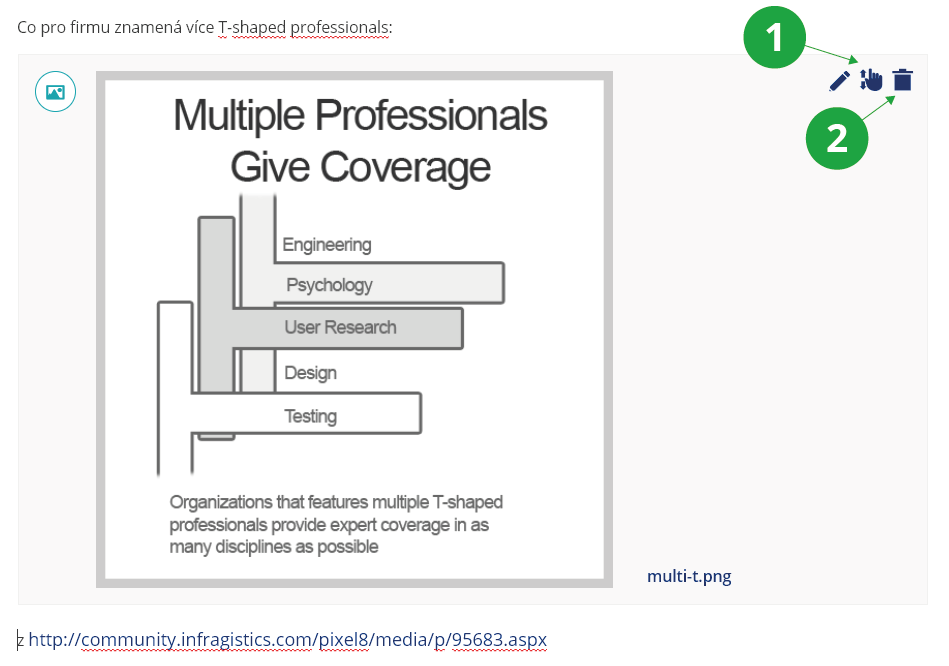
Multimedia, PDF files, images can just be dragged from the computer to the chapter syllabus area. The system will recognize which file it is. It will display the images and prepare some audio and video formats for playback. Individual elements can be deleted using the waste container icon next to the embedded element.
1 You can drag and drop multiple files from your own device into a syllabus chapter.
More details about inserting individual elements:
Inserting a new chapter: a new chapter can be inserted into the syllabus and other chapters (the number of levels is limited to five sublevels). When inserting, you also set the publication options.
Text insertion: the text is entered into the syllabus chapter directly in the space that is visible. Basic text color, italics or bolding, indentation can be set using the edit bar.
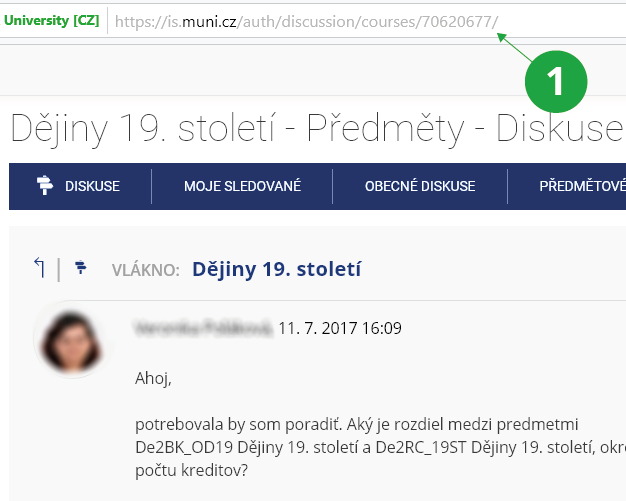
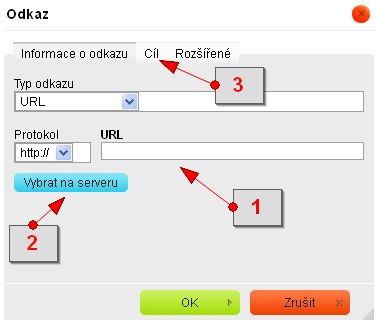
Discussion forum: the syllabus can include a link to the discussion forum of (any) course or directly to a specific discussion thread. You can find the thread number in the address bar of the discussions:
1 Thread number.
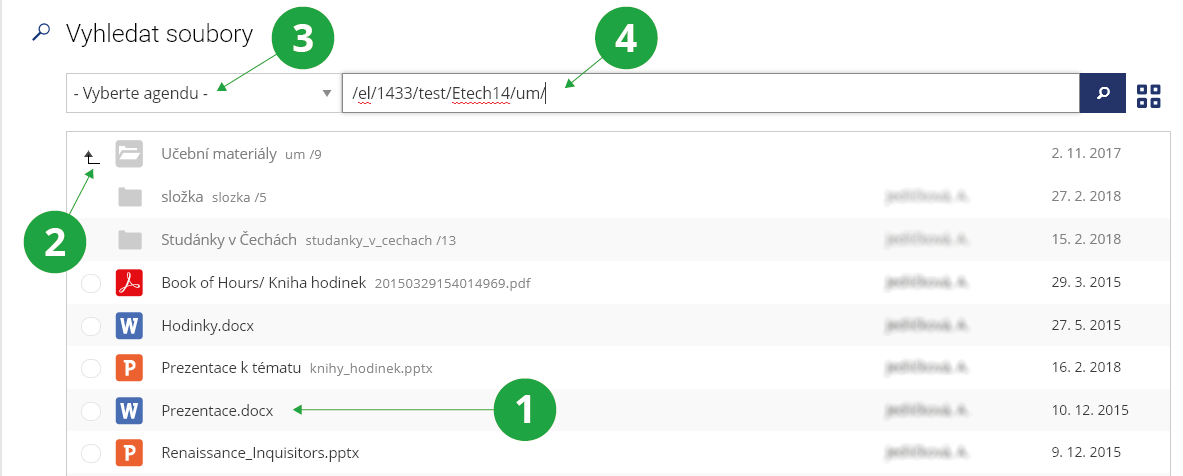
Study materials: you can upload files from your computer (by dragging or searching) or files stored in the Information System (search for them via the File Manager).
1 An item that can be inserted into the interactive syllabus.
2 Link to the higher levels of the file manager.
3 Option to select a different file manager agenda.
4 Address in the IS AMBIS.
After clicking on the selected file, folder or ROPOT, confirm the choice by clicking "Select".
Inserting video and audio files: files in common formats can be dragged or uploaded from your device to the chapter syllabus, the system will recognize them and automatically convert them to the HTML5 player so that they can be played directly in the browser. At the same time, they will be secured against downloading. More information is available in the Playing videos in the MU IS help.
Playing videos in the IS AMBIS help.
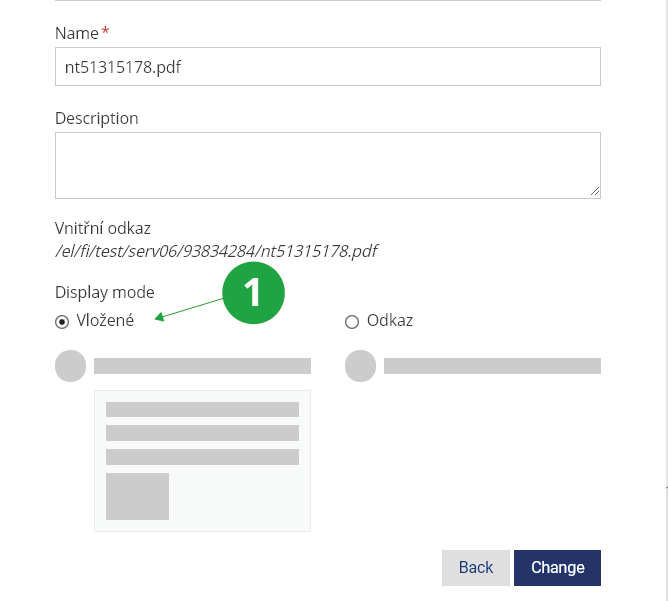
Inserting PDF documents of presentations for direct viewing: PDF files can be inserted into the syllabus via the "Study Materials" icon in the editing bar or by dragging and dropping from the teacher's device. To view a PDF file directly in the syllabus, select "Edit" for the selected file and set "View" to "Embedded". The embedded PDF file will be browsable but not downloadable.
1 For PDF files, you can set the embedded view directly in the interactive syllabus. Students can view the file, not download it.
Highlighted text: to make the texts inserted into the syllabus clearer, the text can be supplemented with icon boxes that provide students with selected important information, tips or warnings.
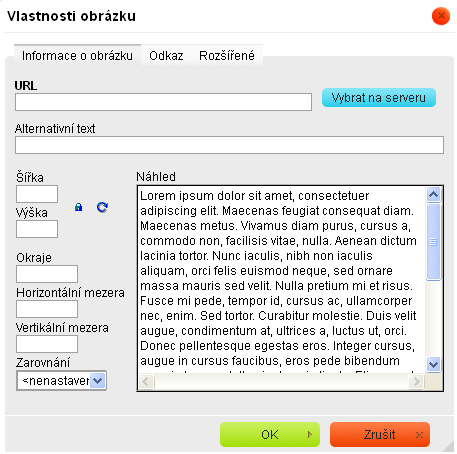
Inserting images: images can just be moved into the syllabus chapter or uploaded from your device, the systém will recognize them, save them in the syllabus and display them.
Moving elements to another place or deleting an element is done using the icon on the top right corner of the element.
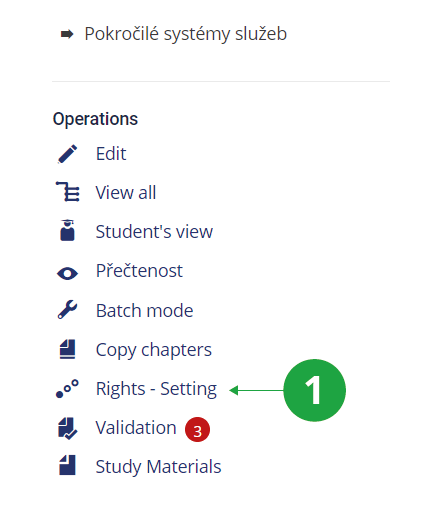
For a typical use in the current course, the syllabus does not need to have the access rights changed because it is implicitly accessible to students of the course. If for some reason it is desirable to limit or extend this right, you can use the "Rights - Setting" option (in the interactive syllabus menu). You will be presented with a dialog for setting the rights of the interactive syllabus file, in which you can change the rights in the desired way. In the case of extending rights, remember that all parent folders in the Study Materials of the course needs to also have the desired read right.
1 Menu of interactive sylabus operations.
2 Options for setting rights to the interactive syllabus.
1 For options for setting rights to the interactive syllabus, see the operations menu when you view it.
If the syllabus is accessible to students (students of the course immediately after the syllabus is created), they can see it in their interface
The Information System Student [course]
a link that they can use to open it.
If you want to make the syllabus available to someone else, you need to set the rights of the file to open the syllabus (.qwarp), including the folder where the file is located, as described above. The syllabus can then be opened by clicking on this file in the course study materials.
Please make sure you have set its access rights correctly.
You can do so by clicking on the Access rights reference situated at the top of your syllabus. Make sure the rights are set the way that allows your students to access the syllabus. If they are not, change the settings.
Similarly, you should also check the rights of the Study materials folder housing the file containing a reference to your syllabus. If the students are not allowed to access this folder, they cannot access the file, and thus the syllabus, either.
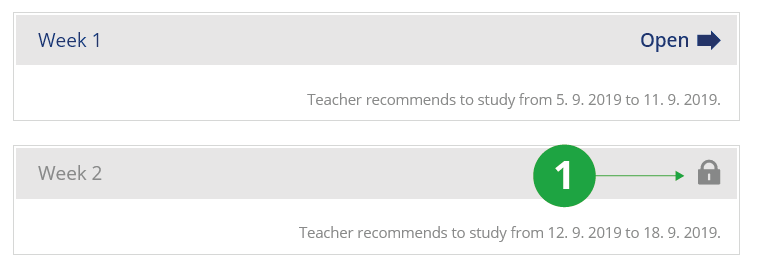
Are you really sure you have made all your chapters public?
When editing the syllabus, check that there is no lock icon for each chapter, if so, click on “chapter settings” (pencil icon after moving to the chapter line) and set to “publish now”.
1 Locked chapter in the interactive syllabus.
If you need to publish multiple chapters at once, use the "Batch mode" link in the operations menu.
This is completely up to you. An interactive syllabus may have, for instance, one of the following forms:
a syllabus containing as many chapters as there are weeks in the term (one chapter for each week)
a syllabus containing as many chapters as there are topics you want to deal with during the term
multiple syllabi (one for each seminar group)
a syllabus containing multiple chapters – some for lectures, some for seminars
a syllabus containing general course-related information and its chapters with seminar group-specific information
Provided some seminar groups have been created under your course, the application used for creating a new syllabus allows you to select between a lecture (course) syllabus and a seminar group one.
Provided you wish to notify your students of organization of your course, you might use the introductory text.
Shown at the beginning of the interactive syllaus and contains some introductory and other important information pertinent
to your course such as teachers' e-mail addresses, their office hours, completion pre-requisites, etc. You can fill in the introductory text in:
The Information System Teacher [select a course] Interactive syllabi Edit Edit (pencil icon at the top right of the banner with the interactive syllabus name)
1 After reaching the right corner of the banner with the interactive syllabus name, you will be able to edit the basic information about the sylabus: the name, the opening image, the person displayed and the introductory text.
2 View the introductory text.
The system allows teachers to insert their own opening image or select from a set of basic ready-made themes. The same opening image can be set for chapters.
The ideal parameters of your own image are:
minimum size 1200x450 px, but for best results 1600x620 px, larger is not recommended;
the ideal format is JPG;
the ideal file size is 200 KB, then it will load quickly, the maximum file size is 1 MB.
It is advisable to always get the application to display sub-syllabi during the weeks (periods) they relate to. To specify when a certain sub-syllabus should be made public, please click on 'Specify when to make public'. You might also want to use the option of Batch mode to do so for several chapters at a time.
1 Setting the recommended interval for chapter study.
Editing the interactive syllabus is called WYSIWYG (acronym for the English sentence "What you see is what you get"). If you use prepared
elements and do not embed advanced scripts in HTML code, for example, you will see the syllabus content as students will see it.
If you want to test how the outline looks in real view without editing elements during editing, use the “Normal View” option in the outline operations menu.
Use the “View All” option (in the normal view) to view the outline of the interactive syllabus, including the locked chapters (eg to check the outline of the interactive syllabus
after editing). However, such an outline can only be seen by a person with sufficient rights, not by the student.
To print the interactive syllabus, select “View All” (in normal view) and then print the outline using the “Print” option in your browser.
The materials displayed in the interactive syllabus, i.e. images, PDFs, videos, etc., can either be uploaded somewhere in the study materials of the course and linked from there, or they can be saved directly into the interactive syllabus.
The interactive syllabus file and the content inserted into it is stored in the course study materials. It is located in the root
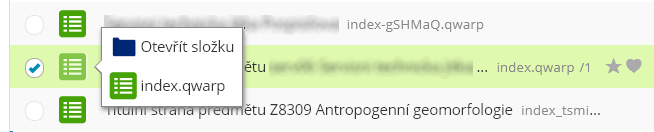
Study Materials agenda folder and always has the extension QWARP, for example, index.qwarp.
When you hover over the syllabus file icon, the option to open the nested syllabus folder appears. This is where you will find all the files that have been inserted into the interactive syllabus directly by uploading from your own device, for example by dragging and dropping.
1 When you hover over the interactive syllabus icon in the file manager, you will see the nested folder that has been created specifically for the syllabus. This is where the files that are dragged and dropped or directly uploaded to the syllabus are stored.
This folder can also be accessed directly from the interactive syllabus via the "Embedded files" option located in the "Operations" column.
1 Link to the folder with files inserted into the interactive syllabus.
Clicking on the reference “Create a new interactive syllabus”, you can create one syllabus for a course (or lecture) and one for each of its seminar groups. Provided you need yet another syllabus, you can create it using the following path:
The Information System E-learning Course-unrelated Interactive syllabi Create a new interactive syllabus
You will be asked to provide a name for the file containing the syllabus, the folder in which the file should be stored, and information on how the syllabus should be structured. This option therefore allows you to create another syllabus in, for instance, the Document Server or Depository sections.
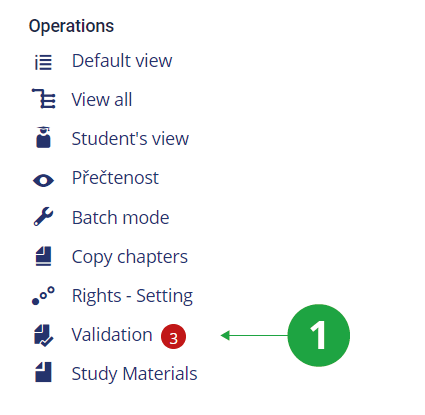
Validation verifies the functionality of all elements in the interactive syllabus. Problems found are marked in red. Situations that may be problematic are highlighted in orange.
The validation is located in the list of operations with the interactive syllabus.
1 If problems are found in the interactive curriculum, an indication is displayed next to the "Validation" operation.
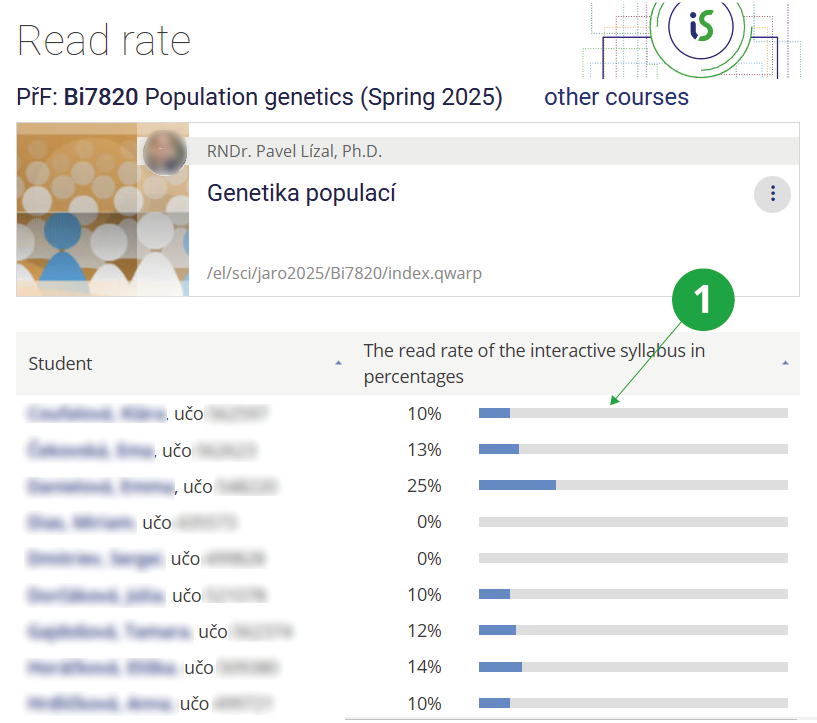
The "Read rate" feature is used to verify that students are looking at the interactive syllabus. This function is located in the list of operations
with the interactive syllabus. Read rate contains a summary table with a list of students and the readership rate is expressed as a percentage.
1 The "Read Rate" function shows how far students are in going through the interactive syllabus.
Tip: What all counts towards read rate?
The "Study progress" indicator in the interactive syllabus recalculates how far along a student is in reading and completing the interactive syllabus.
It counts viewing chapters, running videos, opening linked files, etc. The student can also easily see where they left off in their study of the material.
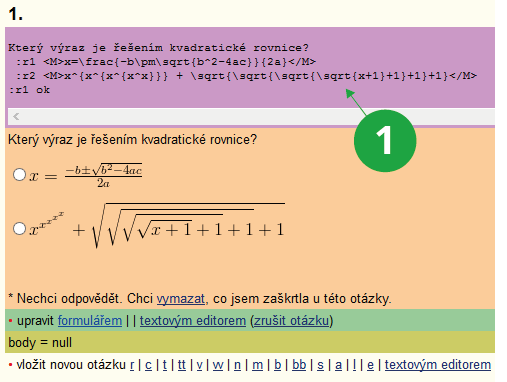
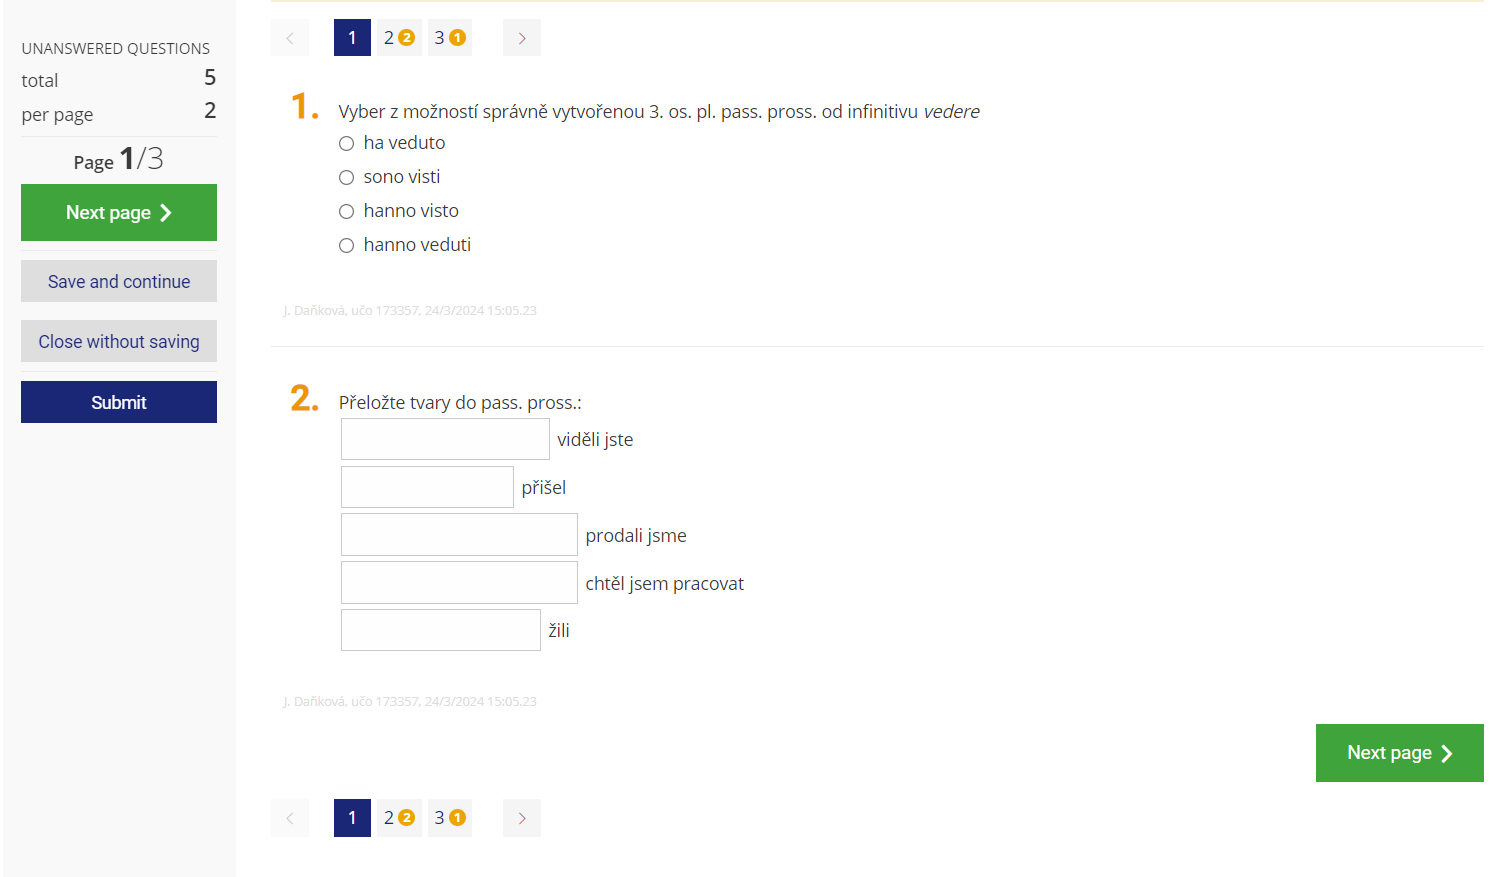
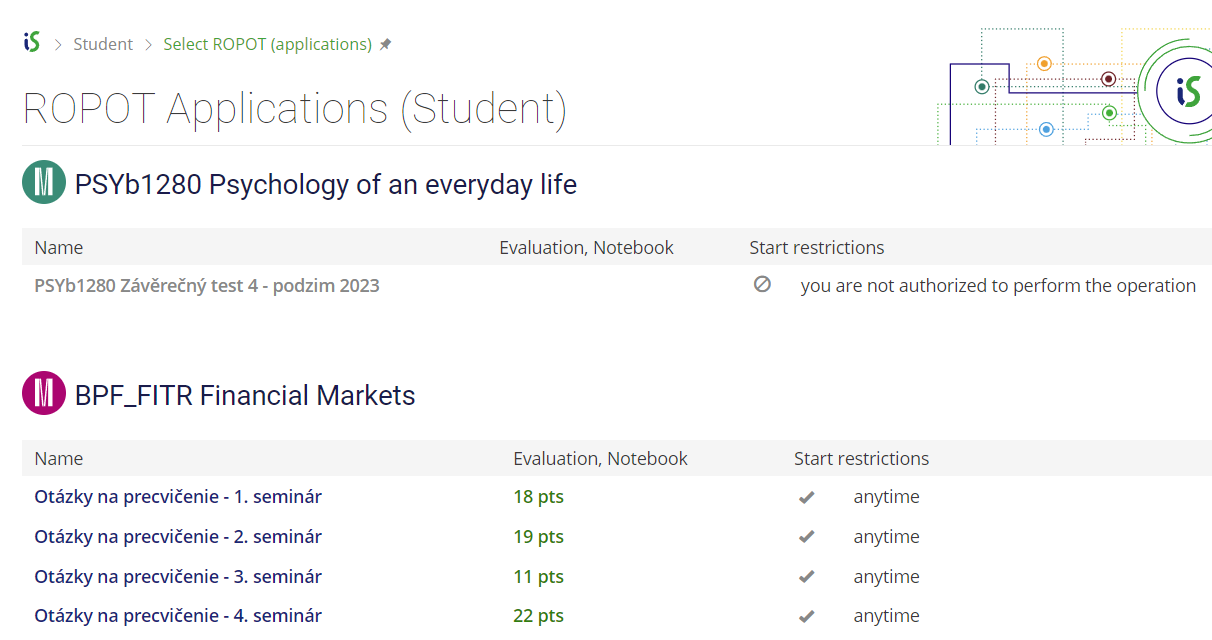
The ROPOTs (Revision, Opinion Poll and Testing) contain questions and allow students to actively answer. The system typically automatically stores and evaluates the answers.
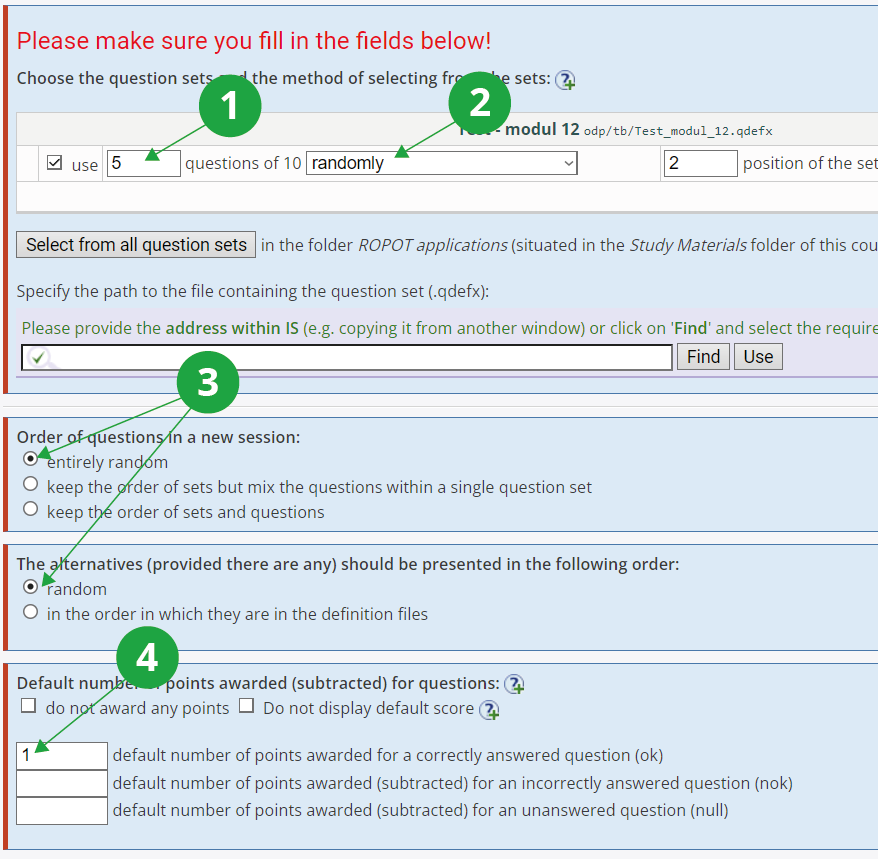
The preparation of the ROPOT consists of two steps - applications:
Question Sets – what the ROPOT asks, the questions to be asked
ROPOT Descriptions – who is allowed to take the test, when and under what conditions, from which question sets the questions are to be used.
The ROPOT can, for instance, be used for the following purposes:
Exercises
Many questions designed for students to work on outside the classroom (recapitulation, drill, checking understanding of the material, ...). Students can open the practice test at any time and view the correct results after submitting it.
PC-based test
A clicker exam that students take in the computer classroom. The test is typically timed and the results are recorded in a notebook (the ability to generate a grade) without displaying the correct answers to the students.
PC-based test demo
The mode is used to easily create a sample test on which students can experience what a live PC-based test looks like. It is advisable to include it during the semester with sufficient distance from the actual testing. The results are not saved.
Text (accompanied by other materials) or opinion poll
Unscored questions with some accompanying texts – shorter interactive teaching materials (with checking of understanding of the text), surveys, questionnaires. The order of questions and answers is not mixed.
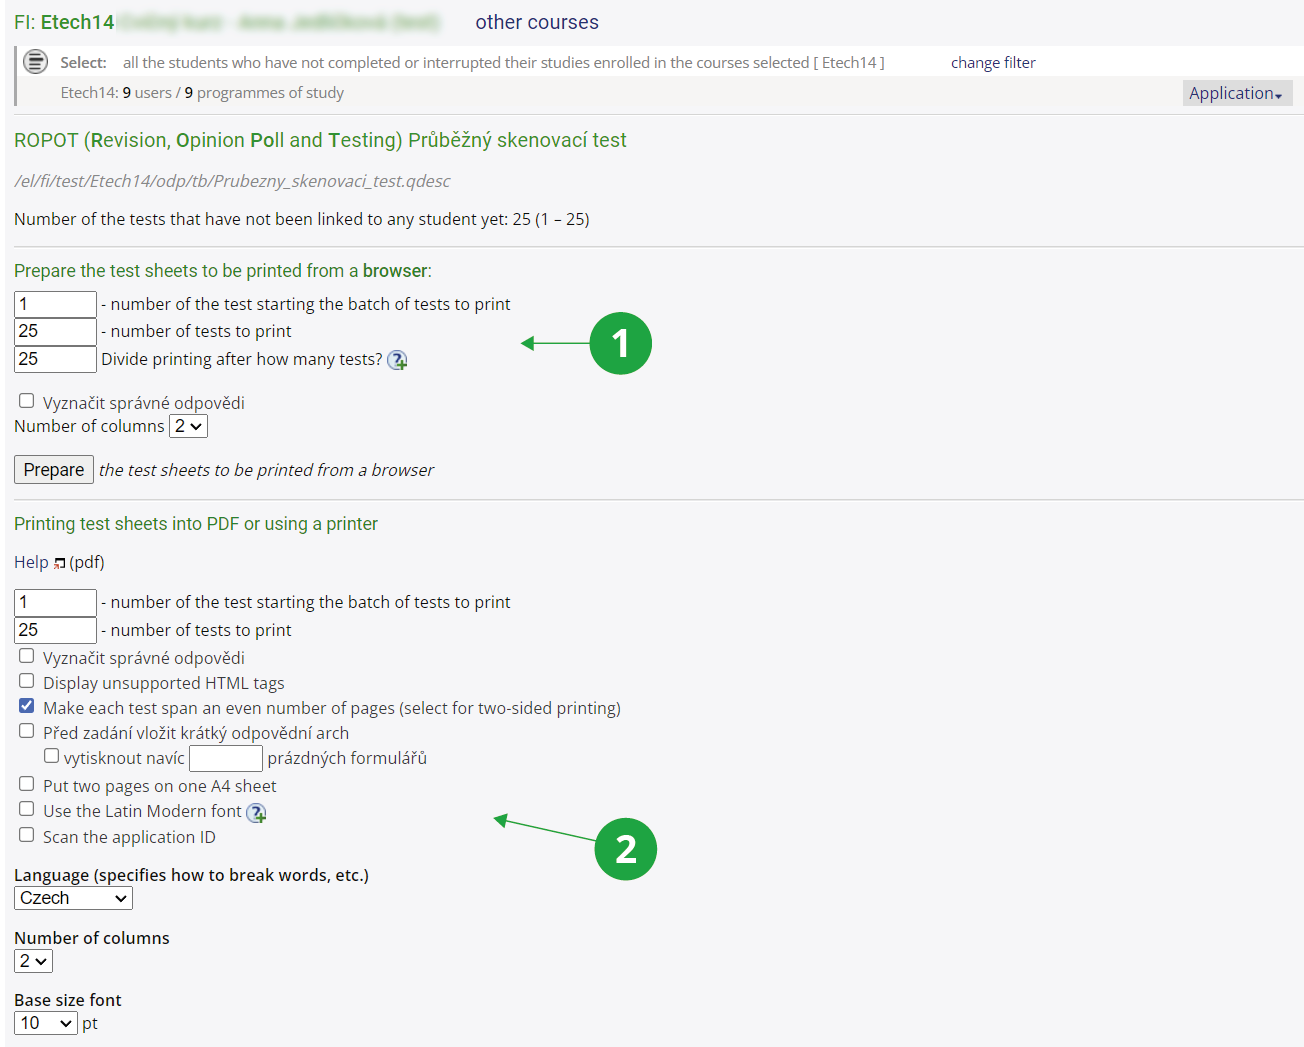
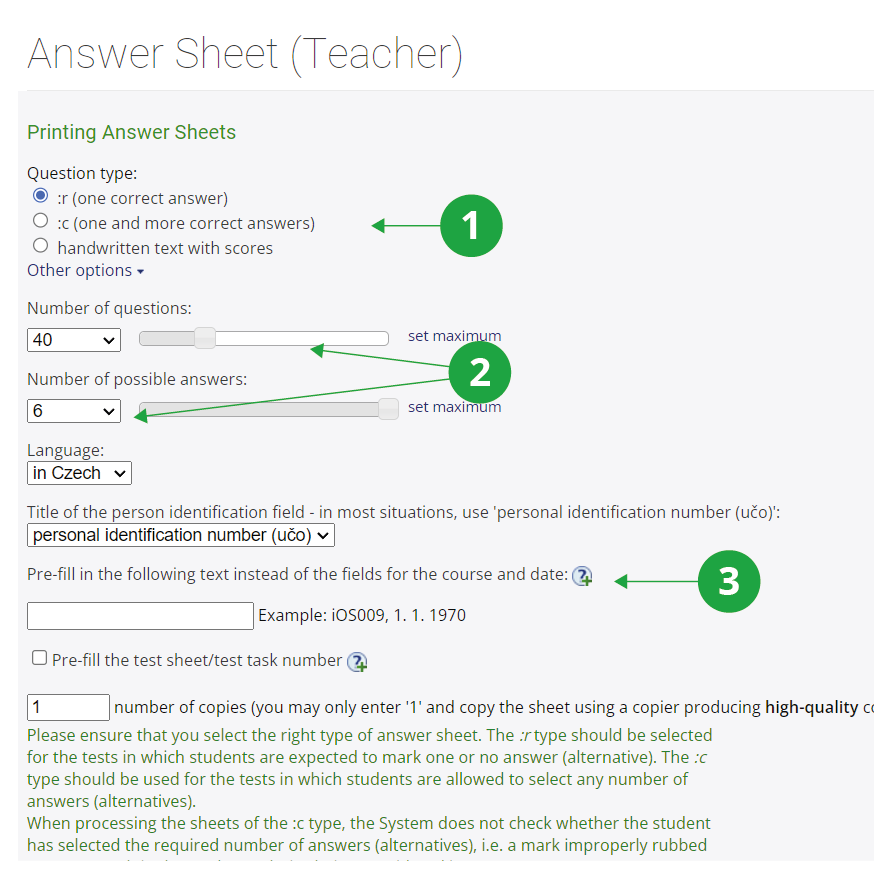
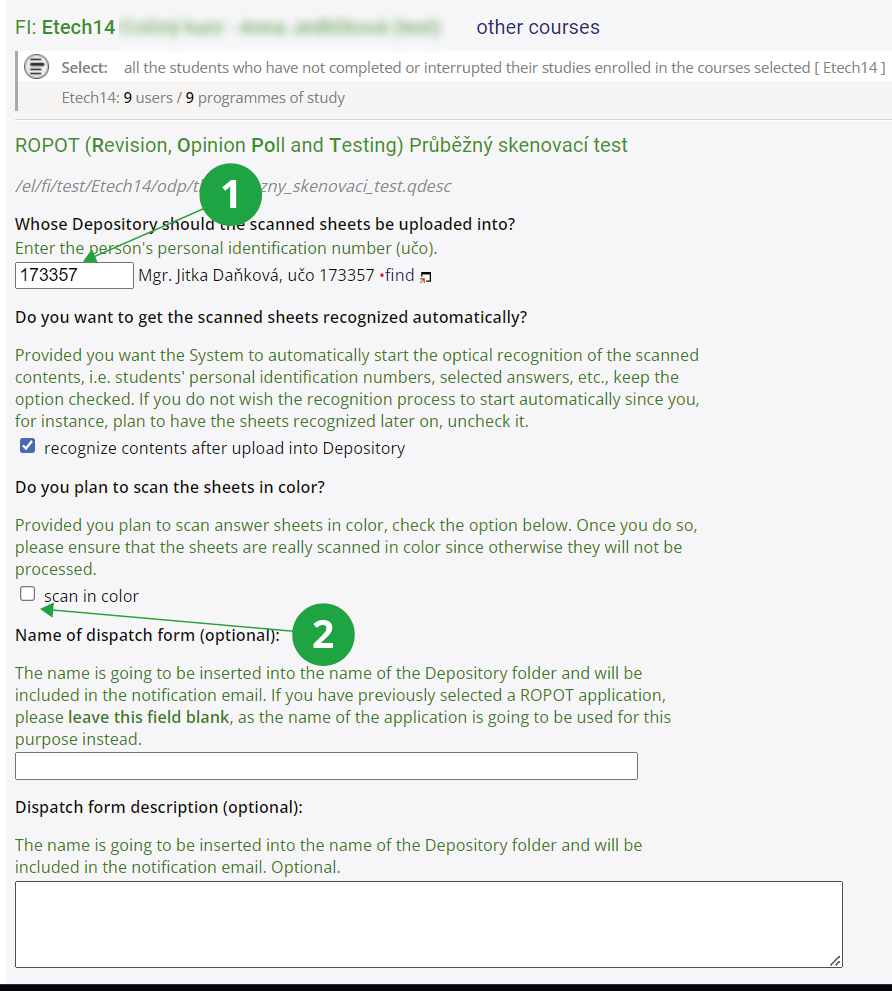
Scannable test (multiple choice)
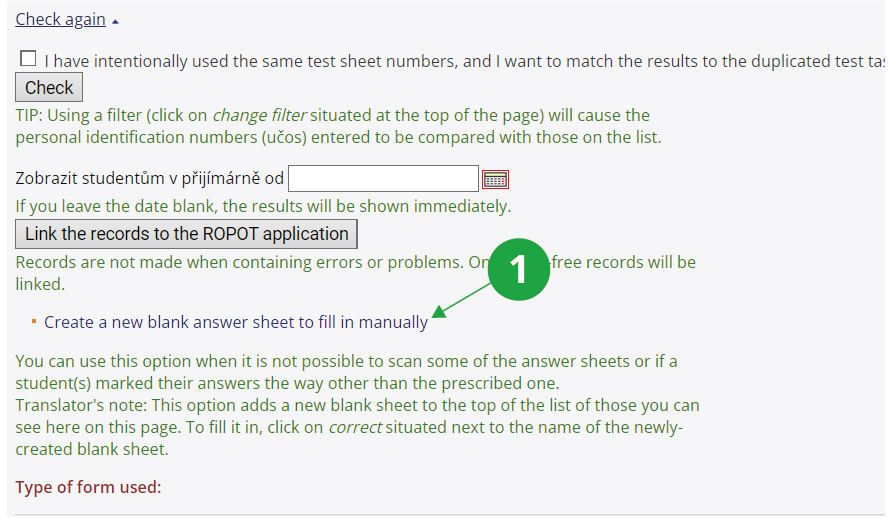
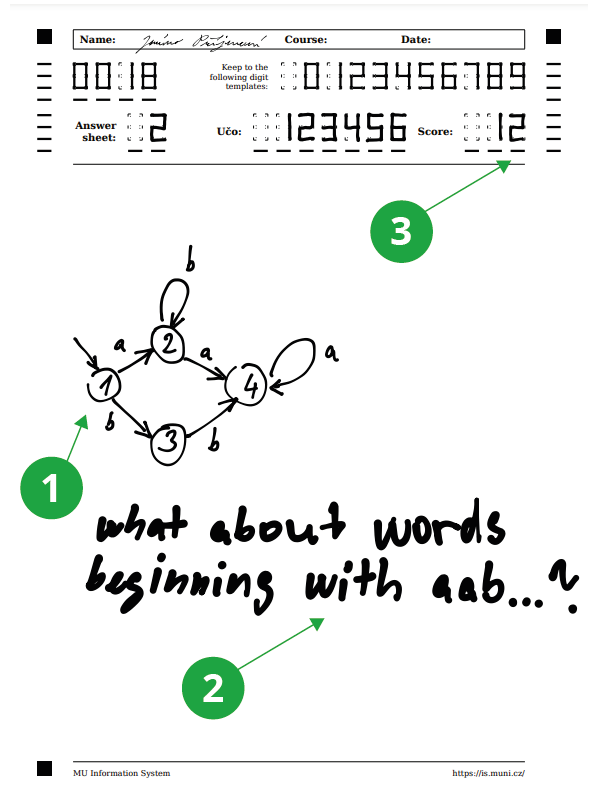
Creating a printable test and then completing it on paper. The results are entered into a notebook after scanning the submitted paper. The scans are also stored in the student's Retrieval Box for review. Please note: the contents of the short answer sheet are entered in full, including the assignment, when uploading to the student's retrieval box.
Scannable handwritten text and scores
A very specific mode – the printed assignment with a free space is filled in manually by the student and the teacher manually corrects and enters the points. After scanning, the number of points is entered into a notebook and the corrected paper is available in the Retrieval Box.
First, you need to create a question set and then use the ROPOT description to define the behavior of the ROPOT (when the student can answer, whether they can see the correct answers, etc.). Only the ROPOT description will allow students to answer the questions, a question set alone is not enough.
After creating the ROPOT, you can see
how students will see the test. Via
The Information system Teacher [course selection] (ROPOTs and Quizzes) Work with ROPOT
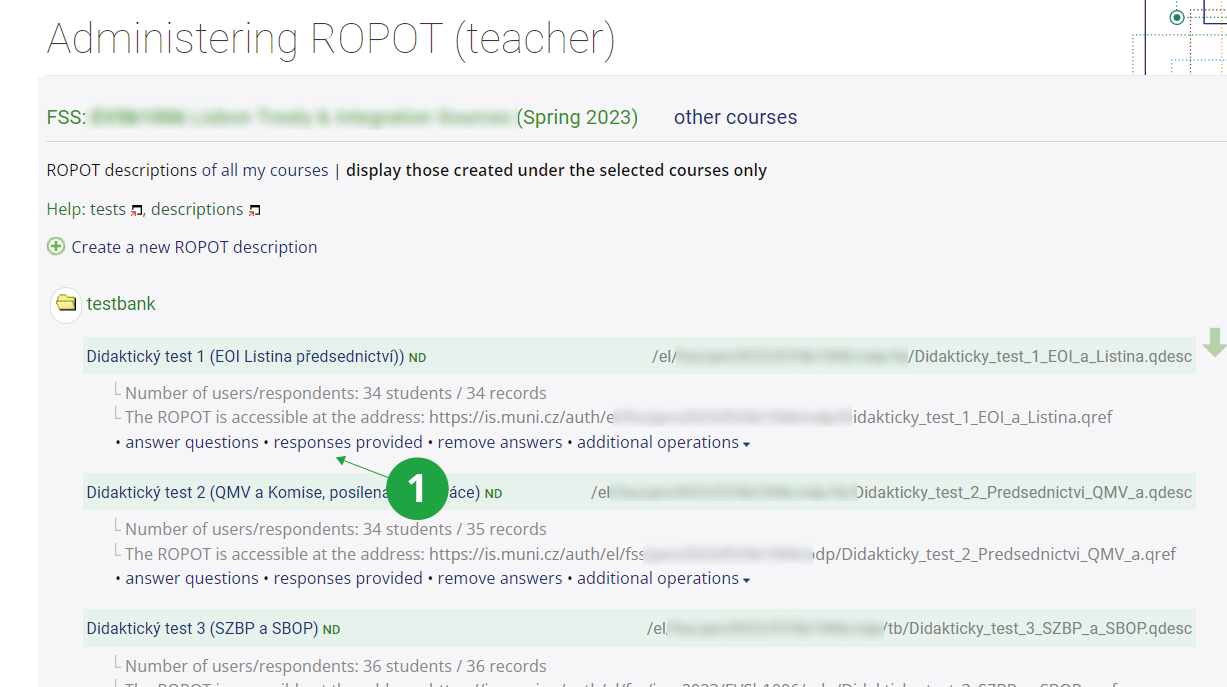
enter the Administering ROPOT page and click on "answer questions"under the name of the ROPOT. From the same page, you can also access the students' answers, this time via the
"responses provided" link.
If you want to try how students will see the ROPOT, try to practice answering it using
The Information system Teacher [course selection] (ROPOTs and Quizzes) Work with ROPOT Answer questions (under the appropriate ROPOT description) or Fill in a ROPOT form (among the links at the bottom of the page)
After submitting the test, you can view how you completed it by clicking on the "view" link. Please note that the link will only appear if you have enabled access to the view in the ROPOT description. This also applies to other settings, such as being able to answer the same form repeatedly or setting up new questions. If you have enabled the answer display, you will see the correct and incorrect answers marked in green and red, the correct solution listed in green, and the number of points scored for each question, if applicable.
Student answers can be accessed via Responses application:
The Information system Teacher [course selection] (ROPOTs and Quizzes) Work with ROPOT responses provided (under the appropriate answer sheet) or Responses (among the links at the bottom of the page)
The Answers application displays all responses and person answering operations for the selected ROPOT. Students' answers can also be evaluated here (with points or verbal comments).
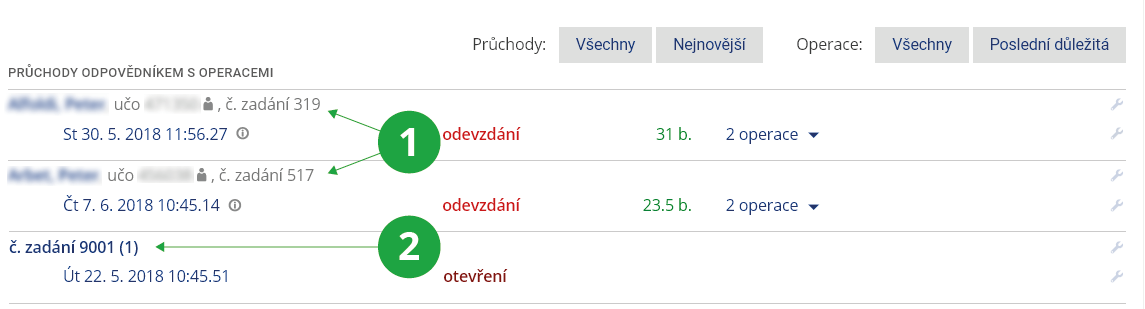
On the page listing the respondents and their responses you can find all the information about who worked with the ROPOT, when and how. A list of respondents is available, which can be restricted and sorted as required, and batch operations can be performed on the list of respondents and their responses.
1 For each ROPOT you can view the students' answers.
The Answers application records all the passes and operations during the answering process of all the persons recorded for a particular ROPOT, and displays the students' answers in the course in priority. The application can be launched via:
The Information system Teacher [course selection] (ROPOTs and Quizzes) Work with ROPOT responses provided (under the appropriate answer sheet) or Responses (among the links at the bottom of the page)
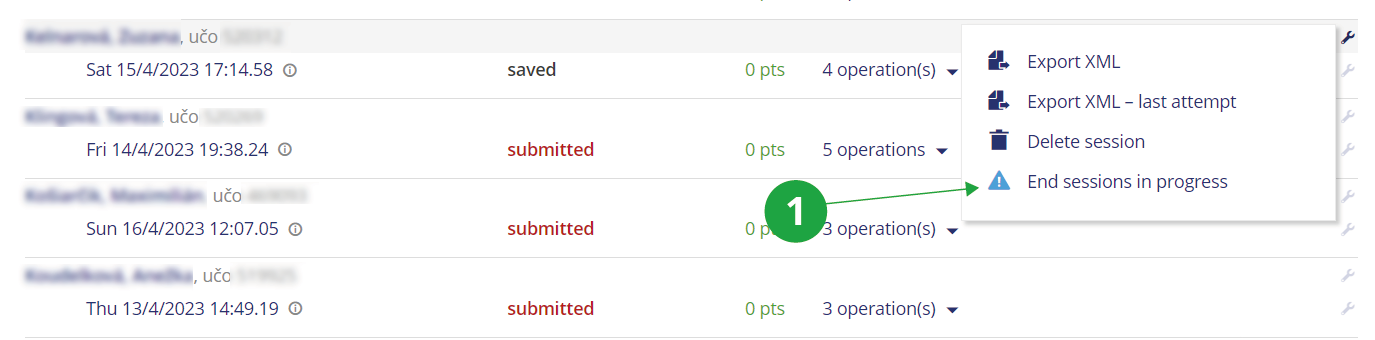
For the course teacher, the application allows to filter these ROPOT sessions using the options given at the top of the page, to delete sessions, to renew sessions, to force the submission of a pending sessions and last but not least to view the student's answers after submission or at different stages of filling in the ROPOT.
In addition, the application allows you to manually rate the student's answers with points or verbal comments.
Answers can also be exported or checked for plagiarism (see Help Are the answers in the ROPOTs also checked?).
1 The instructor can choose to see only records of a limited group of students (e.g. his/her seminar group, etc.), or all records registered for the selected answer sheet will be displayed.
2 Limit the list by type of records (e.g. all records, matching specified by the teacher, unassigned assignments, application numbers, etc.).
3 Order the records and display additional information (e.g. about the manual assessment entered).
4 Setting of batch operations (only those operations that can be performed on the ROPOT are always displayed).
5 Under the assembly key icon, a menu of options for the pass will be displayed on that row (options vary for the whole record,
the whole pass, just a specific operation).
6 Attention to a work in progress pass and the option to end it, for all responders or individually.
7 Warning of a mismatch in the number of operations performed, a passage reopened or a passage not yet answered.
8 Date and time of the last listed operation, typically a submission, also a link to view responses/enter manual evaluation if set.
9 List of matching operations in the sessionas; clicking on the date and time of the operation will display a tour of responses at the time of that operation.
The display of options in the Answers app varies slightly based on, among other things, the mode of the answerer, its settings, or whether the answerer is allowed to have more than one pass. For individual records, sessions or operations, only those options that are relevant at the time, i.e. can be performed, are offered.
Note
The application works with the selection of students that the teacher has chosen when entering the Teacher agenda
(active students of the course or perhaps just one seminar group). If the teacher needs to see all records for a given ROPOT,
he/she must select "Display: All records". Then he/she will also see test passes of other teachers of the course or unassigned scan assignments.
Tip: Terminology of the page with responses provided by students
ROPOT administrator
This is the person who sets up the ROPOT and performs other operations on it. Typically, this is the course teacher or a person authorized by the course teacher with access to the Teacher's Notebook. Anyone can be the administrator of a non-course ROPOT.
The Record
By a record is meant a user who responds a ROPOT (a respondent, typically student) or a compiled test sheet not linked any to student yet.
Session
The user creates the session by clicking on the "Launch a new ROPOT application" button, the system creates the assignment and starts the test. For each session, the date, time, and all operations made during a session are recorded.
Operations
The operation means opening, saving, submitting, viewing by respondent and changing the marking of right/wrong answers in the evaluation section by teacher. The system records all operations that are performed on the ROPOT session.
Session in progress
If a respondent launches the ROPOT, fills in at least one answer and saves it using “Save and continue” button, and does not use the "Submit" button, this session is marked as a session in progress. It is desirable that the sessions do not remain in progress, as only after submission will the test be evaluated (and the result written in the notebook, if required). A turquoise icon with an exclamation mark indicates a session in progress. An in-progress session can be ended either by the respondent submitting the test or by the teacher changing the save to submit in the session (for a tool to end a work-in-progress session, see the handling key icon – i. e. “Edit session” button).
Mismatch in number of started sessions, session reopened, session still unanswered
This is supplementary information, especially for cases where a student reports difficulty working with the answer key. They are notifications
of a non-standard number or order of some operations. Mismatch in the number of started sessions highlights situations where there has been a mismatch
in the number of times the ROPOT has been opened and submitted or vice versa. Re-opened session highlights a situation where the respondent has already
submitted their answers at least once in the sessione, but then returned to the test again by clicking on 'Re-answer' and has not yet made any
changes to their answers since then. For the passage with no answers so far, the answerer has made a new assignment but has not filled in any answers.
Opened
The date and time of launching the ROPOT session by respondent is recorded accordingly. For a compiled test sheet, it indicates the date and time the compiled test sheet was created (typically a compiled test sheet for scannable exam).
Saved
It records the date and time when the respondent used the "Save and Continue" button or when the continuous save occurred automatically.
Submitted
The date and time when the respondent clicked on the "Submit" button and the ROPOT session was evaluated, or when the session was automatically submitted at the end of the time limit for taking the test, is recorded
Viewed
The date and time at which the respondent viewed their answers is recorded. The ability to view responses and possibly see which ones are correct is set by the ROPOT administrator.
Correction
Record the date and time when the teacher made a change of the marking of right/wrong answers in the evaluation section of the answers (for at least one question, the teacher changed which answer was correct and the points were recalculated).
Last important operation
It is either opened, saved or submitted. It is marked with a black horizontal arrow in the list of operations next to the session.
The Information system Teacher [course selection] (ROPOTs and Quizzes) Work with ROPOT Responses provided (under the appropriate ROPOT description) or Responses (among the links at the bottom of the page)
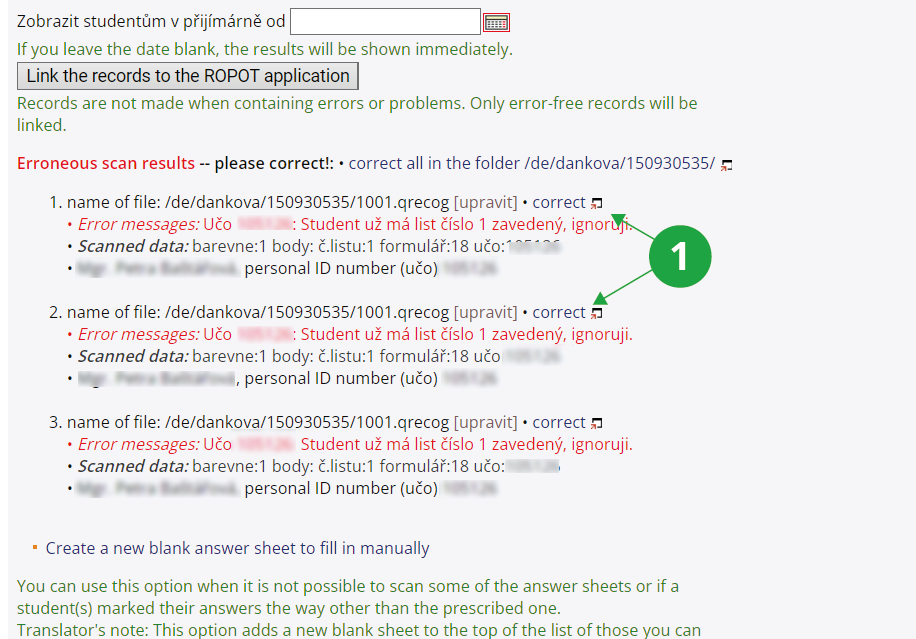
also find the responses of students who wrote the tests on scannable answer sheets. In addition, each student's test sheet number information is included. If you also need to see test sheets that could not be linked to a specific student, select "View: All Records".
1 Responses from students who wrote the exam with scannable answer sheets, test sheet number is also given.
2 Unlinked scannable test sheets.
If students have handwritten a paper on a scannable answer sheet and after correcting it they want to discuss the marking of their paper with you, for example, you can view their paper using the application
The Information system Teacher [course selection] (ROPOTs and Quizzes) Work with ROPOT Browse answer sheets
Responses provided by student are automatically removed five years after the session have been launched.
1 The file with the removed responses in the file manager.
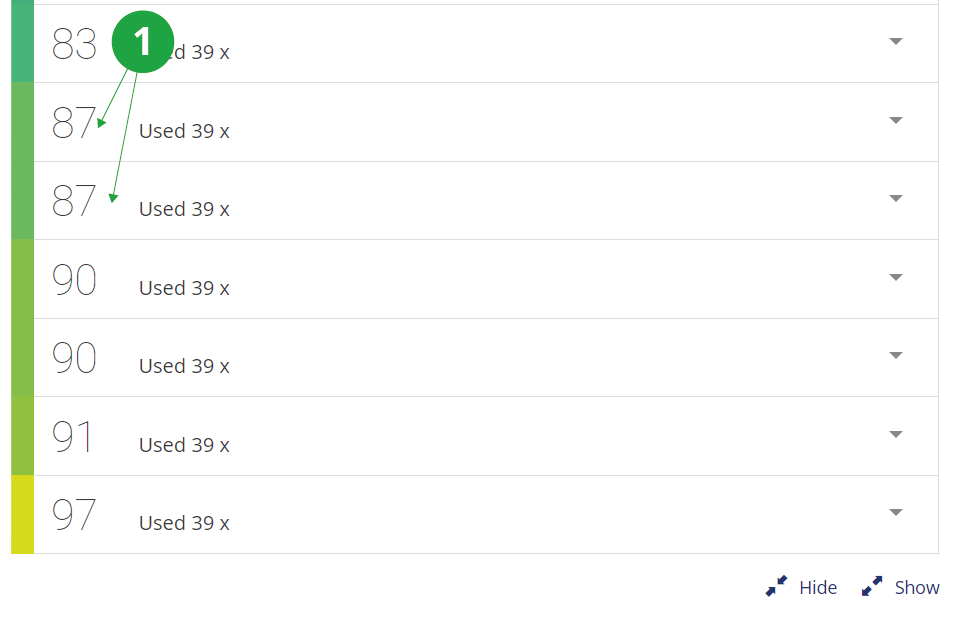
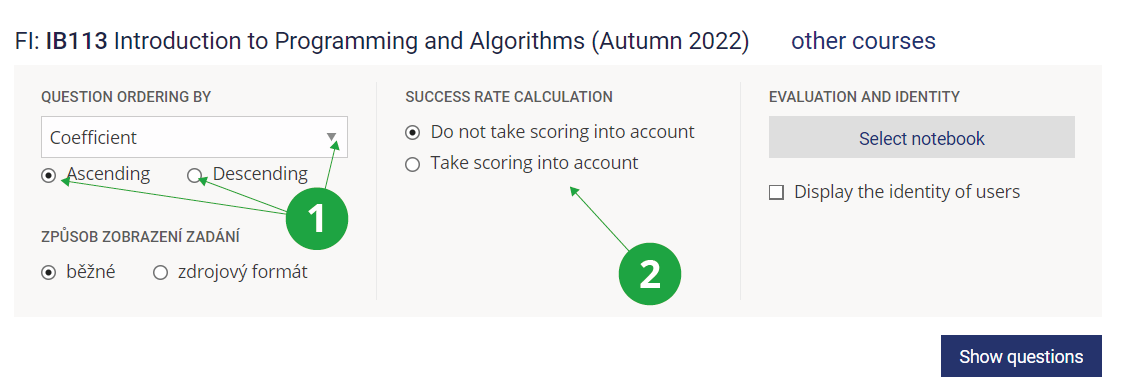
Using the Difficulty level application, you can get a summary of the answers to each question in the ROPOT and see which questions are most difficult for students. You can find the application via
The Information system Teacher [course selection] (ROPOTs and Quizzes) Work with ROPOT Difficulty level (among the links at the bottom of the page)
1 Each question has a difficulty coefficient.
A table will be displayed showing the so-called difficulty coefficient. The difficulty factor is the ratio of correct answers to all answers (including unanswered questions). The lower the number, the more students made mistakes.
You can also sort the questions by how they are placed in the set. The calculation of the coefficient may take into account the scoring of the ROPOT. For example, in the case of tests with negative scores for wrong answers, multiple-choice questions will be more comparable.
You can also view the identity of the respondents and see how the selected students answered each question.
1 Set the order of the questions in Difficulty level.
2 Change if you need to take the ROPOT scoring into account when calculating the difficulty factor.
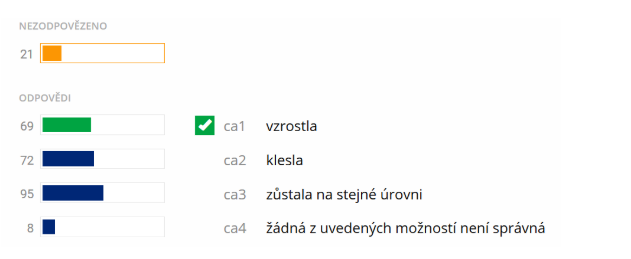
At first glance, you can see the distribution of students' answers to the question. The prevalence of wrong answers may be an impulse to revise the wording of the question, or it may suggest that the material needs to be discussed more with students.
1 Graph of the distribution of student responses.
If the wrong option hasn't fooled anyone, perhaps it is unnecessary in the question or another one can be devised. This is a so-called non-functional distractor.
1 Non-functioning distractors are highlighted in the Difficulty level application.
Sometimes it may happen that a student's connection breaks down while answering (e.g. when answering from home). You may also want to change the assignment and ask students to retake the test. In this case, you must first cancel the students' answers via
The Information system Teacher [course selection] (ROPOTs and Quizzes) Work with ROPOT remove answers (under the relevant ROPOT) or Remove answers (among the links at the bottom of the page)
You can cancel all responses from all persons or only the responses of an individual.
You can cancel responses especially if you have set "no" or "Yes, they should, but it is always the same form (same questions) that should be offered to them."
in the section dedicated to repetitive work with the ROPOT in the description of the ROPOT form. If it is a practice ROPOT with the setting "Yes, they should and some other questions should be offered to them next time they work with the ROPOT application.", the student simply launches the ROPOT creating a new session and the problem is solved.
Cancelled answers are not definitively lost. You can restore them using
The Information system Teacher [course selection] (ROPOTs and Quizzes) Work with ROPOT restore (under the appropriate ROPOT) or Restore discarded answers (among the links at the bottom of the page)
Also remind students to use the "Save and continue" button. In the event of a power outage or disconnection, it is then possible to return to a partially completed test and complete it.
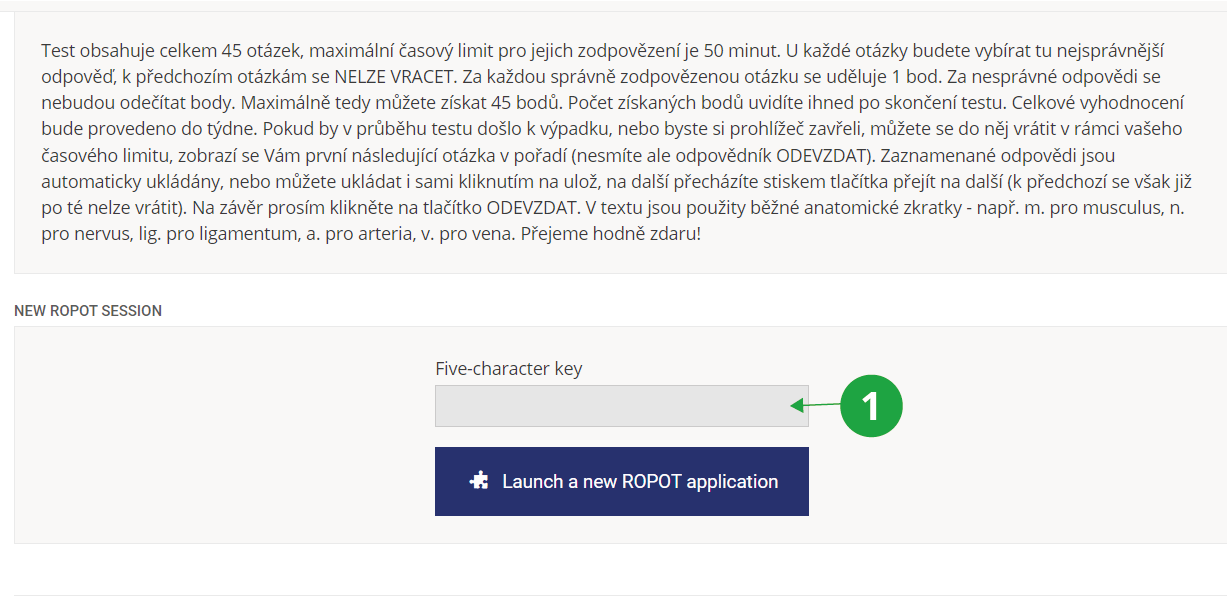
After saving the ROPOT description, use the application
The Information system Teacher [course selection] (ROPOTs and Quizzes) Work with ROPOT Fill in a ROPOT form
fill in the form and submit it for evaluation. This is also how the student works with the ROPOT. Depending on what you have entered in the description, you can answer repeatedly or once, and you can have the same form over and over or new questions each time. A single launching of a blank form (selecting questions and assembling them into a page) is called a
ROPOT session. In the application
The Information system Teacher [course selection] (ROPOTs and Quizzes) Work with ROPOT Responses
you can see who was working with the ROPOT.
If the ROPOT description is set to
"Should students be allowed to access this ROPOT application repeatedly? Yes, they should, but it is always the same form (same questions) that should be offered to them."
you can still see the original session when you select "Work with the question form again" (in the ROPOT application).
Note
If you are changing a question set (editing text, adding a question, ...) and want to see the updated ROPOT, delete your original sessions using the
The Information system Teacher [course selection] (ROPOTs and Quizzes) Work with ROPOT Remove answers
If the ROPOT description is set to
" Should students be allowed to access this ROPOT application repeatedly? Yes, they should and some other questions should be offered to them next time they work with the ROPOT application."
you don't have to cancel your answers when trying the behaviour of the ROPOT, you can already create new sessions with the current questions.
The agenda can be used for testing in the computer classroom. Students fill in a form in the IS, which itself corrects the exam. If the test includes free-form answers (which the system cannot correct automatically), the teacher will correct them manually later. The test is not accessible before the start of the exam.
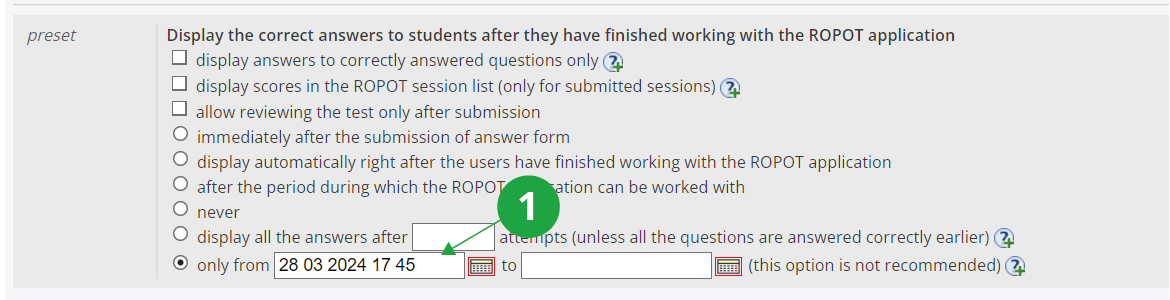
You can limit the time for taking the test, ither by the total number of minutes or by setting the day and hour from-to which the ROPOT can be worked with, or a combination of both (see above).
If you limit the time for working with the ROPOT, the answers will be automatically submitted after the time limit expires. Therefore, the answers of students who did not save the test using the "Submit" button are not lost.
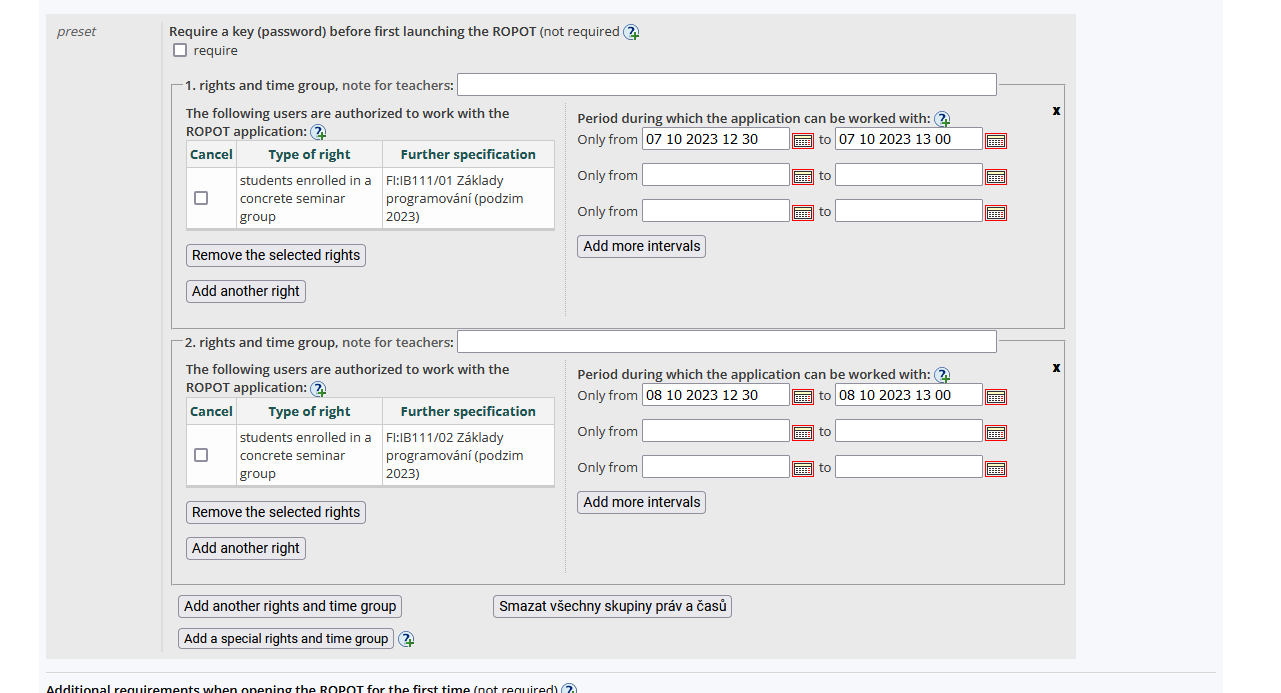
Organization of ROPOTs for multiple examination dates
Make these decisions:
Do I want to use one assignment for multiple examination dates?
Do I want the student to not be able to view the assignment questions in any way after submitting the test?
Depending on the level of "uniqueness" you require, you need to create as many ROPOTs as you need. The usual procedures are:
Each examination date has a unique assignment stored in a separate question set, the test questions are mixed (each student sees them in a different order)
For example, there are three different question sets, each set to be used on multiple examination dates.
There is only one assignment = question set.
How many ROPOTs:
Access to a single ROPOT can be "given and taken" over time. It can be made accesible on Mondays 8.00-9.00, then 14.00-15.00, etc., as the examination dates are organized. A student who has already taken the test cannot change the answers, but can look at the wording of the questions should he/she reopen the ROPOT when the next examination date is in progress.
This can be avoided if you restrict access to the ROPOT to a specific part of the computer network (the classroom – LVT department will help), so that it is not freely accessible from the internet. If you cannot use this restriction and do not want students to be able to return to the assignment, create a separate ROPOT description for each examination date.
Security mechanisms
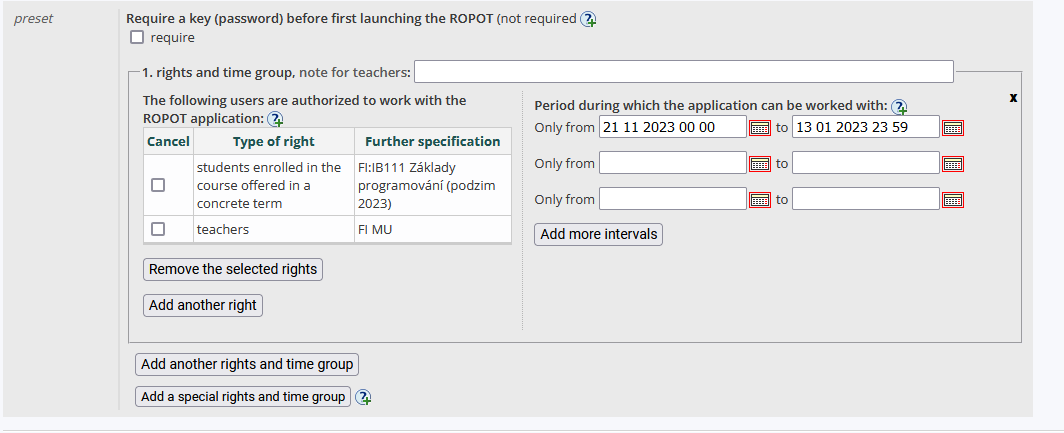
Find out from the technical support of the computer room the range of addresses of the computer network of the classroom (the so-called IP addresses) and enter them in the description of the ROPOT– the section "On which computers should the students be allowed to work with the ROPOT application?". The student can also give you the address of the computer individually, it can be found under
Information system System Remote client IP address
If you don't want or can't find out the IP addresses, you can do the following:
Use the regular examination dates application to divide students into examination dates, set up "log in" and "log out" dates well before the exam date so that someone can't log in at the last minute and open the test (view the test questions).
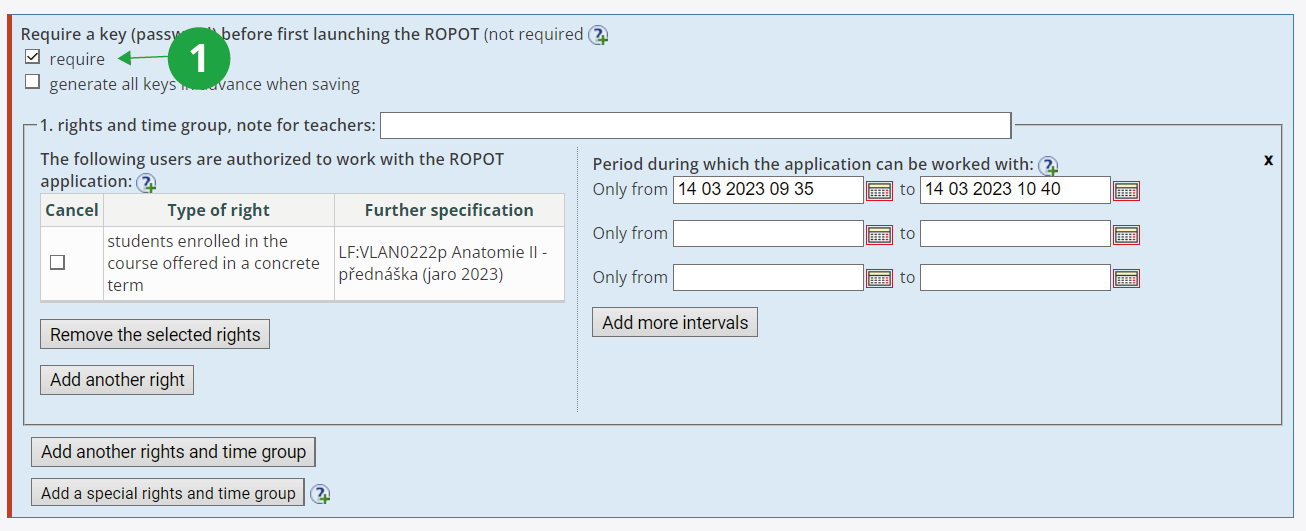
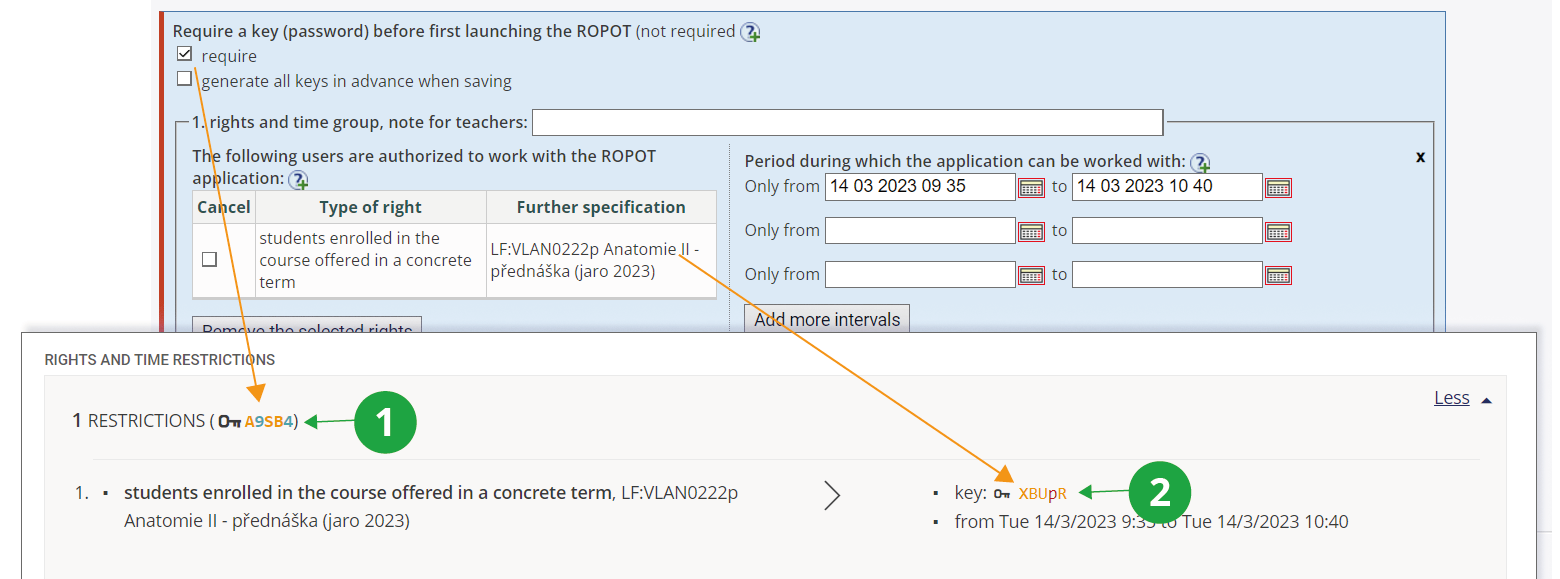
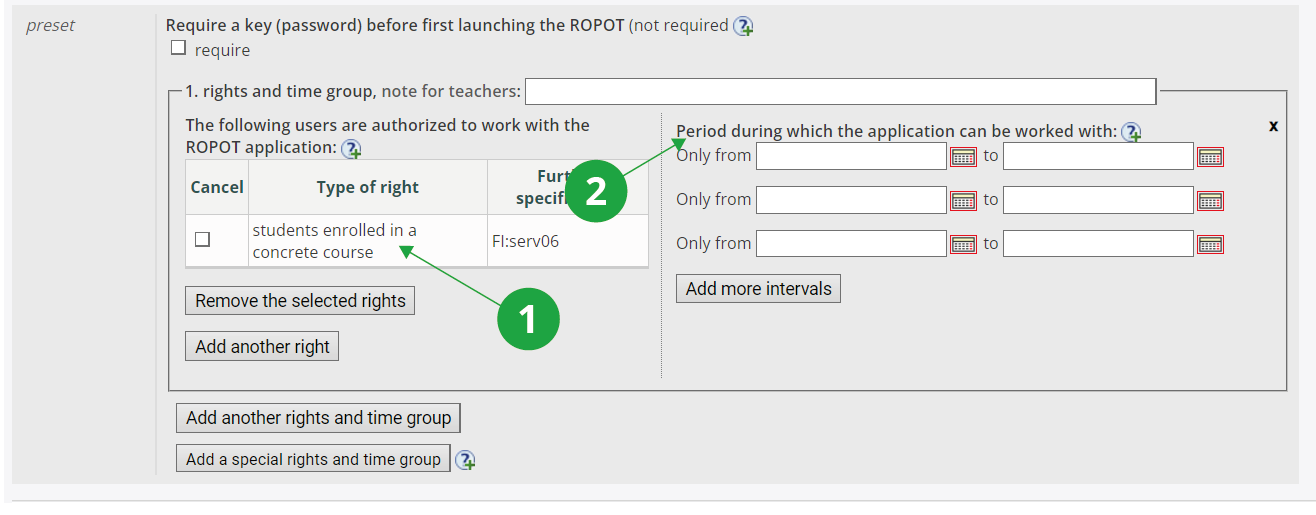
In the description of the ROPOT, under "Rights and time group", specify that only those with a reservation on a specific examination date can open it.
At the beginning of the exam, check attendance and remove those students who are absent from the examination date reservation (so that they do not open the ROPOT from the internet during the exam).
You can also use other security mechanisms:
You can specify in the ROPOT description that a wide coloured column should appear on the left side of the screen when the ROPOT is launched.
1 A coloured column in the ROPOT as part of the security measures.
It allows you to remotely check that everyone is working with the correct ROPOT only. You can choose the colour of the column to distinguish e.g. individual test dates.
If you have set up the display of the left column (see the previous paragraph), the identity of the respondent, i.e. the name, učo and photo of the person logged in, will also be displayed. This will make it easier to check the identity of the respondent.
You can contact the faculty CIT to ask if it would be possible to disable access to other sites than
is.ambis.cz.
What else is good to know...
The student cannot unknowingly open the ROPOT twice (e.g. by double-clicking). If such a situation occurs, MU IS will ask the student whether he/she really wants to open the ROPOT a second time. The same question will be asked if the student wants to open the unsaved test in two browser windows or panels. Whether he/she will be able to do this depends on the setting of the parameters in the ROPOT description,
but the ROPOT cannot be reopened and the answers cannot be continued/changed if the setting is "no (once you open the ROPOT, you cannot reopen the ROPOT sometime later and change the answers)"..
Students have a "Save and continue" button to prevent inconveniences caused by power outages, etc. If you set in the ROPOT description for the test to have multiple pages, “save and continue” is done automatically when a respondent moves between pages. It also occurs when a respondent presses the "Enter" key. However, only the final submission, is the decisive moment for
the evaluation of the test and the allocation of points..
The system records all operations that have been performed (time of launching the ROPOT, computer address, answers chosen, time of submission, viewing the answers, etc.). In the event of problems or suspected malpractice, these data can be found.
If a student accidentally submits a session for evaluation, they typically cannot return to the test. A possible solution is to remove his/hers answers with the application
Information system Teacher [course selection] Work with ROPOT Remove answers
Student responses to a particular ROPOT can be exported to different formats and further processed freely. Use the application in the Teacher's Notebook
Information System Teacher [course selection] Work with ROPOT Export answers (among the links at the bottom of the page)
Select the ROPOT from which you want to export the answers. In the application, you have the possibility to modify the export properties (form of exported questions and options, answers, sessions, etc.), select the exported file format and encoding. The exported answers can be output to the screen or printed, this option is mainly used to check the exported data. For further processing of the answers, use the export to a text file or formats designed for processing in Excel.
You can view the students' answers in XML format, which is suitable for further processing by a programmer.
You can retrieve them using
Information System Teacher [course selection] Work with ROPOT XML (among the links at the bottom of the page)
Download them to your computer and give them to the programmer.
Student responses in the answer sheet can also be exported to a pdf file and then printed. It can only export ROPOTs where questions of type :a (open answer), :r (select one answer), :c (select multiple correct answers) are used.
It is available under the link
Information System Teacher [course selection] Work with ROPOT PDF
The exported pdf contains a list of students who have completed the ROPOT. Student responses always start on a new page. The pdf can be used to archive the answers, for example, for state final exams or admissions.
The a_texty folder is created if you have ROPOTs with free-form answers. Student answers are stored there in text format.
IS AMBIS needs these files to search for plagiarism, but they are not important for a normal user.
Yes, you can. The ROPOT can also be launched in unauthenticated mode, i.e. without logging into the IS AMBIS. Just add the right "anyone on the Internet" in the section "Rights and time group" when editing the description of the ROPOT. Anyone can then launch the ROPOT via the unauthenticated link to the *.qref file.
Note
They must enter a "world address" starting with „https://is.ambis.cz/“.
With unauthenticated access, the identity of the respondent cannot be uniquely determined because individual accesses are identified only by an access number. This number, which is displayed in the list of answers instead of the name and username, is stored in the browser by means of cookies and allows, for example, to retake the test from the same computer and account and to view the results of the previous session. For unauthenticated access it is therefore necessary to have cookies enabled in the browser. Access via an unauthenticated link from another browser/computer means a completely new launch of the ROPOT.
Points from unauthenticated accesses cannot be recorded in the notebook.
ROPOTs with non-authenticated access may be useful for various surveys and polls (e.g. during open days).
The statistics of the scores and the number of completed tests can be found in the usual way by selecting
Information System Teacher [course selection] Work with ROPOT Responses
or through the Difficulty level if it is prepared within the course (which is not necessary, it can be placed outside the Study Materials, e.g. in the Document Server).
Yes. In the description of the ROPOT, you can assign the right to work with the ROPOT using Rights and time group setting to applicants for study (i.e. persons who have submitted an application for study) or to sit entrance examination, where you specify a specific date. These persons will be identified by an application number.
The IS AMBIS allows you to easily obtain a list of persons (who have passed the test) with the number of points achieved and the time of completing the test using the "simple export" function. The function can be accessed using
Information System Teacher [course selection] Work with ROPOT Responses Print and Export Simple export
Here you can choose whether you just want to print the list to the screen or download it in Excel and Word format. The list contains all the people who have worked with the ROPOT, including the respondents authenticated via application number and records of unauthenticated accesses (instead of the name, the record is indicated by the access number).
Simple export is useful for obtaining scores from unauthenticated accesses to the ROPOT, or when using the ROPOT outside of a specific course.
Use the "Export Questions for Drill" feature if you want to allow students to practice the material using Drill application. The export can be found in the application:
Information System Teacher [course selection] Work with ROPOT Export Questions for Drill
Use the form provided to find the question set you want to export and confirm with the "Use" button.
The export application allows you to export the questions including all options in CSV format, which you then use as a data file for importing into the drill. Exporting for drill is only suitable for :r and :c questions where students do not need to know the exact answer but are able to select it from the options provided.
We recommend that you use the drill export only for questions that contain some factual knowledge. You can learn more about drill application in the Help
For the transfer of ROPOTs, as well as other materials in the course, there is an application for copying materials:
Information System Teacher [course selection] Sharing and copying study materials Copy Study Materials
Here, select the course and semester from which you want to copy the ROPOTs and any other files and click on "Copy".
In addition to actually copying the materials, this application also sets access rights and access rights in the ROPOTs for the target semester.
The term of question set refers to a text file containing questions and answers to these. It usually has the .qdefx suffix.
The Information System allows you to create question sets, which may comprise questions of numerous types, with the aid of special forms, for further information, please see the help section:
The Information system Help (Elearning) ROPOT question types
Questions of the types more
complicated than those exemplified cannot be entered via any available form.
If you decide to enter them by yourself, please ensure that you take the
prescribed steps (only in Czech).
The teacher gets to the page for working with sets of questions via
The Information system Teacher [selected course] ROPOTs and Quizzes Question sets
A set can be created by clicking on "Create a new question set", you need to enter the name of the set and find the folder where the set will be placed. By default, the "testbank" folder is used, which is inaccessible to students.
After saving the form, you can go to the set of questions using the button "Enter questions" and start filling it out. The questions in the question set can be completed in three ways:
Questions can be entered using the form. Open the form by clicking on individual letters. Each letter represents one type of question (you can find out which one by hovering your mouse over the letter).
The whole set or individual questions can be edited with a text editor.
The so-called simplified entry of questions can be used. This allows many questions to be inserted by once. It can only be used for certain types of questions.
To go to the page allowing you to work with question sets, please use the following path:
The Information system Teacher [choosen course] ROPOTs and Quizzes Question Sets
The application allows you to open forms designed for posting individual types of questions by clicking on corresponding letters. By moving a cursor over a letter,
you will cause the information on the selected question type to be displayed.
1 Choice of question type.
Each form is accompanied by instructions on how it should be filled in. To display these,
please click on the red question mark situated near the form. To save the contents of the form, click on “Save”. Provided you want to add
some more questions to your set, continue repeating the same procedure until you are done.
Any question you have entered into the System before can be edited any time later on.
If you decide to do so, you have a choice of two editing options - “using a form” or “using a text editor”.
The references to these can be found in the green section of each question. However, the users are recommended to choose the text editor option
only if they are familiar with the tags utilized in this particular mode.
1 Links to edit the question.
After entering your questions, you might want to check them by “answering” them and clicking on the “Check the answers” button.
This will cause the correct answers you have provided to be marked green and the incorrect ones red.
While checking your answers, you may also want to enable one of the options available at the bottom of the page
(e.g. “make the evaluation case-sensitive”, “make the evaluation diacritics-sensitive”, etc.).
Nevertheless, if you intend to penalize your students for not keeping to the required case or diacritics,
you must enable these options in the ROPOT description section.
Note
Enabling them for checking purposes
in the application designed for entering your questions has absolutely no effect on how your students' answers will be
evaluated later on!
Using the forms, you can enter the following types of questions (the list below contains letters used for the individual types followed by their names suggesting the purposes they have
been designed for):
r: Select the answer you consider correct (one per question)
c: Select all the alternatives you consider correct (several per question)
t: Provide missing information or translate
m: Put in the right order or match
v: Select the alternative you consider correct from a menu
s: Put the words in the right order
a: Type in an answer
n: Enter a number
b: To display the answer, click on the key icon
You can also choose from some other, more complicated exercises, e.g. those comprising drop-down menus and fields intended for entering
long texts.
For further information on question types, please use the help: Question types.
The forms represent a package of easy-to-use tools you can utilize to automate the process of entering numerous questions
and save yourself the trouble of formatting these.
Using simplified entry of questions, it is possible to mass insert questions of the type :r for choosing exactly one correct answer, type :c for choosing at least one correct answer, type :a for a free text answer and type :h for a free text answer with formatting in the answer.
The Information system Teacher [chosen course] (ROPOTs and Quizzes) Question sets [chosen question set] simplified entry of questions
A modal window will appear where you need to select which type of questions will be inserted in bulk. Depending on the selected type of questions, it is possible to preset explicit points (which will take precedence over implicit points entered in the answer sheet description), a word or character counter, the size of the field for student answers, etc. A detailed explanation of each item is displayed after clicking on the "Help" option .
At any time, the "Upload Demo" operation will display a pattern of how questions of a given type should be entered. For questions of type :r, :c:
the first paragraph/line means the question entry;
the next paragraphs/lines represent the input of the answers;
the line/paragraph with the correct answer is marked with an asterisk;
individual questions are separated by a blank line.
1 Only certain types of questions can be entered simply and en masse.
2 Sample example questions will help you understand how simplified embedding works.
1 The simplified format of the questions is easy to read.
1 The system will take care of the conversion to the question set format.
For questions of type :a, :h:
the first paragraph/line means the question entry;
individual questions are separated by a blank line.
After inserting the questions at the end of the set, you still need to save them. New inserted questions can be viewed via the option "display in a new look" and possibly further edited via the option "definition of a set of test questions".
The notation of mathematical expressions both in the question entry and in the individual answers is entered using LaTeX notation into the <M> tag, which are inserted into the figure.
You can verify the LaTeX code in the application Ladění vstupu pro Tex2img (only in Czech).
1 Sample source code of the question.
You can view the notation of mathematical expressions using LaTeX notation in the
sample ROPOT.
The HTML editor allows you to easily format the question entry (use bold, italics, colors, etc.)
in a similar way as in programs such as MS Word or OpenOffice.org.
Using the "Insert special characters" icon
you can enter some special characters (e.g. &, <, & and more).
You can easily insert an image using the "Image" icon
.
We recommend that you first save the image to the testbank folder (/tb/) and then link it from that folder.
To find this out, please use the application designed for detecting duplicates. The following path will take you to it:
The Information system Teacher [chosen course] ROPOT Question Sets
Locate the question set you want to check for duplicate questions and click on "duplicate". The System will display the list of all the questions
that appear in the set more than once and you will be offered an option of removing these.
Note
Provided some questions contain the same text and only differ in form (e.g. use a different font), the System will not consider them duplicates. Likewise,
if one of two otherwise identical questions contains a typo, the questions will be considered different and thus will not be listed
among the duplicates either. The same applies to the questions of the :r and :c types which contain the same answers listed in different orders.
The Information system Teacher [choose course] ROPOT Question Sets
Locate the question set you want to compare with some other and click on "compare sets". Then, specify the other set for the comparison (you might
want to use the quick selection option) and click on 'Compare sets'. The application will display a page divided into three
sections – one listing the questions only present in the first set, the other listing those only present in the second set, and the last one containing
the questions present in both, i.e. duplicates.
Provided you are trying to enter a table into a ROPOT application using the HTML editor
and it does not display correctly, you should edit the source code of the question (its
text format) containing the table in the plain text editor by inserting the <html> tag
in front of the table. The <html> tag does not require use of any closing tag.
Please ensure that you really enter the tag using the plain text editor (not the HTML one)
since otherwise it would be considered part of the text making up the question.
If you are entering a table into your question using the text editor from scratch, you may, for the sake
of its correct display, want to squeeze the table code into one line only. Another option
is the aforementioned insertion of the <html> tag, which allows you to make
the table code span several lines and thus easier to read (white spaces are ignored).
If the question was used in the ROPOT and the students have the wrong number of points, use the application to correct the answers in
The Information system Teacher [choose course] ROPOT Work with ROPOT Change the marking of right/wrong answers in the evaluation section
Select the description for which you want to fix the error, find the problematic question, and select "Fix Scoring."
If you want to correct more than one question at a time, click the selected questions and click "Edit questions at once".
The format of the answers is the same as when entering questions with a text editor.
For: r questions, you must rewrite the number after: r to the one that indicates the correct answer. Only one can always be marked as correct. In case of incorrect scoring it is necessary
adjust the number of points at the end of the line (after the "ok" mark).
For: c questions, the line with the wrong answer must be rewritten to the correct one or deleted completely. At least one must always be marked as correct.
For other types of questions, the correction is made analogously.
After making changes, press "Recalculate".
The "new total points" option writes the corrected total points for students who answered the corrected question in a notebook.
The "point difference" option creates a block where there will be only a point difference between the number of points before and after the correction.
The recalculation of points is saved correctly in the notebook if the option "yes, only one" is selected in the description of the ROPOT in the section "Results in the notebook".
latest result (from the last answer of the ROPOT)" or the option "yes, last saved results of all passes".
Note
Corrections are not used to fix question sets. It only works as a calculation of points in the notebook, the sets need to be corrected separately.
Yes, there is. Apart from moving and copying questions within the same question set, you can also do so across the sets.
1 Possibilities of moving questions.
You may want to use the option “Move/copy into a new question set” to create a new question set from the questions contained in another
set created before.
To do so, click on the aforementioned button, i.e. “Move/copy into a new question set”, and select those of the questions that you want to
move/copy (you should specify which of the two operations you want the System to perform). Provided you decide on the former, the selected questions
will be removed from the source question set. You will also be prompted to enter a name for the target set and specify the folder you want it
to be stored in. To complete the moving/copying operation, please click on “OK”.
Note
Using the aforementioned technique, you cannot move questions from a question set A to that of B created before! That is, the operation always
creates a brand new question set (the target one)!
Another option you might find useful is that of “Move/copy from another question set”, which allows you to load a question set with all the
questions making up another set.
To do so, click on the “Move/copy from another question set” button and specify the question behind which you want the other set to be
pasted.
Provided you check the remove the source file option, the source question set will be removed. To complete the operation, click on “OK”.
Each time you want to use a colon (':') in your question, remember to enter it as the following string: &# 58;. Please make sure
you do not separate the pound (hash) sign and the number following it with a space since otherwise this would make the System view it as an answer object.
You can add a comment to each individual question that is only visible
to the teacher, in a set of questions or by inspecting the passages through the ROP.
The comment is preceded by a "#" at the beginning of the line.
Once you have created a question set, access the work with ROPOT pages using
The Information system Teacher [course selection] (ROPOTs and Quizzes) Work with ROPOT
Click on "Create a new ROPOT description" and select the mode (exercises, PC-based test, ...) according to the intended use. The choice of mode affects the presetting of less relevant options with typical values for that use. If the course already contains some ROPOT descriptions, you can use one of them as a template and have the new description preset according to it. Just select the description in the list instead of selecting a specific mode.
Finally, press the "Select" button to enter the form to enter the parameters.
Note
The selected mode and its preset values are only indicative, you can set all properties freely. For example, in the PC-based test mode (for real testing) it is not usual to tell students the correct answers, but you can.
The description of the ROPOT has the extension .qdesc (questionnaire description). By default, it is stored in the study materials in the folder ROPOTs/testbank, which students do not have access to. If you want to change this location, click the "Change" button located right at the beginning of the description next to the existing address.
The first three items on the form are the name of the ROPOT, the file name and the question set selection.
Name of the ROPOT application: preferably short and concise; if you wish to save student scores in a notebook, the ROPOT name must be no more than 32 characters.
Name of file: optional, the IS can create it itself.
Question set to be used: to enter a set, click on the "Select from all question sets" button. This will display a list of all available question sets in the course, in which you mark the ones you want to use and confirm by clicking "Use the selected". In case you want to insert a set that is not in the Study Materials, enter its address in the box below the "Select from all question sets" button and click "Use" (the "Find" button will help you find the address).
You can use several question sets in one ROPOT at the same time. The procedure is basically the same as for the first question set.
Note
All the question sets you want to use must have the box in the grey rectangle checked.
You can specify the order in which the questions of each set should be
in succession - write the desired order in the box in front of "set
order" in the grey rectangle.
You can also specify how questions from the set should be selected for the test if you are selecting only a subset of the questions from the set. You can choose either to select them "randomly", to "start from the question", or to take "a block of continuous questions".
Random means that a given number of questions are randomly selected from all questions in the set.
Start from the question means that a given number of questions are selected in the same order as they appear in the set, starting with question X. In the case of non-completion, start with question 1 in the set.
A block of continuous questions means that it is possible to take into account cases where there are always the same number of related questions in a set of "tasks". The number of questions that form a continuous block in the set is entered (the total number of questions in the set must be divisible by this number). Just one randomly selected block of continuous questions from the set is used.
You set the order of the questions in the student's test (in the session) in the next step in "Order of questions in a new session".
Once a student has launched the ROPOT and created a session in it (or
an assignment for a scannable test is created), the assignment is kept
unchanged even if some of the questions are later changed or removed
by the teacher. In the Responses application, it is thus always
possible to see exactly what the questions looked like when the
student answered them.
Tip
Clicking on the "edit questions" link will open the set in a new window in edit mode. This allows you to quickly check what questions the set contains and, if necessary, edit it for the test.
You can enter instructions for using the ROPOT and other information (maximum points, where students can find the results, etc.) in the "ROPOT application instructions" field. Students will be shown these before launching the ROPOT application.
If you do not wish to use the scoring (e. g. for polls or surveys), tick the "do not award any points" box. Otherwise, enter the default number of points awarded for a correctly answered question (ok).
Do you have a score given in the question set? The point values given directly in the question set carry more weight and "override" the ROPOT settings. For example, if you have 1 point in the ROPOT description, but you have two points ("ok 2") for a difficult question in the set, the student will get two points for a correct answer.
Note
Points are awarded for each "ok" separately. So if you have, for example, four answer boxes in one question and the student fills them in correctly,
he/she will get 4 times the number of points indicated in the ROPOT description (if you set "1", 4 points).
If you want to keep the same number of points for all questions regardless of the number of "ok"s, you can do this by specifying a score in the question set. In our case, this would mean specifying 0.25 for each "ok" (ok 0.25). The value can also be specified using a percentage (ok 25%).
You can also set subtraction of points for wrong answers or unanswered questions.
In the ROPOT description, just chose "save/yes" in the "Saving students' scores to a notebook" section in combination with the default score setting. IS AMBIS will automatically create a notebook where the number of points awarded will be saved. Only points are transferred, not, for example, free-form answers.
The "yes" option is further divided into the following options:
"Save only the score of the last ROPOT session (last test)":
this option is mainly used when setting "Yes, they should, but it is always the same form (same questions) that should be offered to them". However, you can also use this option if you are repeatedly setting up new tests, if only the most recent result is important for you and for the students.
"yes, only the best result (of all the ROPOT sessions)":
this option is most often used in combination with "Passed/failed evaluation". The student launches the ROPOT application repeatedly in order to achieve a certain number of points.
"yes, only the worst result (of all the ROPOT sessions)":
used when you want the student to answer only once but have the option to launch the ROPOT application a second time, e.g. in case of a failure. It cannot be used in combination with the "Passed/failed evaluation" option.
"yes, the results last submitted of all the sessions":
only makes sense if you intend to allow students to repeatedly launch new, blank tests (see below). If they take the test once and then just correct the answers (i.e. "update the same form"), the score is always overwritten by the last result.
"yes, all the results submitted of all the sessions":
used in cases where the student passes the ROPOT repeatedly and it is desirable to record the results of all answers concerning one ROPOT. For example, you can keep track of whether the student is continuously improving or deteriorating while completing the test.
"Save only the score of the last ROPOT session (last test) and the scores gained for individual sets":
use this option in exceptional situations where you need to differentiate the points earned from each question set.
1 Preview the options for saving results to notebook.
If you do not want to publish the notebook to students immediately, check the option "do not make the notebook contents available to students yet". For subsequent publication, choose the "Allow students to access the contents of the notebook" option in the notebook settings.
If you do not want the notebook, check "No, do not save the scores to a notebook".
If the student's answers are not saved correctly (for example, due to a connection error), his/her results will not be entered into the notebook. You can use the "End session in progress" option to additionally enter a partial score (if the student used the Save and continue button in the ROPOT). Select
The Information system Teacher [course selection] Work with ROPOT [selected ROPOT] responses provided [selected student] End session in progress
1 For the selected student, you can view the operations via the assembly key icon and select "End session in progress" among them.
To determine the minimum number of points a student must earn and then check if the limit has been met, enter the required number of points in the "a pass score or pass percentage" field in the “Passed/failed evaluation" section. You can also enter the number of points required to pass the test as a percentage. For example, if you enter "75%", the test will be scored as a pass if the student earns 75% or more of the maximum number of points. At the same time, you need to set the results to be written in a notebook (in the "Saving students' scores to a notebook" section, tick "yes, only the best result (of all the ROPOT sessions").
If a student achieves the minimum score in one of the ROPOT sessions, a *1 will appear in the notebook, which in this case means "passed", not the number of points obtained. If the student does not achieve the minimum number of points, the student will have a *0 in the notebook.
Expressing the achievement of the minimum score in terms of ones and zeros makes it easy to see how many ROPOTs a student has completed by adding up the notebooks.
You can also list students who have or have not achieved the required number of points. When selecting a course in the "Teacher" agenda, also select the filter "other - students" and specifically "selected by their score recorded in a notebook". Then tick the required notebook and enter the number of points. For a listing of students who have passed the ROPOT requirements, this will be "=1" and for a listing of students who have not passed the ROPOT requirements, this will be "=0". The Teacher's notebook with the selected students will be displayed when you click on "Select".
Information about meeting the limit is also displayed to students. At the link to the ROPOT:
The Information system Student Teaching (E-learning) ROPOT (Revision, Opinion Poll and Testing)
is displayed in green "condition met" or in red "condition not met".
Beware of settings in which you combine the percentages set in "Passed/failed evaluation" and any of the options "yes, the results last submitted of all the sessions" or "yes, all the results submitted of all the sessions" in the "Saving students' scores to a notebook" section. With this setting, the sesion is evaluated by taking the maximum points that the responder could have earned as the basis for calculating the percentage and comparing that to the points actually earned.
Example:
a maximum of 10 points can be earned on a test and it has to be completed to at least 80% in order for the student to find "*1 completed" in the notebook, however, the notebook is set to store all the results submitted of all the sessions. A student who has one session in this test has to score at least 8 points to find "*1 pass" in the notebook. A student with two sessions needs to score at least 16 points in total, a student with three sessions must score at least 24 points in total, etc.
They may or may not be. You can specify in the ROPOT description whether you want to mix the order of the questions. There are three options under the setting "The questions should be presented in the following order:"
random – randomly shuffles all questions (if you use multiple question sets and have a set order, questions are randomly shuffled from all of them regardless of the question set order!)
in the same order as that of the question sets they make up, but blended randomly within each of the sets
– used when using multiple sets – randomly shuffle questions from the set while maintaining the question set order (if specified). So first the questions from the first question set will be randomly shuffled in the test, then the questions from the second set will be randomly shuffled, etc.
in the same order as they can be found in the set
–
if you don't use all questions in the question set, the first n questions in the set are selected in the order they are defined in the definition file. If you are using all questions from the question set, they are used in the exact order they appear in the definition file.
If you do not fill in the "position of the set" field, the question sets are used in random order.
You can also decide whether you wish to mix up the order of the options from which students choose the correct answers. Then you don't have to worry about putting the correct answer in the same place every time you create a question.
This also depends on your choice. Access to the correct solution is set in the "Display the correct answers to students after they have finished working with the ROPOT application" section:
display answers to correctly answered questions only: if you tick this option, the correct answers for incorrectly answered questions will not be displayed. The student will only see that he/she answered the question incorrectly. If he/she is allowed another session, he/she can try to answer the question better.
immediately after the submission of answer form:once the student has submitted the test, he/she will be able to see the correct solution and the points obtained by clicking on the "View" button.
display automatically right after the users have finished working with the ROPOT application: immediately after submitting the test, the student will be automatically redirected to the page with the correct solution.
after the period during which the ROPOT application can be worked with: the student will see the correct solution after the period during which the ROPOT can be worked with (see below). Until then, the student will not see the scores for each question. If you still want to tell him/her the overall result, use the transfer of the scores to the notebooks (see above).
never: the student will not see the correct solution, a typical setting for real testing.
It can be enabled to show scores in the session list.
display all the answers after x attempts (unless all the questions are answered correctly earlier): the aim is to make students think more about their possible mistakes in the practice test by preventing them from viewing the correct results immediately after the first attempt. Instead, they have the opportunity to take the test several times, knowing that they did not get everything right. If an option is set that allows multiple different sessions to be generated at the same time, attempts are counted separately for each session generated.
Tip
This number of attempts limits only the access to the answers; the student may do the actual answering in more attempts than is the number entered here.
only from – to (this option is not recommended): the student can only open the correct solution view at the set interval. (If you select the option and do not fill in the values, the student will always view the solution.)
Note
The time limit for displaying the correct answers does not guarantee that students will not take pictures, email them, etc. Therefore, do not use this option if you have a serious interest in keeping the correct results secret.
You can set the possibility to work with the ROPOT repeatedly in the section "Should students be allowed to access this ROPOT application repeatedly?":
maximum number of times the test can be evaluated (if no number is provided, no limit is applied): the number of test evaluations does not include saves (using “save and continue” button), because these do not result in an evaluation of the test. The test is scored only after it is submitted.
If you need to count the number of times the ROPOT is launched instead of the number of times it is evaluated, tick the option "count the number of times the ROPOT application (test) gets opened (not evaluated)“.
Yes, they should and some other questions should be offered to them next time they work with the ROPOT application: the term "session" means that the student launches a blank, new test. You can set this parameter even if you use all the questions in the question set. In that case, the student will have a clean test in front of him/her again and will have to fill in everything again. If you use only a certain number of questions, the student will work with variations of the test (the selection of questions is random!).
For this option, you can disable the ability to answer sessions already launched.
Yes, they should, but it is always the same form (same questions) that should be offered to them: this means that a student can only take the new test once. After that, he/she can only correct his/her answers, he/she will never have a blank test in front of him/her again.
no (once you open the ROPOT, you cannot reopen the ROPOT sometime later and change the answers): this is a typical option for testing. Re-opening is not possible even before final submission.
No, never (select this option provided the test is to be scanned and you only want to make it available for browsing): this option will not allow the student to lauch the test. It is only used for scanable tests where the tests are written on paper. You can make the view of the tests available in the "Display the correct answers to students after they have finished working with the ROPOT application" section.
You can split the ROPOT into pages. In the description in the "Number of questions per page" section, you can specify how many questions to display on the page (screen) or whether to use a single page for questions from one question set only.
1 Sample of the ROPOT set up to have two questions per page.
Students use buttons to switch between pages. Pagination can also make it difficult to copy from a neighbour's screen. In addition, when moving from one page to another, there is an automatic intermediate save. At the same time, if you check the "do not allow students to return to the previous page" option, the student will not be able to return to previous questions and edit their answers after moving to the next page.
Pages can also be divided by question sets (by selecting "use a single page for questions from one question set only"). One page will then contain continuous blocks of questions that are drawn from one question set.
In the "Rights and times group" section, you need to set who is allowed to work with the ROPOT. Select the desired option via the "Add another right" button and click on "Add the right and make further specifications". If you have selected e.g. "students enrolled in the course offered in a concrete term", you have to confirm the selection once more by clicking "Add the right". If the operation was successful, the message "No access rights have been specified for this ROPOT application yet and thus no one is allowed to work with it at the moment." will disappear and a table with the details of the assigned rights will appear.
It is also possible to specify several different rights within one
time and rights group.
1 A form with two rights entered in one time and rights group.
There are two basic options: specifying the from-to interval and the total number of minutes the ROPOT can be worked with.
Setting the from-to interval (period during which the application can be worked with)
You can select the date and time from and until which the ROPOT can be worked with. You can either enter both data or only one of them. You can set more than one interval for accessing the ROPOT.
Setting the total time for the test
Another option is to specify the total number of minutes that the ROPOT
can be worked with. The time is counted for each person separately from the moment the ROPOT session is first launched. Although the teacher can set the student to return to the ROPOT session and work with it repeatedly, the total time is still counted from the first time the ROPOT session is launched.
Combining the two methods
You can combine both types of time restriction. The limit that expires first will apply. For example, you have a ROPOT where the interval is set to 15:00 to 16:00 and 10 minutes. If a student launches the ROPOT at 15:55, they will only have 5 minutes to answer it. If he/she opens it at 15:00, he/she will have 10 minutes.
The combination of time constraints can be used, for example, in real examinations for grades. For example, you want to give students 30 minutes of time and at the same time you don't want students to lose some of their time due to a delay in the start of the test. In such a situation it is convenient to set the interval e.g. 10:00–11:30 and at the same time the total number of minutes to 30. Each student will have 30 minutes to work and it does not matter whether he/she opens the test at 10:00 or 10:05. Only students who open the test at 11:01 or later would be disadvantaged.
You can do the same in tests designed for practice during the semester. For example, you want students to work with the ROPOT repeatedly over a period of time (e.g., March to May), but only for a limited amount of time (e.g., 20 minutes). In this type of testing, you need to have the parameter "yes, they should and some other questions should be offered to them next time they work with the ROPOT application". This is because if you set it to "yes, they should, but it is always the same form (same questions) that should be offered to them", the time from the first time the ROPOT session is launched is counted. In our case, if the student saved the test after 10 minutes and came back to it after half an hour, he/she would not be able to work with it anymore because the 20 minutes would have passed in the meantime.
Multiple periods during which the ROPOT can be worked with is useful in the case of tests on multiple dates for different groups or seminars within a course or courses using shared study materials. This eliminates the need to create multiple ROPOT descriptions for a single test that is intended for different groups of students. It is also important that all groups of students who are to work with the ROPOT at a given time also have the appropriate rights assigned. For example, you want to give one test to two groups of students. The first examination date is at 10:00, the second at 14:00. In the ROPOT description, you set the date and time in the first line to, for example, 10:00–11:00, and in the second line to 14:00–15:00. Thus, one description is used for two examination dates.
With both types of time constraints, the student can see how much time is left. For the last 5 minutes, a red warning appears on the counter indicating the end of the test and flashes for the last minute.
1 Students see that the time for answering the ROPOT is coming to an end.
Different combinations of times and rights can be set within a single ROPOT description.
For example: a teacher teaches three seminar groups on a different
day each, and he/she wants to set up one ROPOT for all groups so that
only students from a particular seminar group can always launch the
ROPOT on the day the seminar group is taught.
For each seminar group, via the "Add another rights and time group" button, the teacher inserts a section within which he/she sets the right for the specific seminar group and sets the time when the student is allowed to launch the ROPOT session.
This way, the teacher doesn't have to set up three different ROPOTs, but just one.
1 Example of the use of rights and time groups – one seminar group will be able to work with the ROPOT
on one day and another on a different
one.
You can also add a special rights and time group. This option is mainly used to set up ROPOTs for students with special needs (typically used by Teiresias).
If the student does not submit the test within the time limit, the system will do it automatically when the time limit expires. This feature does not need to be set up, but it cannot be cancelled either. In this case, the student just needs to wait for the ROPOT application to notify him/her of the automatic submission with a message in the modal window. It is a good idea to inform students of this fact when taking the test.
In order to avoid cases where a student accidentally fails to submit a test for some reason (e.g. due to a computer crash or internet connection failure), students can use the "Save and continue" feature when completing the ROPOT. In this case, when the ROPOT session is launched again, the student will have their previous responses saved as they were when they last saved continuously. If you want to minimize the risk of a student accidentally losing their answers while completing the ROPOT, it is a good idea to warn students of this feature in advance.
ROPOTs are automatically continuously saved to all students
approximately 10 minutes after the last continuous save (or open
operation).
You make the ROPOT available to students by both assigning rights and creating a link to the ROPOT. If you want to test the ROPOT before publishing it, then do not set the rights yet and save the description using the "Save and make inaccessible to students for now" button.
Only when you decide to publish the ROPOT, proceed via
The Information system Teacher [course selection] (ROPOTs and Quizzes) Work with ROPOT [selected ROPOT]
You have to assign rights in the ROPOT description, it is not enough to set them in the file manager (you don't have to set them there).
The next step is to create a link. The link is a new file with a special type .qref (questionnaire reference). You create it by saving the ROPOT description using the "Save and make accessible" button. The default location of the link is in the Study Materials / ROPOT (Revision, Opinion Poll and Testing) folder. You can change this location by using the "Change" button in the "Making the ROPOT application accessible to students" option by inserting a different address.
Students enrolled in the course also see a link to the ROPOT on their student page where all e-learning related links are collected:
The Information system Student Teaching ROPOT (Revision, Opinion Poll and Testing)
The keys (passwords) for the ROPOT are used to restrict access to the ROPOTs. If a key is required, the ROPOT is closed even for persons who have the right to work with the ROPOT in the given time interval.
1 Option "Require a key (password) before first launching the ROPOT".
The teacher usually uses the key (password) when he/she does not know
exactly when the students will take the ROPOT. Typical use is, for
example, in seminars where ROPOTs are taken every week. The teacher
sets an interval in the ROPOT description for answering throughout the
seminar, but only makes it available to students by handing in the key
(password) when he or she deems it appropriate. This will ensure that
students do not access the ROPOT until instructed to do so.
Universal key and individual keys
Each group of rights and times has its own key generated. Furthermore, one universal key is created. This key unlocks the ROPOT for all those who have the right to work with the ROPOT. A second possible universal key unlocks the ROPOT for all special rights and times groups. Individual keys will always unlock the ROPOT for a given rights and times group.
1 A universal key that unlocks the ROPOT for anyone who has the right to launch it.
2 The key unlocks the ROPOT for anyone who belongs into this rights and
times group.
Universal and individual keys are available to instructors on the "Fill in the ROPOT form" page in the "Rights and Time Restrictions" section:
The Information system Teacher [course selection] (ROPOTs and
Quizzes) Work with ROPOT Fill in the ROPOT form [selected ROPOT] Rights and Time Restrictions section
Tip: Can I set the key freely?
No, it is a generated password. However, the teacher has the option to have a new key (or keys)
generated each time the ROPOT description is saved. Note that the entire key set is always generated.
Where do students insert the keys?
Students have a box to insert a key next to the "Launch the new ROPOT application" button.
1 Once the student has inserted the key, they can start the ROPOT.
Tip: During the time students are answering, I have generated the key set again. Is it a problem?
If the key set is generated again, then nothing changes for students
who have already entered the ROPOT with the original key. Only
students who are just entering the ROPOT will be entering a new key.
Yes, you can. In addition to automatic evaluation (i.e. where the student's answers are evaluated according to pre-set scores), there is also the option of manual evaluation of answers. This mode of evaluation must first be enabled in the ROPOT description.
1 The menu will be expanded after the evaluate manully option has been checked.
Where do I add my manual evaluation to the student's answers?
After answering the ROPOT, student answers are displayed in the Responses application. The "Evaluate manually" button appears in batch operations. The button is also displayed if the option is not set in the ROPOT description and leads to its activation.
1 Evaluate manually option in batch operations.
Manual evaluation can be entered for each question separately by clicking on "Evaluate manually" in the submitted ROPOT session.
1 Individual manual evaluation.
Both text and scores can be entered in the manual evaluation field. Points always has to be marked with an asterisk. The left panel shows the number of points awarded automatically, manually and the total number of points.
If the teacher is working on the evaluation of more than one question, the manual evaluation can be saved in bulk by clicking on "Uložit všechny změny v ručním hodnocení" (i.e. Save all changes in manual evaluation in English).
1Bulk save of changes.
Where the manual evaluation is stored?
Manual evaluations are stored in the notebook. The teacher can choose whether this notebook is published to students immediately, not at all, or only after a certain date. If the teacher does not wish to save the content in the notebook, then the option should be checked there, "Nechci obsah propisovat do poznámkového bloku" (i.e. I don't want to store the content in the notebook in English) The manual evaluation will still be available to the teacher in the Responses application.
The notebook created by the "manual evaluation" mode will be marked as such.
1 Displaying the manual evaluation in the notebook.
In what format is the manual evaluation displayed in the notebook?
Depending on the teacher's preference, the manual evaluation in the notebook will be displayed as full text with points (which are always marked with an asterisk), points only or total sum of points. Manual evaluation can also be listed for each question separately.
The notebook abbreviation option is used when the content is to be included in the custimized addition notebook.
1 Setting the format of the manual evaluation in the ROPOT description.
What effect does the setting of the "Saving students' scores to a notebook" section have on the notebooks created by manual evaluation?
None, these are different notebooks with different content.
:: c :: Select all the alternatives you consider correct (several per question):
Score (points) awarded: Please ensure that at least one of the fields contains “ok” which marks the correct answer.
The score that is to be awarded for an alternative can be entered either in the form of a number, in which case it denotes the number of points awarded/subtracted if the alternative is selected, or that of percentage. Examples:
ok
ok 2
ok 75%
-1
-50%
There should always be a space between ok and the value. As regards the conditions the student must meet in order to score 100 percent, you will be able to specify these later in the ROPOT description section. The student is usually awarded the score (number of points) assigned to the alternative he/she selects. Unless you assign a score to one of the alternatives here, the student is awarded the default one specified in the ROPOT description.
Options – select one of the options below the question:
1 The choice of option affects the way points are added.
only the correct answers – the student is awarded the score assigned to the first alternative marked ok provided he/she only selects all the correct alternatives
scores for all the answers – the student is awarded the scores assigned to the alternatives he/she selects (use negative values for the wrong ones)
all the correct answers – the student is awarded the score assigned to the first alternative marked ok provided he/she selects all the correct alternatives (he/she is awarded the score even if he/she selects some wrong ones)
To format your text, you can use the HTML editor or HTML tags (the former only applies to the question sections).
:: r :: Select the answer you consider correct (one per question):
Score (points) awarded: Please ensure that at least one of the fields contains “ok” which marks the correct answer. The score that is to be awarded for an alternative can be entered either in the form of a number, in which case it denotes the number of points awarded/subtracted if the alternative is selected, or that of percentage. Examples:
ok
ok 2
ok 75%
-1
-50%
There should always be a space between ok and the value.
As regards the conditions the student must meet in order to score 100 percent, you will be able to specify these later in the ROPOT description section. The student is usually awarded the score (number of points) assigned to the alternative he/she selects. Unless you assign a score to one of the alternatives here, the student is awarded the default one specified in the ROPOT description.
To format your text, you can use the HTML editor or HTML tags (the former only applies to the question sections).
text area, in which the student writes a longer answer
:: a :: Type in an answer:
What do you know about hedgehog?
The score (points) awarded cannot be specified via this form.
To format your text, you can use the HTML editor or HTML tags (the former only applies to the question sections).
The default size of the text entry window is 80 columns and 10 rows (the size is in characters). The dimensions can be further manipulated.
You can enable character or word counting in the form and set a limit for typing them. Only for characters, it is possible to block further typing after the limit is exceeded. The student's compliance with the limit can be checked in the ROPOT
responses’ view.
1 Set the response window size and character count limit.
A question of type :h offers the possibility to answer with longer text with the possibility to format this text.
1 Example of a question where the answer is in text with formatting.
The score (points) awarded cannot be specified via this form.
To format your text, you can use the HTML editor or HTML tags (the former only applies to the question sections).
You can use the word or character counter function. The counter in the question is indicative, it does not block the entry of additional characters after the limit is exceeded.
Tip
For example, the question can be used in a ROPOT focused on correct citations, where students must be able to use correct formatting – italics, bolding, etc.
:: t :: Fill in: or Translate:
spring, summer, autumn, ...
Score (points) awarded: Please ensure that at least one of the fields contains “ok” which marks the correct answer. The score that is to be awarded for an alternative can be entered either in the form of a number, in which case it denotes the number of points awarded/subtracted if the alternative is selected, or that of percentage. Examples:
ok
ok 2
ok 75%
-1
-50%
There should always be a space between ok and the value. As regards the conditions the student must meet in order to score 100 percent, you will be able to specify these later in the ROPOT description section. The student is usually awarded the score (number of points) assigned to the alternative he/she selects. Unless you assign a score to one of the alternatives here, the student is awarded the default one specified in the ROPOT description.
To format your text, you can use the HTML editor or HTML tags (the former only applies to the question sections).
The number of underscores after the ":t" determines the length of the input field (i.e., e.g., :t___ creates a field of length three characters).
:: tt :: Enter text into fields:
spring, , autumn,
It is the default number of points that is awarded for every correct answer (item) provided since the scores (points) awarded for the individual answers (items) cannot be specified via this form.
Use the small untitled fields below the question one for entering the correct answers (items). Some more fields for entering additional items can be added to the set with the use of the add button.
Use the large untitled fields below the question one for entering the accompanying text. You can add another text field to the set using the add button.
To remove a space from the beginning or end of text, use #.
To format your text, you can utilize the HTML editor or HTML tags (the former only applies to the question sections).
The number of underscores after the ":tt" character determines the length of the input field
(i.e., e.g., :tt___ creates a field of length three characters).
:: v :: Select the alternative you consider correct from a menu:
Score (points) awarded: Please ensure that at least one of the fields contains “ok”, which marks the correct answer. The score that is to be awarded for an alternative can be entered either in the form of a number, in which case it denotes the number of points awarded/subtracted if the alternative is selected, or that of percentage. Examples:
ok
ok 2
ok 75%
-1
-50%
There should always be a space between ok and the value. As regards the conditions the student must meet in order to score 100 percent, you will be able to specify these later in the ROPOT description section. The student is usually awarded the score (number of points) assigned to the alternative he/she selects. Unless you assign a score to one of the alternatives here, the student is awarded the default one specified in the ROPOT description.
To format your text, you can use the HTML editor or HTML tags.
No HTML tags can be used in the sections listing answers/alternatives to choose from. The application, however, supports special characters such as. &, ‰, §, etc. (preferably entered in the form of entities, i.e. as
"&", "‰", "§") as well as the ones of Greek, Russian, and other alphabets.
:: vv :: Select the alternatives you consider correct from multiple menus:
spring,
,
,
winter.
Use the small untitled fields below the question one for entering the items to be selected and check the correct ones (using the checkboxes situated to the left of the items). New fields for entering new items can be added to the set with the use of the add button.
Use the large untitled fields below the question one for entering the accompanying text. You can add another text field to the set using the add button.
To remove a space from the beginning or end of text, use #.
To format your text, you can utilize the HTML editor or HTML tags.
No HTML tags can be used in the sections listing answers/alternatives to choose from. The application, however, supports special characters such as &, ‰, §, etc. (preferably entered in the form of entities, i.e. as
"&", "‰", "§") as well as the ones of Greek, Russian, and other alphabets.
It is the default number of points that is awarded for every correct choice made from the drop-down menu since the scores (points) awarded for the individual items cannot be specified via this form.
Random mixing of the options is achieved by checking the "random" order of answers’ alternatives box in the "ROPOT description".
Score (points) awarded: Please specify the number of points awarded for the right answer (items ordered correctly). The score can be entered either in the form of a number, in which case it denotes the number of points awarded if the order is correct, or that of percentage. Examples:
ok 2 (the student gets 2 points for this answer)
ok 75% (for this answer the student will receive 75% of the value of the answer you define in the "ROPOT description")
-1 (1 point will be deducted for this wrong answer)
-50% (for this wrong answer, 50% of the value of the correct answer, which you define in the "ROPOT description", will be deducted)
As regards the conditions the student must meet in order to score 100 percent, you will be able to specify these later in the ROPOT description section. Unless you enter a score for one of the questions here, the student is awarded the default one specified in the ROPOT description.
Use the small untitled fields below the question one for entering the items to be selected.
Use the large untitled fields below the question one for entering the accompanying text. You can add another text field to the set using the add button.
To remove a space from the beginning or end of text, use #.
HTML tags cannot be used in answers/options. It is also not recommended to use the = (equals sign) which may affect the calculation of points.
You can insert special characters (e.g. &, ‰,
§ - preferably in the form of entities like "&", "‰", "§") and characters of national alphabets (Greek, Cyrillic,...).
You can use HTML tags and the HTML editor in the assignment of the question.
:: n :: Enter a number:
Enter the pi value rounded to three decimal places
Enter the right answer as a number or range of numbers. Examples:
3.14
-4,08
10..20
Score (points) awarded: Please ensure that at least one of the fields contains “ok”, which marks the correct answer. The score that is to be awarded for an alternative can be entered either in the form of a number, in which case it denotes the number of points awarded/subtracted if the alternative is selected, or that of percentage. Examples:
ok
ok 2
ok 75%
-1
-50%
There should always be a space between ok and the value. As regards the conditions the student must meet in order to score 100 percent, you will be able to specify these later in the ROPOT description section. The student is usually awarded the score (number of points) assigned to the alternative he/she selects. Unless you assign a score to one of the alternatives here, the student is awarded the default one specified in the ROPOT description.
To format your text, you can use the HTML editor or HTML tags (the former only applies to the question sections).
:: s ::
Put the words in the right order This| nice| is| very| question
You don't have to fill in the assignment, as it is represented by a sentence from the question with the word order rearranged.
The combination of words that make up the sentence is displayed in different order. You must specify the "random answer order" option in the ROPOT description.
Put the words in the right order: question| This| nice| is| very
Use the first alternative field to enter a sentence in the correct form and separate the sections you want to blend with vertical bars.
Score (points) awarded: Please ensure that at least one of the fields contains “ok”, which marks the correct answer. The score that is to be awarded for an alternative can be entered either in the form of a number, in which case it denotes the number of points awarded/subtracted if the alternative is selected, or that of percentage.
ok
ok 2 (the student gets 2 points for this answer)
ok 75% (for this answer the student will receive 75% of the value of the answer you define in the "ROPOT description")
-1 (1 point will be deducted for this wrong answer)
-50% (for this wrong answer, 50% of the value of the correct answer, which you define in the "ROPOT description", will be deducted)
There should always be a space between ok and the value.
As regards the conditions the student must meet in order to score 100 percent, you will be able to specify these later in the ROPOT description section. The student is usually awarded the score (number of points) assigned to the alternative he/she selects. Unless you assign a score to one of the alternatives here, the student is awarded the default one specified in the ROPOT description.
To format your text, you can use the HTML editor or HTML tags (the former only applies to the question sections).
:: bb :: What is the famous sentence?
To be, or ,
that is
After clicking on the question mark, the system will complete the answer:
:: bb :: What is the famous sentence?
To be, or
not to be:,
that is
the question.
To display the hidden text, the user should click on the question mark/key icon. Please enter the texts you want to keep hidden into the small untitled fields below the question one.
Use the large untitled fields below the question one for entering the accompanying text. You can add another text field to the set using the add button.
To remove a space from the beginning or end of text, use #.
To format your text, you can utilize the HTML editor or HTML tags (the former only applies to the question sections).
This type of question is designed for mathematical questions that require the student to answer with an algebraic expression. The correctness of the answer is checked using the Maple program, allowing, for example, to correctly evaluate different notations of the same expression (e.g., "1/2*sin x" a "sin(x)/2"). Therefore, in order to evaluate the question, the student must write the answer in Maple syntax.
The correctness checking of the answer can be influenced by a whitelist and a blacklist of allowed and disallowed functions or procedures that may or may not appear in the answer. You can make only certain functions available to students for an answer or prevent Maple from calculating its own answer using a Maple function.
The definition of a question is similar to the :t and :tt types, where the number of underscores after the ":l" character determines the length of the input field.
The following examples show how to use whitelist and blacklist.
Example question with whitelist:
Derive the function <M>f(x)=cos(2*x)</M>
:l_________________
:l="-2*sin(2*x) w[sin, cos]" ok (Only the sine and cosine functions can be used for the answer.)Example question with blacklist:
Derive the function <M>f(x)=x^5</M>
:l_________________
:l="5*x^4 b[diff, Diff]" ok (You cannot use the derivation function to specify a derivative expression.)
If neither whitelist nor blacklist is used in the answer definition, the so-called authoring solution is used, which automatically uses the whitelist from the functions used in the correct variant.
You can use HTML tags in the assignment, and the HTML editor for the question assignment. Mathematical expressions are entered using LaTeX notation in the <M> tag, and are planted in the figure. Ex. notation <M>T_e=10^8 K, n_0=10^{19} m^{-3}</M>.
Points: for defining the correct answer, type 'ok' to indicate that this answer is correct. The number of points scored can be further specified by number or percentage, e.g.
2
-2
50%
-25%
The percentage is calculated from the value entered in the ROPOT description.
Tip
You can watch a demo of creating a :l question in the answer key in this video.
Evaluation of the correctness of this type of question is not provided by the AMBIS IS. Answers are sent to an external server where the correctness is evaluated by a script and the result is transmitted back to AMBIS IS. Server failures and problems can be reported to the department that manages the external server (Laboratory of Computer Technology of the Faculty of Science).
:: e :: enter the algorithm:
Enter an algorithm to calculate a successor:
Note: The correct answer is: the algorithm that converts input values into the correct ones
This type of question is intended for cases where the student has to answer with an expression/algorithm that does not have a uniform notation. The correctness of the answers is verified by the teacher's external server, where the teacher himself/herself runs the correctness check of the expression/algorithm.
Score (points) awarded: Please ensure that at least one of the fields contains “ok”, which marks the correct answer. The score that is to be awarded for an alternative can be entered either in the form of a number, in which case it denotes the number of points awarded/subtracted if the alternative is selected, or that of percentage. Examples:
ok
ok 2
ok 75%
-1
-50%
There should always be a space between ok and the value. As regards the conditions the student must meet in order to score 100 percent, you will be able to specify these in the ROPOT description section later on. The student is usually awarded the score (number of points) assigned to the alternative he/she selects. Unless you assign a score to one of the alternatives here, the student is awarded the default one specified in the ROPOT description.
To format your text, you can use the HTML editor or HTML tags (the former only applies to the question sections).
The definition of the answer depends on the agreement with the development team. Typically, the teacher writes the correct answer in the form a:control_values, and these values (control_values) are used by the external server (a) as parameters to evaluate the student's answer. The external server also evaluates and processes the answer based on an agreement with the development team. The return string generally must not contain values of the ok/nok type (whether the answer was correct or not), but may also contain textual feedback or other scoring (even percentage).
HTML material can be inserted between each question. For example, you can start with an explanation or a working text followed by individual questions – exercises.
Informační systém Elportál Vstup do nepředmětových e-l aplikací Dril .. Vstup do drilové aplikace
Dril je určen k memorování základních jednotlivých poznatků (např. slovíček) nazpaměť. Je založen na psychologii učení, podle které si poznatky rychleji a kvalitněji zapamatujeme, pokud
si je připomínáme méně často, ale zároveň během delší doby. Aplikace funguje na algoritmu, podle kterého jsou poznatky ke zopakování předkládány v okamžiku, kdy je zhruba 90% šance, že si
poznatek ještě vybavíme. Poznatky je pak třeba opakovat stále řidčeji a za delší dobu, čímž se z krátkodobé paměti přesouvají do dlouhodobé. To znamená, že jste si znalost již osvojili.
Dril má tři fáze:
fáze učení
Slouží k učení (memorizaci) nového poznatku. Nezáleží na tom, zda si v této fázi poznatek procvičujete jednou či vícekrát. Zapomínat jej začnete okamžitě a po 15 dnech je až 50%
pravděpodobnost, že jste jej zcela zapomněli.
fáze opakování
Dochází k opakování/připomenutí nového poznatku. První opakování by mělo nastat v okamžik, kdy si poznatek na 90% ještě pamatujete, čehož se snaží docílit algoritmus v této aplikaci.
Další opakování přichází vždy za o něco delší dobu. Pokud však systému naznačíte (tlačítky 3 až 6 v aplikaci), že si poznatek nepamatujete tak, jak předpokládal, upraví se algoritmus a
opakování přichází v kratších intervalech.
fáze drilování
V této fázi drilujete poznatky, které jste v předchozí fázi označili tlačítky 3 až 6, tedy poznatky náročnější na zapamatování či naučení. Je to nejdůležitější fáze celého učení,
neboť poznatky se do dlouhodobé pamětí přesunují právě tím, že si je opětovně vybavíte z krátkodobé paměti. Máte-li málo času, raději se neučte nové kartičky, ale fázi drilu vždy
dokončete!
Aplikace je rozdělena do několika pevných oblastí (např. Angličtina, Španělština, Latina ... Jiné ...) a každá oblast může mít libovolný počet učebnic. Učebnice jsou obvykle
rozdělené do několika lekcí a každá lekce obsahuje libovolný počet kartiček (vypisuje se u každé lekce). Nemusíte se učit celou oblast, ale stačí si vybrat i jen několik lekcí z jedné učebnice.
Lze kombinovat i více lekcí z více učebnic, vždy však pouze v rámci jedné oblasti.
Oblasti do aplikace mohou přidávat pouze její správci. Jednotlivé učebnice mohou vytvářet a importovat do systému sami uživatelé.
Pokud vám pro vaši učebnici nevyhovuje žádná z oblastí,
kontaktujte správce na adrese ambisis@fi.muni.cz, kde můžete požádat o vytvoření nové oblasti.
Jste-li v Drilu poprvé, klikněte na titulní stránce drilu na 'Výběr oblasti a učebnice'. Zobrazí se přehled oblastí s názvy jednotlivých učebnic. Učebnice jsou seřazeny podle popularity, na začátku seznamu tak najdete učebnice, ze kterých se učí nejvíce lidí.
Pokud si nejste jistí, jestli vám bude určitá učebnice vyhovovat, klikněte na možnost 'detaily' a zobrazí se vám podrobnosti o učebnici (obsah, autor, počet lekcí atd.).
[1] výběr oblasti
[2] tlačítko pro zobrazení detailů o učebnici
Kliknutím na název učebnice rozbalíte informace o učebnici a rovnou si můžete zaškrtnutím políček aktivovat lekce, které se z učebnice chcete začít učit. Výběr potvrďte tlačítkem 'Aktivovat lekce'.
[1] zaškrtávací políčko pro výběr lekcí
[2] tlačítko pro aktivaci lekcí
Poté se dostanete na výpis aktivních oblastí a aktivních učebnic. Pokud se chcete začít učit, klikněte na název některé z oblastí a můžete začít!
Na titulní stránce Drilu si vyberete oblast, kterou se chcete učit a vstoupíte do Drilu. Pokud máte v jedné oblasti aktivováno více učebnic, můžete si drilování omezit na jednu konkrétní učebnici. Výběr učebnice upřesníte volbou 'detaily', kterou najdete v tabulce s aktivovanými oblastmi. Po vstupu do Drilu se vám zobrazí kartička s otázkou, vy si pomyslíte odpověď a
kliknete na tlačítko 'Ukázat odpověď'. Odpověď si můžete zkusit také napsat do textového políčka. Vepsanou odpověď IS nijak nekontroluje, vepsání je jen pomůcka při procvičování (např. spellingu).
[1] tlačítko pro zobrazení odpovědi
[2] políčko pro vepsání odpovědi
Svou pomyšlenou odpověď porovnáte se zobrazenou správnou odpovědí a kliknutím na některé z tlačítek 1 až 6 ohodnotíte, jak dobře jste znali správnou odpověď. Aplikace podle toho spočítá,
za kolik dní vám kartičku ukáže znovu. Hodnotit můžete také pomocí klávesových zkratek 1-6 resp. Q – Z(Y) a potvrdit 'mezerníkem'. Pokud znáte odpověď okamžitě, můžete ohodnotit klávesou 1 nebo 2 bez zobrazení odpovědi.
[1] správná odpověď
[2] vaše odpověď (pokud jste ji vepsali do příslušného pole)
[3] tlačítka pro hodnocení odpovědi
[4] nápověda k významu tlačítek
Po odeslání hodnocení vaší odpovědi se opět načte další kartička s otázkou, přičemž následný postup zůstává stejný - a to ve všech fázích Drilu. Po dokončení poslední fáze si můžete
zvolit učení dalších nových kartiček nebo odejít do Správy drilu, kde se lze např. začít učit z jiné oblasti.
Na titulní stránce Drilu najdete seznam aktivních oblastí, které se můžete učit. U každé oblasti najdete počet kartiček, které jsou pro vás připravené ke drilování.
[1] seznam aktivních oblastí
[2] počet kartiček ke drilování
[3] kliknutím na odkaz zobrazíte detaily k učení v této oblasti
Po použití volby 'detaily' si můžete přidat nové kartičky a vybrat si z možností opakování kartiček. Např. pokud víte, že nebudete mít další den na drilování čas, můžete si do opakování přidat i kartičky naplánované na druhý den. Nebo pokud máte více času, můžete si do opakování přidat kartičky, kterým se blíží naplánování. Počet kartiček, které jsou připraveny ke drilování zjistíte kliknutím na volbu 'spočítat'.
[1] výběr a přidání nových kartiček
[2] možnosti pro změnu učení kartiček
[3] volba pro zobrazení počtu kartiček připravených ke drilování
Pokud už jste v Drilu byli a máte zvolené učebnice, ze kterých se učíte, zobrazí se rovnou vaše Aktivní oblasti a Aktivní učebnice na titulní stránce Drilu.
Chcete-li se z určité učebnice začít učit další lekce nebo je deaktivovat, použijte volbu 'Aktivovat nebo deaktivovat lekce z této učebnice'. Zobrazí se aktivované lekce, které můžete
označením a volbou 'Deaktivovat lekce' deaktivovat, a neaktivované lekce, které naopak označením a volbou 'Aktivovat lekce' aktivujete.
Učení z nových učebnic můžete přidat pomocí odkazu 'Aktivovat další učebnice'. Učebnici odeberete deaktivováním všech jejích lekcí.
[1] kliknutím na odkaz zobrazíte jednotlivé oblasti se všemi učebnicemi, které lze aktivovat a studovat
[2] informace o této učebnici
[3] kliknutím na odkaz zobrazíte výběr lekcí z této učebnice k de/aktivaci
Je důležité učit se pravidelně, nejlépe každý den. Pokud dril používáte jen občas, kartičky se vám nahromadí, ale také zapomínáte odpovědi a musíte se kartičky učit znovu.
Můžete se učit i po chvilkách např. průběžně celý den. Důležité však je po posledním učení nevynechat fázi drilování!
Pokud např. týden nebudete mít čas se učit, systém vám po návratu předloží velké množství zameškaných kartiček. Bude vám nabízet ty nejvíce zameškané až po ty nejméně zameškané. Postupně
zpoždění dožeňte.
Informaci o postupu v konkrétné učebnici zjistíte ve statistice učebnice, která se zobrazuje u každé aktivované učebnice (aktivované učebnice najdete na titulní stránce Drilu v sekci Aktivní učebnice). Ve statistice zjistíte také kolik kartiček z celkového počtu jste již viděl/a, jaký je průměrný interval zobrazování kartiček nebo průměrná obtížnost kartiček.
Ne, během takové krátké doby nelze využít efekt drilu, tedy učení s prodlevami. Mozek takto nemá šanci poznat, že potřebujete znalost uložit do dlouhodobé paměti, neboť ji
nestihnete opakovat s prodlužujícími se prodlevami.
Systém vám nejdříve nabídne ke zopakování otázky, u kterých jste si v minulém učení nebyli úplně jistí. Pak vám umožní učit se nové otázky a na závěr přejdete ke drilování těch
otázek, které jste označili tlačítky 3 až 6. Pokud máte čas a chcete se učit více nových otázek, než vám napoprvé systém nabídne, zvolte si další nové otázky a drilování nechte úplně na
závěr.
Průběžný dril znamená, že se vám ve fázi učení nových kartiček či fázi opakování mohou občas nabízet kartičky, které jste viděli před chvílí (zhruba 10 minut) a ohodnotili je
tlačítky 3 až 6. Počet těchto kartiček je uveden v závorce za znakem '+', např. takto (13 + 3). Tím se vám do fáze konečného drilování nedostane tolik kartiček a počátečním častějším
opakováním si můžete kartičku lépe zapamatovat.
To je dost individuální. Začnětě např. se 30 kartičkami denně a sledujte, jak je učení efektivní, tzn. jak vám to jde a kolik dostáváte kartiček ke zopakování v dalších dnech. Podle
toho, kolik času chcete učení věnovat, si můžete zvýšit nebo snížit počet nových kartiček na den.
Rozhodně není vhodné drilovat kartičku ihned poté, co jsme ji právě viděli. Smyslem drilu je, aby si člověk vybavoval kartičky z paměti, takže pokud máte ke drilování málo kartiček,
je vhodné pár minut počkat a teprve poté je drilovat, aby se mozek namáhal a kartičky se uložily do dlouhodobé paměti.
Pokud nechcete začít s učením všech oblastí a učebnic od začátku, můžete si z titulní stránky drilu volbou 'Smazat mé údaje o oblasti' určit přímo oblast, kde budou veškeré vaše
údaje smazány, ale v ostatních oblastech zůstanou.
[1] klikněte na odkaz pro postup k potvrzovacímu formuláři
[2] z menu vyberte oblast, ve které chcete smazat své údaje
[3] volbu potvrďte kliknutím na tlačítko 'Smazat mé údaje'
Je-li pro vás zadání kartičky nedostatečné či nejasné, můžete si pro sebe kartičku upravit přímo během učení. U zobrazené kartičky použijte volbu 'Upravit tuto kartičku'.
V zadání můžete upřesnit otázku nebo odpověď, např. doplněním fráze, ve které se slovíčko obvykle používá. Hodí se typicky, pokud na zadání otázky existuje více možných odpovědí. Pokud
jste kartičku měnili již v minulosti, nabídne se vám funkce na odstranění změn. Veškeré prováděné změny se zobrazí pouze uživateli, který změny zadal.
Kartičku můžete upravit také globálně, změna se pak projeví u všech uživatelů.
[1] kliknutím na volbu otevřete nové okno s editory k úpravě kartičky
[2] kliknutím na volbu otevřete nové okno s editory pro globální úpravu kartičky
Kartičky se v databázi nacházejí v obou směrech (brother → bratr i bratr → brother). Systém je chápe jako dvě odlišné otázky. Jednu asi budete zvládat lépe
(tu, která zkouší "co to znamená") a druhou hůře ("jak se to řekne"), proto se velmi rychle vzdálí od sebe intervaly, ve kterých se kartičky zobrazují.
Nepředepisuje se, který směr se má zobrazit nejdříve, vybírá se náhodně. Systém pouze hlídá, že v určitý den se zobrazí z této dvojice kartička maximálně z jednoho směru (a to i v
případě, že i druhý směr má dle algoritmu předepsáno se v tento den znovu zobrazit).
Autor učebnice pravděpodobně naimportoval do lekce opravené kartičky, přičemž předtím chybné kartičky smazal. Mazáním se kartičkám pouze nastaví příznak "smazaná", ale zůstávají v
databázi pro uživatele, kteří se je chtějí nadále učit. Pokud chcete, aby se vám při drilování zobrazovaly jen nově naimportované kartičky (tudíž ne kartičky s příznakem "smazaná"), deaktivujte
si a znovu aktivujte lekci.
Prohlížeč vás tímto upozorňuje, že nemáte povolený smíšený obsah (mixed content), který v MS IE povolíte v záložce Tools. Klikněte na položku Internet Options, poté na záložku
Security tab a tlačítko Custom Level. V dialogovém okně Security Settings najděte sekci Miscellaneous. V ní dohledejte Display mixed content a zatrhněte možnost Enable. V dialogovém okně
Security Settings klikněte na OK a poté znovu zvolte OK pro odchod z Internet Options.
Poznámka: Jakmile povolíte smíšený obsah, budou se vám zobrazovat stránky jak HTTPS, tak i obsah bez HTTPS, ale Internet Explorer již nebude zobrazovat ikonu zámku.
Nejjednodušší způsob, jak nahrát data do Drilu, je vytvoření jednoduchého textového souboru s příponou .txt nebo .csv, ve
kterém uspořádáte dvojice ("kartičky") otázka - odpověď. Obsah textového souboru musí splňovat tyto podmínky:
každá dvojice otázka - odpověď je umístěna na samostatném řádku,
každý řádek začíná rovnou textem otázky, následuje jeden tabulátor (klávesa Tab), vše za tabulátorem je již přímo text odpovědi,
na každém řádku musí být právě dvě položky oddělené tabulátorem,
k oddělení otázky - odpovědinelze použít více než jeden tabulátor,
pro úpravu formátování otázky i odpovědi lze použít značky HTML.
Příklad: Ve kterém z následujících měst nejezdí metro?<br/>Praha, Londýn, Moskva, Brno<jeden tabulátor>Brno
V drilu se otázka zobrazí jako:
Ve kterém z následujících měst nejezdí metro?
Praha, Londýn, Moskva, Brno
Pozn.: Při vytváření jednoduchých kartiček s daty typu brother → bratr, bratr → brother
stačí v souboru vypsat pouze jeden směr kartiček (např. AJ → ČJ).
Druhý směr (ČJ → AJ) se vytvoří v aplikaci automaticky při importu dat do učebnice. Tzn. importujete-li např. 10 kartiček, aplikace ke každé z nich vytvoří druhý směr, tj. vznikne celkem
20 nových kartiček v učebnici.
K úpravě kartiček lze použít HTML značky v datovém souboru .txt (.csv).
Příklad: Ve kterém z následujících měst <b>ne</b> jezdí metro?<br/>Praha, Londýn, Moskva, Brno<jeden tabulátor>Brno
V drilu se otázka zobrazí jako:
Ve kterém z následujících měst nejezdí metro?
Praha, Londýn, Moskva, Brno
Chcete-li použít složitější vzhled, který by se měl uplatnit u více kartiček, je lepší vytvořit si šablonu, podle které se mají kartičky
formátovat. Pokud si jednorázově připravíte soubor se šablonami vzhledu kartiček, v datovém souboru už pouze určíte u každé kartičky, podle jaké
šablony se má upravit.
Pomocí systému šablon můžete formátovat velikost, typ a barvu písma, ale také vkládat např. opakující se texty, obrázky apod.
Vytváření souboru šablon je určeno pro uživatele s pokročilejší znalostí, především XML.
Pokud chcete kartičky formátovat dle šablon vzhledu, je potřeba si
předem připravit soubor XML se šablonami vzhledu kartiček a
správně naplnit datový soubor .txt (.csv) s ohledem na vlastnosti připravených šablon.
XML soubor (šablona) musí mít následující strukturu:
je kořenový element, který obsahuje jeden nebo více elementů <template>
<template>
šablona - určuje způsob, jak se z řádku v datovém souboru zobrazí kartička
povinný atribut name určuje název šablony, který se uvádí na každém řádku v datovém souboru,
povinný atribut params určuje, kolik parametrů obsahuje řádek v datovém souboru,
obsahuje jeden a více elementů <card>
<card>
určuje jednu konkrétní prezentaci kartičky
je-li elementů <card> v šabloně více, určují např. různé směry zkoušení - pak v každé stačí použít jinou kombinaci parametrů (typicky jsou dvě, např. AJ → ČJ a
ČJ → AJ)
nepovinný textový atribut lesson
určí, do které lekce se kartička zařadí
má přednost před určením lekce ve formuláři pro vložení kartičky
nepovinný textový atribut uniq
představuje řetězec charakterizující kartičku jedinečně v celé učebnici, nelze vložit dvě kartičky se stejnou hodnotou parametru
při neuvedení se parametr generuje automaticky
obsahuje právě dva elementy: <question> a <answer>
<question>
představuje otázkovou část kartičky
celý obsah je uzavřen v elementu <![CDATA[ ... ]]>
obsahem může být libovolný HTML
na místo označené $x se vloží hodnota x-tého parametru z datového souboru (takových proměnných lze použít i více)
V případě použití souboru se šablonou musí každý řádek datového souboru (každá kartička) obsahovat název šablony, podle které se má formátovat. Název
šablony se uvádí na počátku řádku. Za ním následují jednotlivé parametry, vše je odděleno vždy jedním tabulátorem:
<nazev_sablony><tabulator><parametr_1><tabulator><parametr_2>
Typický počet parametrů je 2 (otázka a odpověď), lze však použít libovolně i více parametrů, které se přes místa v šabloně označená
$<číslo_parametru> zobrazí na požadovaném místě kartičky. Počet parametrů na každém řádku však musí odpovídat počtu parametrů uvedených
v příslušné šabloně (atribut 'params' elementu 'template').
Příklad použití šablony pro 3 parametry:
řádek v datovém souboru: matematika 5+5 10 sčítání
šablona:
<template name="matematika" params="3">
 <card>
 <question>
 <![CDATA[
        <p>Kolik je <p>$1</p>
 ]]>
 </question>
 <answer>
 <![CDATA[
        <p>Správný výsledek je <b>$2</b> </p>
  <p>Nápověda: jedná se o operaci $3</p>
 ]]>
 </answer>
</template>
Je-li v šabloně více kartiček (elementů <card> s otázkou a odpovědí), tedy jeden řádek datového souboru se využívá pro různý směr dotazování, systém
pohlídá, aby se v jednom učebním cyklu (v jeden den) zobrazila pouze jedna z nich (tedy např. jeden směr překladu).
Na titulní stránce Drilu v sekci Správa drilu odkaz 'Zobrazit moje učebnice' zobrazí všechny vaše vytvořené učebnice. U každé se vám nabídnou tyto možnosti:
Aktivovat lekce z této učebnice - pro aktivaci či deaktivaci lekcí.
Importovat do učebnice kartičky - lze vytvářet nové nebo plnit již vytvořené lekce v učebnici.
Zobrazit lekce - lze prohlížet a upravovat kartičky a názvy lekcí.
Upravit učebnici - lze dodatečně doplnit informace k učebnici, povolit její zveřejnění všem uživatelům, nastavit zobrazování obrázku ...
Upravit přístupová práva k učebnicím - lze změnit nebo nastavit přístupová práva k učebnici.
[1] oblast, do které je učebnice zařazena
[2] název učebnice
[3] možnosti úpravy učebnice jejím správcem
Správa drilu .. Zobrazit moje učebnice Vytvořit novou učebnici
vyberte oblast, kam se má učebnice zařadit a zadejte název učebnice a její popis (co učebnice obsahuje - např. fráze, slovíčka, gramatiku). Vyplňujte
pouhým textem, nepoužívejte HTML znaky.
Pokročilí uživatelé mohou do pole HTML, které se zobrazí u kartičky při drilování pomocí HTML editoru vložit např. obrázek učebnice. Pole
Javascript, který se spouští před zobrazením otázky lze použít např. k přehrávání výslovnosti otázky a pole Javascript, který se spouští před
zobrazením odpovědi lze použít např. k přehrání výslovnosti při zobrazení odpovědi.
Nakonec potvrďte tlačítkem 'Vytvořit učebnici'. Pokračujte
Zpět na správu drilu Správa drilu .. Zobrazit moje učebnice
Vyhledejte učebnici, kterou chcete naplnit a zvolte 'Importovat do učebnice kartičky'. Vytvořte novou lekci a zadejte její název, nebo zvolte již
existující lekci. Pomocí tlačítka 'Procházet...' nahrajte datový soubor z vašeho počítače, a pokud chcete použít šablonu, dohledejte ji pomocí
'Procházet...'. Případně můžete zvolit některou z dalších možností a nakonec potvrďte tlačítkem 'Odeslat'.
Záznamník učitele Odpovědníky .. Správa odpovědníku Export pro dril
vyberte sadu otázek a vytvořte CSV soubor se všemi otázkami a možnými i správnými odpověďmi.
Dále je v šabloně potřeba specifikovat, jak se má pracovat s jednotlivými typy otázek. Musíte počítat s tím, kolik mají otázky možností celkem a kolik je
správných odpovědí. V šabloně pak pro každý typ otázky lze vytvořit jeden vzor <template> a uspořádat je za sebe.
Položka <moznost> zaručí, že odpovědi se uživatelům drilu zobrazí v náhodném pořadí.
Příklad: Otázky, které mají 5 možností a jen jednu správnou odpověď
Správa drilu .. Zobrazit moje učebnice Upravit učebnici
Zobrazí se tentýž formulář, kterým byla učebnice založena. Upravovat učebnici může vlastník učebnice nebo osoba/osoby, kterým bylo přiděleno právo danou učebnici spravovat.
Správa drilu .. Zobrazit moje učebnice Upravit přístupová práva k učebnici
Zde si můžete nastavit práva k učebnicím, které jste vytvořili. Existují tři druhy práv: právo na správu učebnice, právo na import kartiček do učebnice a právo učit se z učebnice.
[1] volba práva
Vybraná práva lze přidělit různým skupinám osob. Skupinu osob můžete dále upřesnit potvrzením tlačítka 'Přidat právo'.
Ano, kartičky můžete upravovat v učebnici, jíž jste vlastníkem nebo jíž máte právo spravovat. Z titulní stránky Drilu pokračujte
Správa drilu .. Zobrazit moje učebnice Zobrazit lekce
Kliknutím na název lekce vyberete tu, ve které chcete kartičky upravovat a zobrazíte tak seznam všech kartiček. Upravovat je lze jednotlivě a u každé
kartičky máte několik možností úpravy. Odkazem 'Upravit tuto kartičku pro sebe' vstoupíte do HTML editoru a můžete pro svoji potřebu kartičku upřesnit nebo doplnit. Změna se zobrazí pouze uživateli, který změnu zadal. Odkazem 'Upravit tuto kartičku globálně' můžete v HTML editoru kartičku upravit a změna se pak projeví u všech uživatelů. Další možností je volba 'Smazat', kterou můžete jednotlivé kartičky odstranit. Smazaná kartička zůstává nadále v seznamu kartiček a je možné ji znovu obnovit.
[1] skupina kartiček (tedy jedna kartička v obou směrech) je lemována čárkovaným obdélníkem
[2] odkazy pro úpravu kartičky HTML editorem
Chcete-li dále upravit kartičky v jiné lekci, klikněte na odkaz 'Zpět na výběr lekce' a pokračujte výše popsaným způsobem.
Při importu datového souboru s kartičkami do učebnice
Správa drilu .. Zobrazit moje učebnice Importovat do učebnice kartičky
můžete v sekci Další možnosti zaškrtnout funkci 'Přepsat existující podobné kartičky'. Tato funkce umožňuje přepisovat
existující kartičky např. při opravném importu stejných dat do stávající učebnice.
[1] označením této volby dojde k přepsání podobných kartiček
[2] tlačítkem potvrďte import dat (včetně přepisu)
Řetězec uniq určuje, které kartičky se mají přepsat. Buď se manuálně určí v šabloně (atribut <uniq> v elementu <card>), nebo je automaticky
generován z dat, ze kterých se kartička vytváří.
Funkce je vhodná např. při importu nezměněného datového souboru a změněné šablony (např. změna v HTML kódu kartičky), kdy je žádoucí přepsat již existující kartičky. Které kartičky a jak
se změní, lze zjistit kliknutím na odkaz 'Zobrazit seznam vygenerovaných kartiček' po jejich importu.
Autor učebnice se může rozhodnout importovat datový soubor s nově opravenými (např. opravy překlepů) i nezměněnými kartičkami, které již ve drilu jsou. Nejdříve je potřeba smazat kartičky z
dané lekce v aplikaci:
Správa drilu .. Zobrazit moje učebnice Prohlédnout kartičky
vyberete si lekci (kliknutím na její název), kterou budete opravovat. Nad přehledem jednotlivých kartiček klikněte na možnost 'Smazat všechny kartičky z této lekce' a smazání potvrďte. Poté
můžete známým způsobem lekci z opraveného datového souboru naimportovat.
Kartičky, které se v datovém souboru nezměnily, se obnoví s původními hodnotami, tj. uživatelům zůstanou statistiky od původních kartiček. Změněné kartičky se naimportují jako úplně nové.
Pozn.: Kartičky lze mazat i jednotlivě v téže aplikaci po výběru lekce.
Uživatelé, kteří se učí smazanou kartičku, se ji budou moci učit i nadále, jen se jim při drilování zobrazí informace o jejím smazání. Smazané kartičky už se nezobrazí pouze těm, kteří si
lekci aktivují nově po smazání kartiček.
Smazané kartičky můžete obnovit, nemažou se totiž fyzicky, jen se jim nastaví příznak "smazaná". Kartičky obnovíte v aplikaci:
Správa drilu .. Zobrazit moje učebnice Prohlédnout kartičky
Vyberte lekci, klikněte na odkaz 'Obnovit smazané kartičky v této lekci' a obnovení potvrďte.
Před úpravou datového souboru a šablony je třeba mít obrázky někde uložené. V Informačním systému můžete využít např. Můj web. Úschovna není
vhodné úložiště, neboť soubory v ní expirují.
Datový soubor na každém řádku obsahuje:
název šablony,
přesné umístění obrázku (url)
a odpověď,vždy oddělené jedním tabulátorem.
Příklad:
fiesta1  /učo/kvetina.png  la flor
fiesta1  /učo/auto.png  el coche
XML šablona obsahuje:
v otázce adresu úložiště obrázků ukončenou parametrem $1,
Pozn.: Pokud budete ukládat obrázky do úložiště Můj web v IS AMBIS, můžete použít přímo vzorovou šablonu z nápovědy a datový soubor
vytvořit podle příkladu výše.
Můžete použít implicitní šablonu přednastavenou v ISu nebo vlastní šablonu.
Pokud používáte implicitní šablonu, zaškrtněte při importu kartiček do učebnice možnost "Při použití vestavěné implicitní šablony generovat pouze jednosměrné kartičky"
a soubor nahrajte.
Vlastní šablonu (XML soubor např. karticka.xml) upravte např. takto:
Pozn.: Pokud budete ukládat obrázky do úložiště Můj web v IS AMBIS, můžete použít přímo vzorovou šablonu z nápovědy a datový soubor
vytvořit podle příkladu výše.
Aby se v kartičkách přehrával zvuk, je třeba upravit vlastnosti učebnice v:
Správa drilu .. Zobrazit moje učebnice Upravit učebnici
Zvuk se přehraje při zobrazení otázky:
do pole Javascript, který se spouští před zobrazením otázky zkopírujte zdrojový kód
var player = get_element("sound_player1");
    var autoplay = "true";

    if (player) {
      var url = player.innerHTML;
      player.innerHTML =
        '<embed src="' + url + '" autostart="' + autoplay + '" width="0" height="0" id="sound" enablejavascript="true">'
       +'<form>'
       +'<div>'
       +'<input style="width: 26px; height: 26px;'
       +'background: lightgrey
       url(\'/pics/design/14/dril/dril_speaker.gif\') no-repeat top;"'
       +'type="button" value="" onClick="get_element(\'sound\').Play();"/>'
       +'</div>'
       +'</form>';
    }
Zvuk se přehraje při zobrazení odpovědi:
do pole Javascript, který se spouští před zobrazením odpovědi zkopírujte zdrojový kód
var player = get_element("sound_player2");
    var autoplay = "true";

    if (player) {
      var url = player.innerHTML;
      player.innerHTML =
        '<embed src="' + url + '" autostart="' + autoplay + '" width="0" height="0" id="sound" enablejavascript="true">'
       +'<form>'
       +'<div>'
       +'<input style="width: 26px; height: 26px;'
       +'background: lightgrey
       url(\'/pics/design/14/dril/dril_speaker.gif\') no-repeat top;"'
       +'type="button" value="" onClick="get_element(\'sound\').Play();"/>'
       +'</div>'
       +'</form>';
    }
Pozor: Zdrojový kód Javascriptu je citlivý na zalamování řádků, a proto, aby vám fungoval, zkopírujte kód z nápovědy a vložte jej do určeného pole.
Zkontrolujte, že se kód nezalomil jinak, než je tomu v nápovědě. Předejdete tak problémům s nefunkčností.
XML šablonu pro kartičky se zvukem je potřeba upravit tak, aby zdrojový kód Javascriptu (viz výše) nahradil <div id="sound_player1">, resp.
<div id="sound_player2"> použité v šabloně, která může vypadat např. takto:
Příklad:
Tzn. že v otázce, resp. odpovědi je důležité napsat <div id="sound_player1">$2</div>, resp. <div id="sound_player2">$2</div>.
Přesná adresa, odkud bude zvuk k jednotlivým kartičkám přebírán, se zadá do datového souboru (.CSV nebo .TXT). Řádek v datovém souboru pak může vypadat takto:
vim honeymoon https://is.muni.cz/dstore/dril/anglictina/pokr/01_Family/sound/honeymoon.mp3 líbánky
neboli <název šablony> tab <otázka> tab <url otázky> tab <odpověď>.
Veškeré nástroje pro úpravu textu jsou přístupné z panelu nástrojů, který se zobrazuje v horní části obrazovky.
Pracujete podobně jako v textovém editoru Word - práce s textem v bloku + ikonky reprezentující jednotlivé editační možnosti.
Pokud si nejste jistí funkcí jednotlivých ikon, najeďte na ikonu kurzorem a zobrazí se vám popisek její funkce.
Pro vyšší uživatelský komfort je HTML editor v některých agendách vybaven tlačítkem "Průběžného uložení". Můžeta tak svoji práci pohodlně ukládat již během editace
a předcházet tak ztrátě svých dat.
[1] volba pro průběžné uložení
[2] tlačítko "Vložit" použijte až když jste s prací hotovi a chcete editor opustit
mohou pokročilí uživatelé text editovat přímo ve zdrojovém kódu HTML.
Návrat zpět do okna, které zobrazuje momentální podobu editovaného textu se realizuje opětovným stisknutím tlačítka "Zdroj".
Každý uživatel si vzhled editoru může nastavit přesně podle svých představ. Zúžit panel nástrojů, změnit jazyk a design editoru, případně nastavit výšku editačního okna. A to buď v prostředí diskusního fóra nebo studijních materiálů (u obou možností jsou vypsány další agendy, pro které se nastavení uplatní).
V dolní části obrazovky potom vidíte náhled aktuálního nastavení editoru - změny se projeví až po kliknutí na "Uložit a aplikovat".
Doporučujeme mít vkládané obrázky uložené přímo v agendách IS (např. ve "Studijních materiálech",
tvoříte-li výukový dokument, nebo ve "Web", tvoříte-li soukromý dokument).
Budete tak mít nejen lepší přehled o zobrazovaných souborech, ale především tak předejdete možnému
vymazání nebo přesunutí souboru bez vašeho vědomí.
Ujistěte se, že kurzor v textu je umístěn právě tam, kam chcete obrázek vkládat. Klikněte na ikonku
v panelu nástrojů "Obrázek"
.
V zobrazené dialogu Vlastnosti obrázku zvolte "Vybrat na serveru". Zobrazí se vám adresářová struktura
vaší fakulty, kde zvolíte váš předmět v období a vyhledáte příslušný soubor.
Po kliknutí na soubor s obrázkem se automaticky vrátíte na předchozí dialogové okno. Zde můžete upravit
chování textu vzhledem k obrázku (odsazení, obtékání...).
Vše potvrdíte tlačítkem "OK".
[1] pro vložení obrázku uloženého v materiálech na ISu zvolte "Vybrat na serveru".
Chcete-li, aby se určitý text stal interaktivním a po kliknutí na něj byl student odkázán na
relevantní internetovou adresu nebo soubor v ISu, vyberte tento text do bloku (např. obtáhnutím
myší jako ve Wordu) a zvolte ikonku "Vložit/změnit
odkaz"
A) Odkaz do internetu (mimo IS)
V zobrazeném dialogovém oknu Odkaz vepište do políčka "URL" požadovanou adresu.
Chcete-li, aby se odkaz studentům po kliknutí otevřel v novém okně prohlížeče, vyberte v dialogovém okně
ODKAZ záložku "Cíl". V roletce "Cíl" zvolte "Nové okno" a potvrďte OK.
B) Odkaz na jiný dokument v IS
V dialogovém oknu Odkaz klikněte na "Vybrat na serveru" a v zobrazené adresářové struktuře vyhledejte
požadovaný soubor (stejně jako při vkládání obrázku).
Chcete-li, aby se odkaz studentům po kliknutí otevřel v novém okně prohlížeče, vyberte v dialogovém okně
ODKAZ záložku "Cíl". V roletce "Cíl" zvolte "Nové okno" a potvrďte OK.
[1] do tohoto políčka vepište internetovou adresu, na kterou chcete v textu odkazovat
[2] chcete-li v textu odkazovat na materiál umístěný v IS, zvolte "Vybrat na serveru"
[3] pro otevírání odkazu v novém okně prohlížeče, vyberte záložku "Cíl" a v roletce "Cíl"
zvolte "Nové okno"
K chybnému chování HTML editoru (např. ztráta části vkládaného textu,
příliš velké/malé odsazení odstavce apod.) může docházet, pokud není
upravovaný text správně HTML formátován, obsahuje-li nestandardní prvky, či
je porušen. To se může stát, upravujete-li text, který byl vytvořen
nebo změněn mimo editor HTML, nebo po zásahu přímo do zdrojového HTML kódu textu.
Pokud vkládáte text z Wordu, či jiného pokročilého textového editoru, nemusí se
formátování po vložení shodovat s původním, což je zapřičiněno značně odlišnými
formátovacími možnostmi HTML stránek a velkých editorů určených k sazbě a tisku.
Problematického chování v HTML editoru se vyvarujete, pokud budete text
vytvářet a editovat pouze HTML editorem v IS. Obsah z jiných zdrojů (z
HTML stránek, z Wordu atd.) vkládejte pouze funkcemi editoru (Vložit,
Vložit jako čistý text, Vložit z Wordu). Zároveň nepoužívejte přímou
editaci zdrojového kódu, pokud si nejste jisti, zda změny nemohou porušit
správné formátování HTML.
Scanner – (preferably with a feeder, if the scanner only scans one sheet at a time, the work will be tedious). Scanners that have already proven themselves for scanning answer sheets can be found in:
Information system Printing from IS (Tools tile) List of verified scanners suitable for scanning into IS
Program „skenovani.exe“ – installed on the computer with the scanner. If software is not installed, it will be done by faculty’s CIT or . More detailed information on the operation of the scanning software can be found in
Preparing the questions – if you have the questions themselves ready, then it will take less than one minute to insert one question into the question set (it doesn't matter whether you have it written on paper or in a text file).
It takes about ten minutes to set up the ROPOT description – The best way to set up the ROPOT description can be found below in this help.
Setting up the test sheets – this is operation in the IS AMBIS that creates the paper assignments. It is not time consuming.
Printing the test sheets, answer sheets, dispatch form – it depends on the number of papers, or on the printer's capabilities (printing the assignment double-sided) or whether it is necessary to manually complete papers that have assignments created on multiple pages.
Duration of the written examination itself – it's up to you.
Scanning – it depends on the speed of the scanner.
Recognition of scanned answer sheets – it takes about 5 seconds to recognize one answer sheet.
Correction of misrecognised answer sheets – it depends on the number of misrecognised answer sheets. Our experience tells us that the misrecognised papers are in units of one percent.
This can be influenced by giving students precise instructions on how to complete the answer sheet.
Only questions of type :r (radio button; just one of the offered options is correct) or :c (checkbox; at least one of the offered options is correct) can be used for scanning and automatic evaluation of the exam.
It is not possible to combine these types of questions in one exam. The test assignment must consist of either :r questions only or :c questions only.
There is a maximum of 6 possible answers per question.
Information system Help (E-learning) Question sets
If you have a large number of questions, it is a good idea to insert all the questions at once directly from the text file.
For this you can use the so-called "simplified entry of questions".
Information system Teacher [course selection] Question sets [set selection] simplified entry of questions
This function is described in more detail in the help here.
Even tests that are corrected manually by the teacher can be scanned.
This kind of answer sheet is special because there are no questions entered in the IS. The questions can be handwritten or supplied on another paper.
LaTeX experts can paste the text directly into the form after downloading the macros on the Print Answer Sheets page.
Information system Teacher [course selection] Work with ROPOT Printing from IS: Answer Sheet Macros for handwritten answers
Information system Teacher [course selection] Work with ROPOT
Here first you need to set up a new ROPOT description.
It is easiest if one ROPOT description is exclusively for one specific examination date (if one ROPOT description is for multiple dates,
then the "Should students be allowed to access this ROPOT application repeatedly?" setting in the description needs to be adjusted accordingly).
Use the option "Create a new ROPOT description".
Select "scannable test (multiple choice)" as the default mode.
If this is not the first time you are creating a ROPOT description, but you have already scanned in the semester and want to use the same settings as in the previous ROPOT, you do not need to click the settings from the beginning.
Select an existing ROPOT description from the "I want to select an existent ROPOT application whose information I want the new one to be filled with" menu.
This will create a new ROPOT with the settings of the existing one, so it is necessary to enter a new name (e.g. new examination date).
If you are creating a ROPOT for a handwritten test, set mode to "scannable handwritten text and scores". For a scannable handwritten test, give the name of the ROPOT (preferably with the examination date) and save.
This type of test is covered in detail in the question Scanning of handwritten tests (i.e. free-form answers, not multiple choice).
In case you are creating a scannable test for the first time, follow these steps:
After selecting the ROPOT mode, a form with the settings for the ROPOT description is displayed. The ROPOT is automatically stored in the secure folder "testbank", which is by default inaccessible to students.
We recommend not changing this location. Next, choose a name for the ROPOT, preferably with the date of the examination. Instructions do not need to be filled in.
1 Search for the question set to be used and enter how many questions to select from that set. Check "use".
2 The way in which a specified number of questions are selected from a set. The setting is independent of the order of questions in a new session setting below.
3 Choose the order of the questions and alternatives (answers), most often leaving "random".
4 Determine default number of points awarded for each question. It is up to you whether you want to give only plus points for correct answers, or whether you want to penalise students for guessing the answer and substract points for wrong answers.
We recommend filling in the following fields as follows:
1 Save the results of to notebook.
2 Check if you do not want students to have the scores available immediately after the scanned tests have been evaluated. Alternatively, you can fill in the date from when the scores will be made public to students.
1 For scannable tests, it is typically not desirable to show students the correct answers in the browsing of answers.
2 The sessions for the scannable test are created by the teacher in a separate application, so the responding student does not need to launch a new ROPOT session.
1 Typically, students do not have a ROPOT in the IS AMBIS accessible. You make this setting in at the bottom of "Making the ROPOT application accessible to students" when you save the ROPOT description.
2Save the ROPOT description by clicking "Save and make inaccessible" to students for now.
Setting up scannable tests involves several steps.
1The first step in the preparation of a scanneble test (right after the ROPOT is created) is to generate the test sheets.
2The test sheets need to be printed for each student.
3It is useful to print a few more answer sheets than necessary so that there are back-ups in case some students complete them incorrectly.
4The dispatch form will automatically assign the scanned answer sheets to the correct ROPOT.
Setting up printed tests
Information system Teacher [course selection] Work with ROPOT Generate test sheets to be printed
The first step in preparing a scanned test (right after creating the ROPOT description) is to create the test sheets.
This is where you select how many test sheets will be generated for printing. If you want to create multiple identical test sheets, specify the number of times the same test sheet should be generated.
The application will then create test sheets that are identical in content and differ only in the test sheet number. This option may be useful when you want to prepare assignments with the same difficulty for all students (e.g. a final state‘s examination).
1 The field for entering the required number of test sheets. This can be
inspired by the number of students in the course displayed under the
course name, or alternatively, by changing the filter, you can
display, for example, the number of students registered for an
examination date.
2 How many of the above test sheets should be the same. An empty field means that all test sheets will be unique.
Printing the test sheets
Information system Teacher [course selection] Work with ROPOT Printing from IS: Test sheets
You need to select the specific ROPOT. Now you basically have two options.
Try both on a few assignments and see which one "works better" for your ROPOT:
Prepare the test sheets to be printed from a browser: Cannot achieve double-sided printing. The output will look exactly as you see it in the browser (the browser prepares the printout), i.e. tables, images etc. should look like the page in IS. Select the number of test sheets you want to print; type all the test sheets on one page, click on "Prepare the test sheets to be printed from a browser" and print. As you print, the browser will print each new test sheet on a new page.
Printing test sheets into PDF or using a printer: You can check the option to make each test span an even number of pages for two-sided printing . If the original test sheet has an odd number of pages, then each test sheet will have an even number of pages in the resulting printable file. The numbers of the test sheets you print will be offered to you automatically. You will need to select the type of file to print to (PDF file is best) and click on "Download".
The PDF file will open straight away. You be able to check that the sheets look as you wish, e.g. for double-sided printing, and print on your chosen faculty printer using the "Print" button. This printing is done by the IS subsystem, more complex elements in the test sheets (tables, images) may not work. Alternatively, you can download the PDF of the test sheet and print it afterwards.
1Preparation of the test sheets to be printed from a browser.
2Printing test sheets into PDF or using a printer.
Printing the answer sheets
Information system Teacher [course selection] Work with ROPOT Printing from IS: Answer Sheet
You can select the type of questions you are using in your test (type :r to select just one correct answer, type :c to select at least one correct answer, or handwritten text with scores if you are using open-ended answers ). Choose the language and the title of the person identification field (typically leave the "personal identification number (učo)" option – other options are used, e.g. for scanning the answers of applicants for study (the "application ID" option) or for answers of persons completely unrelated to the
AMBIS (the "ID selected by me" option). Then you need to enter the number of answer sheets you want to print (it is a good idea to print more than the number of test sheets you will be using, because if a student ticks a question incorrectly and wants to change his/her answer or has already used up the possible number of corrections, he/she will need to be given a new answer sheet and will fill in the answers again) and print them.
1Selecting the type of questions.
2How many questions and possible answers should be on the answer sheet.
Not to be filled in for the "handwritten text with scores" option.
3Other options that affect the appearance of the answer sheet.
Printing the dispatch form
Information system Teacher [course selection] Work with ROPOT Printing from IS: Dispatch form
You will need to enter the učo (personal identification number) of a person into whose File Depository should the scanned answer sheets be uploaded and check the option to have the test sheets recognized after they were uploaded into the depository. You need to print the dispatch form and scan it when scanning the answer sheets; place it either before or after the scanned sheets. For more information on sending scanned answer sheets to the IS, see
Information system Printing from IS Skenování do ISu
Creating and printing the dispatch form is typically not necessary if you will be scanning and evaluating the answer sheets yourself (using Check results of recognition process).
Scanned answer sheets can be uploaded to a person's depository directly and without a dispatch form by entering the person's učo (personal identification number) in the scanning program's field.
1The UIN (učo) of the person who will evaluate the answer sheets.
2Option typically for handwritten tests that the teacher corrects with colored pencil.
Information system Teacher [course selection] Work with ROPOT Folder contents recognition
Specify a folder in your Depository containing the scanned files of the answer sheets and click on "Use the folder selected". Once the answer sheets have been recognised, go to the Checking results of recognition process application, select the appropriate ROPOT description and the folder with the recognised files and click "Check".
The application will offer to correct the answer sheets that it either could not recognize or there is some other discrepancy (missing test sheet number, učo, answer is illegible or missing completely, ...).
1After clicking on "correct" you can try to fill in the missing data yourself in the prepared fields if the data on the answer sheet is present and just not recognized.
1Correction of scanned answer sheet recognition. The "i" icon indicates that this is a recognized correction.
When you have completed your corrections, you need to click on "Save" in the upper section and then close the window.
You can find the completely missing entry (test sheet number, učo) by the unused test sheet numbers,
which are listed below the list of erroneous scan results, or by test sheets where students write their name and učo. This can be tedious for large numbers of answer forms, so we recommend consistently requiring students to remember to write učo and test sheet number.
1Test sheets which have not been used.
You can fill in the misrecognized answer yourself according to the original.
If the scanned answer sheet is fine and legible, but the answers are still not recognized, it is possible that the answer sheet is scanned incorrectly. Then the answers need to be manually filled in.
It may happen that even after correcting the wrong answer sheets, there are still some unused assignments or that there are fewer answer sheets which has been scanned than the paper ones.
If all students came to the examination, then some students may have taken the test sheet as well as answer sheet home with them or the scanner feeder may have taken two sheets instead of one.
By assignment number, you can find the paper answer sheet and use the option "Create a new blank answer sheet to fill in manually" to create another form to fill in the answers, which, according to the paper form, you fill in. This option is also useful if the form is otherwise damaged and cannot be scanned.
1This option can be used to correct unrecognizable sheet by filling it in manually.
Once all the corrections are complete, click on "Check" again. If everything is now in order, click on "Link the records to the ROPOT application". Alternatively, you can enter the date from which the scanned answer sheets will be made available to students in their retrieval box.
Once the records have been linked to the ROPOT description, the scores for each test sheet (assignment) will be entered into a notebook, which will be the same name as the ROPOT title. These scores can then be used by the application
Information system Teacher [course selection] (Notebooks) Evaluate on the basis of scores
and converted to grades according to the specified scale. Using the application
Information system Teacher [course selection] (Notebooks) Evaluation transfer
you can assign students grades from the notebook as the final course grade. For more information, see the help:
Information system Help Teacher Notebooks
Scanned answer sheet previews and a records of recognition (question number, ticked answer and number of points awarded for the question) can be found in the students' retrieval box:
Information system Student Teaching Answer sheets
Note
Scores from scanned tests of unauthenticated persons or persons identified by application number cannot be entered in the notebook. Those identified by application number can find answer sheet previews and recognition records in their application.
After scanning, recognizing and evaluating the tests, the IS will automatically link the recognized data to the ROPOT with the students' answers as if they had checked the answers directly in the ROPOT application in the IS (although students cannot see these answers yet – not valid for handwritten answers). The teacher can find such answers in the application:
Information system Teacher [course selection] Work with ROPOT Responses
If the student is to be able to view the responses they provided, this can be set via the ROPOT description. This can be set straight away when preparing the ROPOT before printing the test sheets or at any time afterwards.
These are the settings under "Display the correct answers to students after they have finished working with the ROPOT application" and "Rights and time groups":
1Display setting options. In case of limiting the viewing "only to", it is necessary to take into account that students can print the displayed questions from the browser and have them available after this date.
Who is allowed to work with the ROPOT:
1 Who is allowed to work with the ROPOT: Typically, this will be students enrolled for a specific examination date or all students in a course; it will be those students who are allowed to view the responses they provided. You need to click on "Add another right", here you need to select the option "students with a reservation on an examination date" (or other suitable option), then select a specific examination date (or other refinement) from the menu and confirm by clicking on "Add the right".
2 When the ROPOT can be worked with: If the option "No, never (select this option provided the test is to be scanned and you only want to make it available for browsing)." is checked in the "Should students be allowed to access this ROPOT application repeatedly?" section, the content of the boxes can be left blank and students will only have access to the viewing their answers.
Finally, you need to specify the folder to which the link to the ROPOT should be placed. The course usually has a preset folder for ROPOT (Revision, Opinion Poll and Testing) in Study Materials and this setting does not need to be changed. The description of the ROPOT needs to be saved via the "Save and make accessible" button.
In the case of ROPOT in the "scannable handwritten text and scores"
mode, students can see a scan of their answer sheet in their Retrieval
Box according to the settings (the time and date from which students
will be able to access the previews in the Retrieval Box can be set
when checking results of recognition process). You can also make scans
of answer sheets available to students in responses view by setting
the ROPOT as accessible in the ROPOT description (the "Save and make
accessible" button).
Scanning handwritten tests is an option a teacher can use if he/she wants students to write the solution to a problem on paper (drawing graphs, pictures, etc.).
The teacher can then correct the students' paper solutions and give them a score.
The teacher can write the evaluation comment and points directly on
the answer sheets and then scan them in, or if the teacher prefers to
enter the evaluation comment and points on the computer, he/she can
scan the answer sheets first and then add the evaluation comment and
points in the Responses application.
Students can have multiple problems on multiple sheets of paper. The student writes their answers on the front side of the answer sheet. They can also write on the reverse side, but this is not scanned so the student will not see it in the IS AMBIS.
Once the paper has been corrected and marked by the teacher and entered into the IS AMBIS, students can see their answers and the teacher's comments in the IS AMBIS.
The basic procedure is illustrated in the following commented video, a
more detailed procedure including all options is specified in the text
below:
Procedure:
Create a ROPOT description for scannable handwritten tests (see ROPOT description).
You can either prepare the assignment on a separate sheet with students writing their answers on printed answer sheets with the header, or you can copy the assignment under the header on the answer sheet. However, you must not interfere with the machine-processable zone (it is marked on the answer sheet).
The student fills in the sheet number (e.g. 3 sheets in total – each sheet will have one or more questions) and his/her učo. The student will complete the paper.
See
Help Teacher Tips on examinations based on scannable answer sheets
Correct the handwritten test by hand, you can write your comments on the front side. Only the front side is scanned, the reverse side is not scanned. For correcting, you can choose whether you want to correct and scan the paper in colour or black and white. If you choose to scan in black and white to distinguish corrections and teacher comments, it is recommended that you use a thick black marker, for example.
Enter the number of points in the box provided. In case you make a mistake and need to correct it, write in pencil and erase any errors. The second way is to write, for example, the letter E instead of a number in a blank, which will cause the error to be reported later. The error can then be corrected manually.
Scan the answer sheets with the dispatch form either on your own or with CIT support. When sending to the IS, place the dispatch form either before or after the scanned papers.
Note
If you have corrected the papers in colour, you need to set the scanning program skenovani.exe to scan "in colour" instead of "greyscale" before you start scanning.
After checking, the results are entered into the IS. The IS AMBIS will automatically create notebooks for each answer sheet, i.e. in notebook 1 will be the scores of all students from answer sheet 1, in notebook 2 from answer sheet 2, etc. In the notebooks, the scores are entered with an asterisk.
In the Teacher's Notebook – using the function "Add up scores stored in different notebooks" – will determine the total number of points by adding up the notebooks for sheet 1, sheet 2, etc.
If you plan to correct students' answers on your computer (i.e., you
have set the ROPOT description to be manually evaluated), then you can
enter the grading comments and scores in the Responses application,
where you will find a preview of the scanned student answer sheets and
a text box where you can enter verbal comments and scores.
Yes, it is. The procedure is the same as for scanning the tests of persons with the učo, but when creating the ROPOT description, you need to specify what type of number to scan.
The option "change identification method" located next to the ROPOT mode selection on the ROPOT description setup form is used for this purpose.
If you want to scan the tests of applicants for study at the AMBIS, use the option "Identification method: application No.".
If you want to scan the tests of persons without any relation to the AMBIS (e.g. if you have your own list to identify them by), use the option "Identification method: ID number selected by me".
Within a single ROPOT description, you can scan either only tests of students with učo, or only tests of applicants for study with application numbers, or only tests of people with an assigned number.
Note
Scores from scanned tests of persons with an assigned number and applicants for study with an application number cannot be recorded in the notebook. Persons with an assigned number are not able to see answer sheet previews and recognition records of their tests. Applicants for study with an application number will be able to see answer sheet previews and recognition records of their tests in their application.
If you enter the answer sheet for the wrong student, or if a preview
of the answer sheet is entered into the Retrieval Box by a stranger
(this happens when a student incorrectly fills in his/her UIN on the
answer sheet), the error can be corrected.
If the answer sheet is in "scannable handwritten text and scores"
mode, you can correct the error in the Responses application, where
you have the option in the view of student's session to turn on
deletion of answer sheets and delete sheets one at a time. By doing
this (deleting the answer sheet in the session), the sheet will also
be deleted from the wrong person's Retrieval Box. Note, deleting the
entire person's session will not delete the established previews from
the student's Retrieval Box.
naskenovat sadu odpovědních listů a předat je ISu k vyhodnocení
zkopírovat naskenované dokumenty (příp. jiné soubory) do Úschovny uživatele
Program předpokládá (stolní) skener připojený k počítači se systémem MS Windows, zpravidla s automatickým podavačem a dále ovladače skeneru
komunikující dle standardu TWAIN.
Pozn.: Fungování s jinými typy skenerů není vyloučeno, avšak nebylo testováno.
Pokud je na počítači nainstalováno více ovladačů skeneru (je připojeno více skenerů, nebo výrobce skeneru dodává více různých ovladačů), objeví se po
spuštění dialog umožňující výběr ovladače, pravděpodobně s titulkem Select Source (tento dialog není ovládán programem Skenování do IS MU). Je-li na
počítači pouze jeden ovladač skeneru, bude vybrán automaticky.
V případě, že bude dialog ukončen bez výběru ovladače skeneru, nebo pokud na počítači není nainstalovaný ovladač, zobrazí se varovné hlášení a program
bude spuštěn v omezeném módu umožňujícím pouze přenos existujících souborů do ISu.
Uživatel si po spuštění programu vybere jednu z následujících možností:
skenovat dokumenty a naskenované je odeslat do ISu
odeslat soubory z již existující složky
vybrat již existující složku, k jejím souborům přidat další naskenované stránky a celé předat ISu
Volba 'Chci naskenovat stránky do souborů a odeslat je' je základní funkcí programu. Do pomocného adresáře se postupně ukládají soubory
odpovídající naskenovaným stránkám. Skenování je iniciováno tlačítky 'Skenovat z plochy' a 'Skenovat z podavače', která zároveň určují zdroj pro
skenování. Tlačítka lze použít opakovaně a libovolně je kombinovat.
Příklad: Pro skenování sady odpovědních listů použijte několikrát tlačítko 'Skenovat z podavače' podle poměru počtu stránek k naskenování a kapacity
automatického podavače skeneru.
Pozor: Pokud jsou skenovány odpovědní listy, je nutné výchozí nastavení ponechat beze změn, v ostatních případech lze před skenováním měnit barevnost a
rozlišení.
Pod tlačítky 'Skenovat ...' se zobrazuje informace o počtu a umístění dosud naskenovaných souborů (stránek). Po naskenování všech požadovaných stránek je
lze odeslat do ISu.
Při skenování odpovědních listů je nutné Průvodku naskenovat buď jako první, nebo jako poslední stránku (celého balíku odpovědních listů, nikoli
každé dávky dle kapacity podavače), jinak nebude možné naskenovanou sadu odpovědních listů po odeslání do ISu správně vyhodnotit. Při skenování více
balíků odpovědních listů je nutné odesílat každý zvlášť tak, aby v každém balíku odesílaném do ISu byla právě jedna Průvodka.
Při skenování odpovědních listů nezáleží na jejich orientaci: budou-li do podavače vloženy "naopak", bude naskenovaný obraz automaticky otočen.
Volbou 'Chci odeslat již naskenované soubory' zvolíte existující neprázdnou složku, jejíž soubory budou předány do ISu. Jméno složky lze
editovat v příslušné kolonce, nebo ji lze vybrat pomocí tlačítka 'Vyhledat'. Ve složce s naskenovanými odpovědními listy je nutné, aby soubor s
Průvodkou byl abecedně buď první, nebo poslední.
Volbou 'Chci přidat k již naskenovaným další a odeslat' kombinuje výběr existující neprázdné složky a poté skenování dokumentů. Skenované stránky
se ukládají do zvolené složky, ze které budou ISu odeslány všechny soubory.
U naskenovaných odpovědních listů musí být Průvodka abecedně první mezi již existujícími soubory (přidáním znaku vykřičníku na začátek jména souboru s
Průvodkou docílíte jejího zařazení na začátek), nebo jméno abecedně posledního souboru ve složce musí být 1xxx.bmp (kdy x je libovolná cifra) a
zároveň stránka Průvodky musí být naskenována jako poslední z přidávaných stránek.
Je nutné vyplnit buď učo osoby, do jejíž Úschovny budou soubory přeneseny, nebo zaškrtnout volbu 'Průvodka' udávající, že jde o odpovědní listy
s Průvodkou, které mají být na straně ISu vyhodnoceny.
Po odeslání dat
Čeká se na odpověď ISu (může trvat i několik sekund). V případě odpovědních listů hlášení o přijetí dat v pořádku znamená, že data byla
předána a Průvodka nalezena a zpracována, neznamená to např. analýzu všech přenesených odpovědních listů.
Aplikace se vrátí do stavu po spuštění programu. Pokud byla v předchozím kroku vybrána nějaká existující složka, zůstane její jméno v kolonce pro výběr
složky (ve výchozím stavu neaktivní). Volbou 'Chci naskenovat stránky do souborů a odeslat je' se tato složka nepoužije, zůstává tam pro ostatní dvě
volby pro případ, že by se uživatel chtěl vrátit k datům, s nimiž pracoval v předchozím kroku.
Pozor: Aplikace zatím z technických důvodů neodesílá data serveru průběžně ihned po kompresi jednotlivých naskenovaných souborů, ale ukládá je před
odesláním na disk jako jeden zkomprimovaný soubor do adresáře s odesílanými soubory. Na disku tak musí být na komprimovaná data místo (alespoň
polovina místa, které zabírají nezkomprimovaná data, raději však stejně). Dále to znamená, že pokud v adresáři s odesílanými daty bude existovat soubor
is_sken.tmp, bude bez varování smazán (Pravděpodobně bude takto fungovat jen dočasně).
Před skenováním, i v jeho průběhu při doplňování stránek do podavače, je vhodné šetrně otřít prach a drobná smítka z té části plochy skeneru, přes
kterou automatický podavač posunuje skenované stránky. Při skenování mnoha stránek se usazené drobné nečistoty mohou promítnout do naskenovaných souborů
jako svislé čáry a ztížit tak rozpoznávání.
Uváznutí papíru v podavači
Stane se snadno, např. když jsou odevzdané odpovědní listy pomačkané. Proto ve složce s naskenovanými soubory zkontrolujte, který odpovědní list byl
naskenován jako poslední a který/které je ještě potřeba vrátit do podavače. Novější skenery pro urychlení začínají natahovat další stránku do
podavače již při skenování předchozí. Skener se tak může zastavit ještě před odesláním obrazu předchozí stránky do počítače, takže tato projde
podavačem mezi ostatní již naskenované, třebaže z pohledu počítače/programu naskenovaná nebude.
Rozdíly v ovladačích skeneru
Ne všechny ovladače skenerů dodržují svým chováním normu, proto nemusí na konkrétním ovladači vše fungovat podle popisu výše. Takové situace by měly
být ošetřeny informativními či varovnými hlášeními a neměly by mít vliv na funkčnost resp. použitelnost programu.
Pokud by přesto došlo k neuspokojivému či nestandardnímu chování a nepomohlo ani použití jiného ovladače skeneru (je-li k dispozici), zašlete
prosím popis průběhu spolu se souborem log.txt z adresáře Skenování v dokumentech přihlášeného uživatele na adresu ambisisfimunicz.
Pod pojmem rozpoznávání rozumíme proces označovaný optické
rozpoznávání znaků (OCR - Optical Character Recognition). Skenerem
naskenujete jednu nebo více stran textu, příp. textu spolu s grafikou a
získáte tak počítačový soubor s obrazem skenované předlohy. Rozpoznáním
získáte ze souboru s obrazem naskenované předlohy text, který pak
můžete např. označit myší, můžete v něm vyhledávat, přenést text do
Wordu a dále ho zpracovávat a upravovat.
IS umí rozpoznávat obsah PDF (Portable Document Format) souborů, tj.
souborů majících typicky .pdf na konci jména souboru. Budete-li chtít
naskenované předlohy rozpoznat, musíte skenovacímu software sdělit, že
má produkovat PDF soubor. V jednom PDF souboru může být libovolný počet
naskenovaných předloh (stran textu).
Rozpoznáním lze zpracovávat i PDF soubory, které vznikly jinak než
skenováním. Rozpoznat lze i PDF soubory vytvořené některými sázecími
(grafickými) programy zvláště v případech, že z nich text nelze běžnými
postupy získat (typicky pokud je "rozbitá" diakritika).
IS implicitně ke každému PDF souboru vytváří jeho textový formát a
ve Správci souborů textový formát najdete na stejném řádku (vedle)
originálního PDF souboru. Textový formát je určen pro fulltextové
vyhledávání a pro kontrolu podobných souborů.
jako dvouvrstvé PDF:
Vkladatel souboru smí ve Správci souborů požádat o vytvoření tzv.
dvouvrstvého PDF. Rozpoznávací systém vytvoří nový PDF soubor, který
bude obsahovat jak oskenovaný originál (v první vrstvě), tak i
rozpoznaný text (ve druhé vrstvě). Tzn. že pod naskenovanými obrázky
písmen jsou uloženy počítačové znaky tak, že je nyní lze vzít do myši.
IS při požadavku vytvořit dvouvrstvé PDF původní PDF soubor přejmenuje
na _orig.pdf a změní mu typ z application/pdf na
application/octet-stream.
Nový (dvouvrstvý) soubor uloží pod originálním jménem s typem
application/pdf. Dále pak IS ještě z dvouvrstvého PDF automaticky
vytvoří formát .txt. Ve Správci souborů pak uvidíte na řádku s PDF
souborem jeho tři formáty. Soubor _orig.pdf se může zdát nadbytečný,
ale zatím se provozovatelé systému neodhodlali jej automaticky rušit,
protože s vytvářením dvouvrstvého PDF v ISu nejsou dlouhodobé
zkušenosti a může se stát, že se dvouvrstvé PDF vytvoří v nějaké
situaci špatně. Proto originál zachováváme.
IS je schopen rozpoznat PDF soubory uložené do libovolné agendy, ve
které funguje Správce souborů. Tzn. ve Studijních materiálech, v
Úschovně, na Mém webu, v Poskytovně, v Dokumentovém serveru atp. IS
automaticky rozpoznává do formátu text. O rozpoznání do formátu
text není nutné žádat.
Chcete-li vytvořit dvouvrstvé PDF, musíte požádat ve Správci souborů
následovně:
Na řádku se souborem kliknete vlevo na symbol montážního klíče
(Nástroje).
Kliknete na odkaz "Zařadit do fronty na rozpoznání".
Vyberete, zda chcete dvouvrstvé PDF nebo text. Zřejmě chcete
dvouvrstvé PDF.
Kliknete na tlačítko "Zařadit do fronty na rozpoznání".
Abyste mohli nechat soubor rozpoznat, je potřeba mít právo
daný soubor spravovat. V případě, že toto právo k danému souboru
nemáte, nenabídne se vám odkaz "Zařadit do fronty na rozpoznání".
složka obsahuje mnoho souborů, a proto u nich nebyla přepočítána
práva
Práva překontrolujete (přepočítáte) pomocí ikony montážního klíče
se zaškrtávátkem v hnědé liště označující úroveň, ve které se právě
nacházíte.
Systém dovolí požádat o rozpoznání libovolného počtu souborů, nicméně
rozpoznávání souborů je řízeno prioritami. Student pro dva soubory a
učitel pro dvacet souborů získá nejvyšší prioritu. Pro další soubory
získáte už prioritu nižší. Při stanovování priorit se vychází z počtu
souborů, které jsou aktuálně zařazené ve frontě na zpracování. Soubory,
které již byly zpracovány (rozpoznány), se do výpočtu nezahrnují.
Jednou přidělená priorita se nemění. Proto nemá smysl žádat o
zpracování velkého počtu souborů naráz, protože další soubory by se
zpracovávaly s nižší prioritou. Soubory na nižší prioritě se dostanou
ke zpracování až v okamžiku, kdy systém zpracoval všechny soubory s
prioritou vyšší a také zpracoval všechny soubory, kterým automaticky
bez žádosti uživatele vytváří implicitní textový formát.
Je třeba upozornit, že rozpoznání jednoho souboru trvá od jednotek
minut po jednotky hodin podle počtu stran a složitosti obsahu. Dobu, do
které bude váš soubor rozpoznán, nelze předem určit, ani garantovat.
Správci systému budou stav rozpoznávacích front sledovat a při
zjištěném dlouhodobém přeplnění front se pokusí zakoupit další servery
a rozšířit tak počet serverů, které rozpoznávání provádějí.
Pokud jste požádal/a o rozpoznání souboru ve Správci souborů, obdržíte
po provedení rozpoznání od systému informační e-mail. Informační e-mail
se posílá po zpracování každého vyžádaného souboru zvlášť.
Soubor byl buď zpracován úspěšně, nebo neúspěšně. O výsledku zpracování
budete informováni v e-mailu.
Neúspěšné zpracování může mít jeden z následujících důvodů:
PDF soubor je nějakým způsobem chráněný. Např. je zašifrovaný, nebo
je v něm vypnutá možnost kopírovat text (označit něco myší).
Musíte dodat soubor, který není tímto způsobem chráněný.
PDF soubor neobsahuje žádný text.
PDF soubor obsahuje nečitelný text, např. rukou psaný. Rukou psaný
text systém neumí rozpoznat.
Obsah souboru byl nekvalitně naskenován. Text je příliš světlý nebo
kontrast kolísá.
Soubor je příliš velký. Rozpoznávací systém má pojistku, která
rozpoznávání násilně ukončí po několika hodinách práce nad jedním
souborem. Pokud se do té doby nestihlo soubor rozpoznat (např. 500
stran a více), prohlásí se soubor za nezpracovatelný. Přesně určit
předem maximální zpracovatelný počet stran však nelze.
Je-li soubor jednou označen za neúspěšně zpracovaný, nelze znovu
požádat o jeho zpracování. Uživatel by jej měl typicky upravit a zavést
do systému znovu. Pak může znovu požádat.
se dozvíte stav svých žádostí vzhledem k žádostem ostatních uživatelů,
zde můžete svůj požadavek na rozpoznání zrušit, uvidíte seznam souborů,
které se nepovedlo úspěšně převést, a příp. můžete vyhledat PDF soubor
a zařadit jej do fronty na rozpoznání. Pro zařazování do fronty na
rozpoznání se preferuje postup přes Správce souborů, viz výše.
mám záložky (odkazy do internetu, „Oblíbené“, Bookmarks) na jednom bezpečném místě v IS AMBIS,
pokud mne něco zaujme, založím veřejnou záložku i pro ostatní,
vidím, jaké záložky založili ostatní.
Zde jsou záložky, které si v poslední době uložilo nejvíce lidí (tzv. žhavé záložky):
https://is.ambis.cz/auth/ln/hot.
Zobrazit žhavé záložky.
Veřejné záložky jsou k nahlédnutí i uživatelům nepřihlášeným do IS AMBIS, např.
https://is.ambis.cz/ln/hot.
Štítky (anglicky tag) si k záložkám vepisuji jako nehierarchická
klíčová slova - o čem
záložka je, proč jsem si ji uložil, co si o ní myslím, k čemu ji chci
později použít. Pro představu zkuste
https://is.ambis.cz/auth/ln/tag/radioZobrazit.https://is.ambis.cz/auth/ln/tag/brno+cajovnaZobrazit.
Názvy štítků lze vepsat do adresy, jak je zde naznačeno, nebo v agendě
použijte vyhledávací pole.
Co znamenaji údaje u zobrazené mé záložky?
1 Zadám-li štítek „favorit“ nebo „favourite“, je záložka dostupná v pohledu „oblíbené“.
2 Štítek s kódem předmětu zakončený vykřičníkem zadal učitel předmětu.
3 Cizí štítky: tuto záložku mají uloženou i jiní lidé, s těmito štítky.
4 Možnost záložku upravit.
5 Počet osob, které mají tuto záložku: odkaz vede na seznam osob a podrobnosti.
6 Kdo záložku jako první vložil do IS AMBIS a kdy.
7 Odkaz na veřejné záložky osoby, která záložku první vložila do IS AMBIS.
Nechcete-li sdílet záložky, je možné si položky ukládat výhradně jako soukromé. Pokud pracujete
z mnoha počítačů (různé počítačové učebny, studovny, domov, kolej, ...), je pro vás
stále dostupná báze vašich odkazů přínosem - nemusíte
synchronizovat mezi jednotlivými počítači a prohlížeči; je k dispozici
všude, kde se
dostanete k IS AMBIS
Kdykoli vás zaujmou materiály, které takto poskytují
kolegové, můžete se také do sdílení (do informování o tom, co jste kde na webu
zajímavého četl) zapojit.
Při vkládání nové záložky vyplňte Název, Adresu, ev. Popis. Pokud systém tuší, jaké štítky se k záložce hodí či jste již používali, nabídne vám je:
1 Náhled výběru štítků.
Kliknutím štítky vkládáte a opětovným kliknutím odstraňujete, do políčka můžete připsat další. Štítek „favorit“ se nabízí vždy, můžete jím záložku označit jako oblíbenou.
Veřejné štítky: o čem záložka je, jaká je. Informace využitelné ostatními uživateli. Soukromé štítky: k čemu vám záložka je, značky pro další použití (ukol_precist,
darek_koupit), kterými nechcete „rušit“ veřejnou znalostní bázi.
Soukromá poznámka: text poznámky nevidí další uživatelé. Příznak „soukromá záložka“: celou tuto záložku nevidí další uživatelé.
Štítky pro předmět a pro obor: používejte je, upozorňujte svoje spolužáky
na zajímavé zdroje.
Odkaz „rychle“ v libovolném seznamu záložek
zobrazí formulářové políčko, ve kterém můžete upravit štítky k
záložce. Ostatní údaje budou okopírovány ze vzorové záložky beze
změn.
Pokud chcete touto metodou přidat soukromý štítek, uveďte před
něj znak dolar „$“, např. $proklikat.
Práce do školy, výzkum – označte si podklady k psaní eseje či
článku společným štítkem, budou se vám lépe dělat citace.
Studijní obory – máte zajímavé zdroje k oblasti, kterou
studujete? Označte je např. obor_sociologie či
obor_fyzika. Lze očekávat, že ostatní přidají zase svoje.
Co jste si přečetli a zaujalo – články na libovolné téma,
které stojí za přečtení, ev. je chcete doporučit ostatním.
Cestování – chystáte se někam? Najděte a uložte si možnosti
ubytování, stravování, zajímavé destinace. Při hledání štítky kombinujte,
např. znojmo+vino
Vaření – ukládejte si recepty štítkované např. dle surovin,
ceny, způsobu přípravy, ...
Hodnocení – vyjádřete počtem hvězdiček váš názor na
odkazovanou restauraci, knihu, článek ...
Odborník doporučuje – zajímá vás, které odkazy k určitému
tématu si založil známý expert? Mají adresu
https://is.ambis.cz/auth/ln/UCO.
Pohled na záložky je dostupný i uživatelům nepřihlášeným do IS AMBIS na adrese is.ambis.cz/ln/ (nemohou do agendy
přispívat). To vám dovoluje používat agendu např. pro vaše veřejné seznamy
Co jsem poslední dobou četl zajímavého – evidujte si v systému a odkaz na seznam dejte na svůj web, svůj blog
Nahoře v navigační liště si můžete přepnout pohled na záložky dle různých kritérií.
Pro přístup ke svým záložkám volte:
moje: oblíbené – co mám označeno štítkem favorit nebo favourite,
moje: všechny – vše, co mám uložno jako záložku.
Pro orientaci co nového v agendě přibylo, co uživatelé na internetu
čtou a zakládají:
ostatní: žhavé – co si nedávno uložilo více lidí,
ostatní: populární – co má uloženo nejvíce lidí,
ostatní: nejnovější – poslední uložené záložky,
štítky – všechny používané štítky.
Zajímají-li vás záložky označené konkrétním štítkem nebo založené
konkrétní osobou, použijte vyhledávací pole a v menu zvolte „ve štítcích“.
1 Možnosti přístupu k záložkám.
2 Pole pro vyhledávání ve štítcích.
Slova ve vyhledávání lze kombinovat pomocí znamének plus a minus:
kas+linux
Záložky uživatele s přezdívkou „kas“, které označil štítkem „linux“ (nebo záložky označené štítky „kas“ a „linux“ zároveň).
linux+1885
Záložky uživatele s učo 1885 označené štítkem „linux“.
recept-cukr
Záložky označené „recept“, ale neoznačené „cukr“.
Do vyhledávacího pole můžete zadat také url - adresu záložky
(musí přesně odpovídat).
Lze také plnotextově vyhledávat v názvech, popisech a poznámkách
(přepněte v menu na „v textech“). Toto vyhledávání je realizováno jiným mechanismem, než hledání
mezi štítky, a proto se v něm používají jiné operátory pro případné
kombinování:
víno MINUS Znojmo
Záložky, jejichž texty obsahují víno, ale neobsahují Znojmo.
víno AND Znojmo
Záložky, jejichž texty obsahují víno i Znojmo.
Pokud si nejste jisti přesným tvarem hledaného slova, lze jej doplnit
znakem procento, tj.
vín%
vyhledá výskyty slov víno, vína, vínový ap.
Lze také vyhledat záložky neoznačené žádnými štítky - odkaz „moje záložky bez štítků“ ke konci
pravého sloupce s vašimi štítky. Jsou dostupné také na adrese /ln/učo/>/bez či
/ln/učo/>/without. Cizí veřejné záložky bez štítku najdete pod volbou „štítky“
v horní liště (pod mrakem štítků), nebo na adrese /ln/tag/bez, /ln/tag/without.
Tip
Do agregačních mechanismů nejsou zahrnuty záložky, v jejichž URL
se objevuje „is.ambis.cz/“ Takové záložky se nevypisují v pohledech žhavé
záložky, populární a nejnovější.
Mrak štítků zobrazuje štítky, které byly nejčastěji použity k označení záložek. Pomáhá tak nejen k lepší orientaci na stránce, ale i k vyhledávání. Častěji používané štítky jsou zvýrazněny větším písmem. V mraku štítků tak vidíte, které štítky jsou ve vybrané kategorii použity a můžete podle nich dále vyhledávat. Mrak štítků se mění podle toho, v jaké kategorii štítků se právě nacházíte. Pokud si nějaký štítek rozkliknete, bude mrak na nové stránce odkazovat na související štítky. Štítky mohou být seřazeny podle abecedy nebo podle četnosti výskytu.
1 Ukázka mraku štítků.
Pokud vám pro zobrazení štítků nevyhovuje mrak, můžete si nejpoužívanější štítky zobrazit v seznamu. V závorce se pak zobrazuje četnost výskytu štítku.
(tj. s vykřičníkem na konci)
jsou záložky k předmětu, které uložili bývalí i současní vyučující
tohoto předmětu. Můžete tedy zvolit, zda vás zajímají výhradně
odkazy doporučované učiteli, nebo cokoliv co k předmětu kdokoliv
zařadil (bude typicky obsáhlejší, ale možná může být méně kvalitní).
Jak lze Záložky využít v e-learningu? Odkazy na zajímavé zdroje v internetu
má mnoho učitelů zájem studentům poskytovat - nejčastěji formou souboru
se seznamem odkazů zavěšeným do Studijních materiálů předmětu. Agenda
Záložky přináší nové možnosti: odkazy lze snadno editovat, štítkovat, třídit
a zejména do nich mohou snadno přispívat studenti. Zapojení studentů
do spoluvytváření informačních zdrojů je v e-learningu trendem. Jako
učitel můžete například:
vystavit záložky k určitému tématu,
označit je štítkem a např. v textu
studijního materiálu na ně upozornit - jsou na adrese
https://is.ambis.cz/auth/ln/tag/zkratka_fakulty:kod_predmetu+jmeno_stitku
tj. např.
https://is.ambis.cz/auth/ln/tag/FI:PV005!+web
Variantu bez vykřičníku použijete, pokud chcete vyhledat i ty
záložky, které k předmětu nevložili učitelé, ale lib. uživatelé:
https://is.ambis.cz/auth/ln/tag/FI:PV005+web
vystavit seznam doporučené literatury, jejíž položky jsou dostupné
on-line (články, volně šířené publikace). Pokud zadáváte studentům
např. každý týden čtení, lze toto snadno vyznačit štítky, např.
Snadnou editací štítků můžete seznamy pohodlně měnit, doplňovat. Může
to být pohodlnější, než udržovat seznamy odkazů např. v souborech ve Wordu.
Studentům jen sdělíte zvolenou konvenci (např. že mají hledat
„cteni+prvni_tyden“) nebo jim v Interaktivní osnově či jinde připravíte
odkaz se seznamem pro daný týden;
zadat studentům vyhledat/aktualizovat záložky k určitému
tématu a strukturovaně je oštítkovat a popsat (vyjádřit, co obsahují,
proč by na ně čtenář měl klikat, jak jim připadají kvalitní, ...).
Pokud vaši studenti zpracovávají např. referáty k danému tématu, může
být součástí úkolu průzkum a doplnění „Dalšího čtení k tématu“
prostřednictvím této agendy;
vyzvat studenty, aby si zkopírovali a okomentovali záložku -
vložte odkaz např. na určitý článek. Pomocí „přidat k mým“ si student
snadno odkaz zkopíruje a může u něj vyplnit štítky a popis. Pod odkazem
např. „14 osob“ se pak zobrazuje souborná stránka, kde lze popisy
zhlédnout.
Někdy se v těchto systémech kromě sběru komentářů sbírá také „agregovaný
názor“ studentů: v popisu k vloženému článku formulujte dotaz, např.
„Myslíte si, že autor Platónovo východisko správně pochopil? Vyjádřete
svůj názor štítkem ano / ne“ a přidejte k záložce štítky „ano“ a „ne“.
Student pak může použít volbu „rychle“, umazat štítek, pro který „nehlasuje“
a záložku si uložit. Cizí štítky jsou u záložky vypsány v pořadí
dle četnosti použití, tj. je vidět, zda studenti hlasují spíše „ano“
nebo „ne“. Můžete samozřejmě nechat „hlasovat“ i z více možností, např.
pomocí počtů hvězdiček ap.
Jsou to ty vaše Záložky, které mají štítek favorit nebo favourite.
Máte je přehledně pod odkazem „oblíbené“ a lze u nich nastavit pořadí.
Typicky pro:
odkazy jinam, které používáte hodně často: vaše e-mailová schránka
na cizím serveru, vaše oblíbené rádio, předpověď počasí, slovník,
encyklopedie wikipedia a podobně;
odkazy do ISu, které např. aktuálně používáte více, ale nejsou
dostupné „na jeden klik“ z titulní strany - např. přehled poznámkových
bloků, poskytovna předmětu, který nemáte zapsaný, diskusní vlákno, kde
čekáte na odpověď.
Note
Některé stránky IS AMBIS - zejména výsledky
vyhledávání v různých agendách - nemusí být možné do Záložek zařadit,
resp. po otevření takové Záložky se vám zobrazí jen nabídka vyhledávání
a nikoliv dříve vyhledaný výsledek. Musíte v konkrétním případě
vyzkoušet, zda umožňuje.
Pro export záložek si nejprve vyberte záložky, se kterými chcete pracovat, v navigační liště nahoře na stránce (volba „moje oblíbené/všechny“).
Následně zvolte v pravém sloupci v sekci Správa záložek možnost „export“. V aplikaci pro export můžete upřesnit rozsah exportu či typ výstupu.
Pokud chcete do IS AMBIS nahrát svoje záložky z jiné služby pro ukládání záložek, vyberte v sekci Správa záložek možnost „import“ a následně dohledejte
soubor ve vašem počítači.
Štítek je jedno slovo (bez mezery), které je vepsáno ke konkrétní
záložce a podle kterého pak můžete vyhledat skupinu záložek.
Ve štítku lze používat pouze písmena (i s diakritikou, malá i velká),
číslice, znak podtržení (_) a hvězdičku.
Záložky označené štítkem nebo kombinací štítků jsou na adrese:
https://is.ambis.cz/auth/ln/tag/stitek1+stitek2
Záložky označené štítkem1 a současně neoznačené štítkem2 jsou na adrese:
https://is.ambis.cz/auth/ln/tag/stitek1-stitek2
Tipy:
Štítek formulujte v 1. pádu jednotného čísla, tj. např. „internet“
nikoliv „internetový“, „internetové“ nebo „hra“ nikoliv „hry“. Štítky se tak
méně množí.
Slova v nutně víceslovných štítcích oddělujte podtržítkem, např. dvur_kralove.
Rozhodněte se, zda budete používat štítky česky, anglicky, s diakritikou, bez
a dodržujte to - budou se vám méně množit. Většina prohlížečů umí
zobrazovat adresy s diakritikou s URL. Pokud vyhledáte štítek
s diakritikou a nic se vám nenajde, např. is.ambis.cz/ln/tag/víno,
zkuste ještě bez diakritiky: is.ambis.cz/ln/tag/vino - chyba může být
ve vašem prohlížeči. V seznamech/mracích štítků se štítky slučují - nevidíte
vícekrát štítky lišící se pouze diakritikou nebo velkými/malými písmeny.
Nápadným formátováním (velká písmena, hvězdičky, více podtržítek, ...)
si lze opticky zvýraznit soukromé štítky, které třeba chcete mít v abecedním
seznamu svých štítků pohromadě (např. __ukol_tisk, __ukol_cist, __ukol_koupit)
Víte, že s dalšími uživateli sdílíte podobný speciální zájem (anime, web 2.0,
Carl Gustav Jung, ...). Domluvte se na systému štítkování – štítky se pak méně množí.
Jako štítky nelze používat slova „bez“ a „without“, protože takto systém označuje
záložky, které nemají žádný štítek.
Podobná služba je k dispozici např. na linkuj.cz, jagg.cz, del.icio.us,
digg.com. Jedná se o tzv. social bookmarking. Více o tomto fenoménu
najdete např. v záložkách na adrese
https://is.ambis.cz/auth/ln/tag/social_bookmarkingZobrazit.
V čem může být přínos obdobné služby v univerzitním prostředí?
Do sdílení se zapojí i lidé, kteří podobné služby na internetu
nenavštěvují, ale IS AMBIS používají aktivně.
Služba není anonymní – vidím, kdo záložku přidal, kdo a jaký má na
záložku názor (podle veřejných štítků).
Univerzitní komunita je (oproti širému internetu) poměrně sourodá:
zajímají nás informace o našem městě, o studiu, o studentském trávení
volného času, nebo o učení, cestování, vědě, ... Lidé mají obvykle zájem
o dění v oboru, který studují nebo vyučují. Sdílení odkazů do internetu
tak může být velmi přínosné.
Služba agreguje záložky týkající se studijních předmětů – snadno
můžete se zajímavým materiálem seznámit své spolužáky či své studenty.
Platí pravidla pro používání Informačního systému AMBIS.
Je povoleno vkládat záložky odkazující na komerční subjekty či nabídky služeb.
Je zakázáno spamovat opakovaným vkládáním stejných nebo podobných položek
s cílem dosáhnout efektu inzerce. Není povoleno duplikovat funkci Vývěsky
ISu.
Štítkujte záložky s rozmyslem. Neoznačujte např. oborovými štítky relaxační
(vtipný ap.) materiál – ctěte omezený čas jiných uživatelů, kteří v agendě
hledají např. užitečné zdroje ke svému studiu.
In the applications associated with e-learning in the AMBIS IS, the teacher has the opportunity to look at selected AMBIS IS pages from the perspective of a specific student. In this way, the teacher has the opportunity to check that the information entered by him/her into the Notebook has reached the student correctly, that he/she has set up the interactive course syllabus correctly, that he/she has set up the ROPOT parameters correctly, etc.
The mechanism was introduced at the request of teachers who wanted to introduce a student identity for testing into the system. However, a student identity for testing would not be usable in this AMBIS IS (unlike other systems) because the person who has enrolled in the course does not have common and uniform student rights (as is usual in other systems), but has individual rights. Students may differ in their study status, seminar group, may have individual rights, etc.
A teacher can use someone else's identity via:
Information system Teacher [course selection] (ROPOTs and Quizzes) E-learning from a student's point of view
The AMBIS IS allows teachers and s_vyuka explicit access right holders to choose someone else's identity. A teacher may change his/her identity to any of his/her students who have registered for the teacher's course in the last 3 years. Owners of the s_vyuka explicit access right are allowed to change identity to a student of the faculty for which the right is assigned.
After selecting someone else's identity, the teacher is only allowed to use the selected applications. These are e-learning related applications. The list of applications is listed below. The teacher will definitely not be able to access the student's e-mail, private bookmarks, grades from other courses, File Depository, etc.
Applications that run with someone else's identity selected work in a special mode. The teacher is prevented from performing operations other than viewing or reading under the selected identity. Thus, the teacher cannot perform any operation that would be identified in the database by the student's UIN (i.e. učo). That is, the teacher can see if the student is allowed to answer in the ROPOT, but cannot, for example, save the answers instead of the student or launch a new ROPOT session.
If the teacher has chosen someone else's identity, then the teacher has a distinctive red horizontal bar in the header of each AMBIS IS page. The student's name appears in the red bar. If the bar disappears, then you have clicked on a page where you no longer have the right to change your identity, and you can already see the page under your own identity (your name will be at the top right corner).
The teacher is allowed to use someone else's identity in applications:
Information system homepage
The teacher sees only the Student tile.
Student signpost
Only the Student / My courses, and Teaching tabs contain any clickable links.
Student / My courses tab
Only e-learning related links are clicable. The teacher can only see information accessible to him/her via the Teacher's Notebook. However, some information is accessible to the teacher only via the Teacher's Notebook of the course and not from student's point of view.
1 Available links in the course when using someone else's identity.
Teaching tab
The only clicable links are Study Materials, ROPOT (Revision, Opinion Poll and Testing), Information from notebooks, Notebook score statistics, Scheduled online lessons, and Student consultations and meetings.
Interactive syllabus
The teacher will only see the parts of the interactive syllabus that are accessible to the identity of student via which the teacher is viewing. Similarly, the teacher will only see those links and elements in the syllabus that the student actually has the right to read. The readership of the syllabus by the teacher viewing with someone else's identity is not reflected in the readership of the interactive syllabus by the student.
Study materials
It does not indicate information about the reading of a file that the teacher has read with the chosen someone else's identity (i.e. the student will still see the file as unread if the teacher has read it but the student has not).
Homework Vaults
The teacher, under someone else's identity, sees the folders of the homework vaults in the same way as the student, including any file or folder operations offered. So, for example, he or she can check what the homework vault folder tree looks like from the student's point of view and whether the student has sufficient access rights to upload their file. The teacher under someone else's identity cannot upload or manage files on behalf of a student. The teacher can only do this under his/her own identity.
File Manager
In the File Manager, the teacher can only choose someone else's identity when viewing the Study Materials. The teacher will not be able to access other people's File Depository etc. When the identity is changed, operations other than viewing or reading cannot be performed in the File Manager. If a teacher attempts to upload a file in the File Manager with a changed identity, the operation will be performed, but the teacher will be listed as the uploader even though someone else's identity remains selected. If the teacher gets to a location where someone else's identity is no longer applied, in addition to the red bar disappearing, an informational message will alert the teacher.
ROPOTs
The teacher can look at the ROPOTs and see if he/she has set the ROPOT correctly. The teacher is not allowed to launch a new ROPOT session or save the answers in behalf of the student. However, the teacher can change the last student’s save operation to submitted in the Responses application in the Teacher's Notebook in special case when the student does not finish his/her ROPOT session by submission of his/hers answers. The teacher does this under his/her own identity.
Notebook information
The teacher will only see information from the course notebooks that the teacher teaches.
Notebook score statistics
The teacher will only see information from the course notebooks that the teacher teaches.
All operations are recorded in the AMBIS IS. Operations performed by a teacher under someone else's identity are recorded in the same way as all other teacher operations.
By using someone else's identity in e-learning in the manner described in this Help, you are not violating the Rules Governing the Use of AMBIS IS or the computer network conduct regulations. This identity change mechanism is supported by the AMBIS IS and the operations are recorded.
By providing your password or making your account available to another person, you would be in violation of the rules and regulations and risk disciplinary action.
The teacher-student communication appears to be crucial chiefly in the e-learning courses, where
the teacher-student contact is considerably limited. Moreover, what attests to the importance of
the interaction is that it represents a motivating factor since
self-study always tends to become rather humdrum after some time and needs to be given some fresh air. Finally, students need someone to answer their questions related
to the subject matter as well as those pertaining to the ways of using the electronic material.
However, the very communication and techniques of maintaining it to the desirable extent may also represent a hindrance
when not handled properly. Teachers are therefore advised to motivate
their students to ask questions and participate in discussions actively. On the other hand,
assigning your students too many communication-involving tasks requiring a lot of participation on your part
might eventually keep you rather busy. That is why agreeing on certain deadlines and rules
usually proves useful.
E-mail, group e-mail: E-mail represents the most reliable mode of communication
between teachers and their students since both the groups are required to retrieve it. This is also the reason
why you should use it when sending your students the information you consider important. Tip: Before entering the Teacher's Notebook of a course,
you can select one or more filters to limit the number of students your e-mail will be sent to.
Notebook: The notebook allows you to enter the student's score or any other information you want
to communicate to him/her into a text field adjacent to his/her name.
The notebook itself can be configured to be either accessible or inaccessible to students.
For further information on this application, please see the Help section.
Course discussion group: This application can be utilized for discussing the issues related
to the organization of the course under which it has been created, or a concrete topic. Teachers are allowed to moderate the discussion
by deleting the contributions they consider irrelevant.
For further information on this application, please see the Help section. Tip: It is advisable to clearly delineate the topic (goal) of the discussion and specify
the rules governing it.
Sub-syllabus or discussion thread titled as 'News': Provided you are changing a syllabus
of your course, it proves convenient to keep all the information on the changes involving, for instance,
information sources, students' duties, etc. in one place. If you do not plan to post a large amount of this information in the future,
you can start making it public utilizing a sub-syllabus, which can be displayed to students as expanded by default (a mode you yourself can enable).
The advantage of using a sub-syllabus is that it is comparatively easy to navigate in. Provided you, however, expect the information to be extensive, it is advisable to post it
under a discussion thread and ask your students to only read it, but not contribute to it.
Folder titled Course-Related Instructions situated in the Study materials section: Provided your communication with your
students entails the use of large files (or long texts), please make sure you upload them into this folder and instruct the students to keep track of its contents.
Teachers may foster the inter-student communication by encouraging their students to cooperate with one another, creating discussion threads for
common projects, posting references to relevant Web sites, etc.
Discussion groups also enable teachers to use some threads for teaching purposes.
Provided the course has been enrolled in by lots of students, it is advisable to divide them into groups (the seminar groups
created under the course may perfectly serve this purpose) and assign a discussion thread to each of these.
Here are two model situations demonstrating other possible uses of discussion groups:
A teacher regularly posts under a certain thread some problems that he/she wants his/her students
to solve and rewards them for correct solutions as well as well-founded criticism of someone else's solution.
A teacher asks each of his/her students to post a problem of his/her own (e.g. a chemistry experiment
designed for a certain grade of elementary school) and assess the problems posted
by the others. Eventually, the teacher evaluates the quality of the student's feedback.
Utilizing discussion groups for the aforementioned activities proves useful when you
have some experience of moderating your students' discussion since each of them may
make multiple contributions and the total number of these may turn out to be rather overwhelming.
If this is not the case, you might want to use homework vaults or
e-surveys instead.
 fi
fi muni
muni